Get Started with WebPagetest to Test Your Site's Performance
Caution: this content was last updated over 1 year ago
WebPagetest is a web service that provides details about how well a page performs. It can give a lot of different information: from a brief summary with letter grades to a forensic breakdown of how the page performs at various stages of loading. In short, our performance team consider it a vital tool for diagnosing potential issues, and it's included in their performance checklist.
But this article isn't just going to me waxing lyrical about its features in general and why you should use it. Instead, I want to focus on two features that you may not know about that could pique your interest:
- Scripting
- REST APIs
The first, scripting, lets you provide a series of directives for what you want the web page test to include. For example, you could tell it to click certain elements, enter data into form fields, or even navigate throughout the entire site (eg, placing an order). You can also use scripting to manipulate the request; for example, you could use it to block calls to specific domains, which could be helpful if you're trying to work out if a particular third-party service is impacting performance.
The second, the REST APIs, let you interact with their service in ways other than than their site UI. This means, for example, that you could use your command line interface to fire off tests, and we'll look at that later.
Note that Oracle NetSuite does not formally endorse WebPagetest. It is being offered as a suggestion as a service you may find useful.
WebPagetest Basics
Our performance team likes to bring up the service whenever they talk about performance, and with good reason: it provides a lot of good analysis.
On the landing page for the site, at its simplest, you can put in a site URL and it will send a bot to hit it and gather information about how well that experience went. A simple per-page test can provide some good foundational information about any performance problems affecting your site.
The first time a shopper visits your site is usually the (or one of the) most costly in terms of performance. They must download the whole application code, as well as any assets associated with the page. As we use single-page architecture, this is a high performance cost but is deliberate as it means that subsequent visits within the application are a lot quicker.
For example, if a shopper visits the homepage, it'll take a relatively long time to load, but if they click around (visit a category, or perform a keyword search, for example), then those results will be relatively quick as the only new data is the API call and any assets associated with the results (the application code is already cached).
As I said, this data can be particularly useful for initial tests; if you've never run them before, you can find immediate problems, such as if you haven't compressed images enough, or if your CDN is not active. For example, here is the headline result for a real SuiteCommerce Advanced site:

Another cool thing you can do is test the site on a mobile device over a simulated 3G connection. As we know, things are a lot more constrained on mobile devices, and so optimizing for them is very important. For example, this customer site was fully loaded after 6.1 seconds on a fast desktop device, but it took 17.6 seconds on a fast 3G connection.
But, as we said, this may not be a true representation of the entire shopper journey — what happens when a user navigates around the site after the first load? Therefore, the best way to truly test your site's performance is not just to tell WebPagetest to visit each page individually, but rather to simulate the shopper experience by moving around the site, performing typical shopper actions, in a single session. In order to do that, we need to use a script.
Scripting
First things first, they have a page in their documentation about scripting, that I advise you take a look at in conjunction with this post.
The prime benefit of scripting is that it lets you go beyond the simple one-page GET requests that the basic tests typically include. It allows you to increase the complexity of the test, so that you can get your tests to more closely match the interactions of a real human shopper using your site such as moving around the site and adding items to the cart.
For example, any part of your site that requires a user to log in before they can access it is typically off-limits to any automated testing service. However, with scripting, you can provide it with some login details and it can navigate around your site using a session — very handy for testing the checkout, and for sites that use features such as password-protected site and log in to see pricing.
You can access the scripting interface via the web by visiting the landing page for testing and clicking Advanced Settings > Script.

Before we begin, I just want to say that while it has a lot of syntax built into it, one interesting thing that some developers may find useful is that it is possible to pass JavaScript as the commands, rather than their built-in language. As such, you may prefer to simply write the script using this. If you already have scripts (eg in a headless browser) that use JavaScript to navigate around, you may be able to simply copy them across. For the purposes of this post, I'm mostly going to use JavaScript.
Theory
So, let's think about what we're doing here. Remember, we're trying to emulate a typical shopper, so we need to plan out a user journey that they might take. For example:
- Visit homepage
- Perform a keyword search
- Select an item
- Select matrix options
- Add to cart
- Visit cart
- Proceed to checkout
- Enter login details (of a pre-registered user)
- Complete checkout process
Of course, this is a contrived example: real shoppers would click around a lot more, look at different items, maybe visit some static content pages, etc, but this script would cover a lot of important areas in one go. Plus, we can always create more scripts later (eg for the account area, testing pagination, navigating around categories, etc).
Basic Script
With these steps in mind, we can then move onto converting these steps into a language the service can understand. You can store it in a text or HTML file on your computer (we're going to use it again later).
By way of style, I'm going to bring each step up into roughly four steps:
- A human description of the step
- A time allowance for the step to complete
- An event name
- An action (or two) to perform during the step
So, for example, the very step in our script could like this:
//              Home page
setTimeout      7
setEventName    Home
navigate        https://www.example.com
Which translates to this:
- A code comment line — you can put as many commented lines in as you like, as long as they start with
//; these are only stored in the script file and will be ignored by the service - A timeout of 7 — this gives the browser time (in seconds) to load and to run the specified action (this can be higher or lower depending on how long we expect it to run)
- An event name of "Home" — this will be used to break up the test results into recognizable steps
- A
navigateaction — which will navigate the service to the homepage (swapping out https://www.example.com for my actual site URL)
If we were just to run this test, it would perform only the initial page hit — try it out with your site if you like — but I'm going to suggest something a little bit more complicated first.
From Homepage to Cart
Let's build up a script just for the shopping part of the application. Here's my script:
//              Home page
setTimeout      7
setEventName    Home
navigate        https://www.example.com

//              Search
setTimeout      7
setEventName    Keyword search
execAndWait     Backbone.history.navigate('search?keywords=dress', {trigger: true})

//              Search results
setTimeout      7
setEventName    Search results
execAndWait     jQuery('a:contains("Oolong Dress")')[0].click()

//              Product detail page
setTimeout      7
setEventName    PDP
exec            jQuery('.custcol_gen_color-controls input')[0].click()
exec            jQuery('.custcol_gen_size-controls input')[0].click()

//              Add item to cart
setTimeout      10
setEventName    Add to Cart
execAndWait     jQuery('.cart-add-to-cart-button-button')[0].click()

//              View Cart
setTimeout      20
setEventName    View Cart
execAndWait     Backbone.history.navigate('cart', {trigger: true})
If you're following along, put this in your script file and put in your own values (eg site address, keyword search term, classes for the selectors, etc).
When I run this on my (test) site I get the following results, which have been handily broken down into the individual steps:
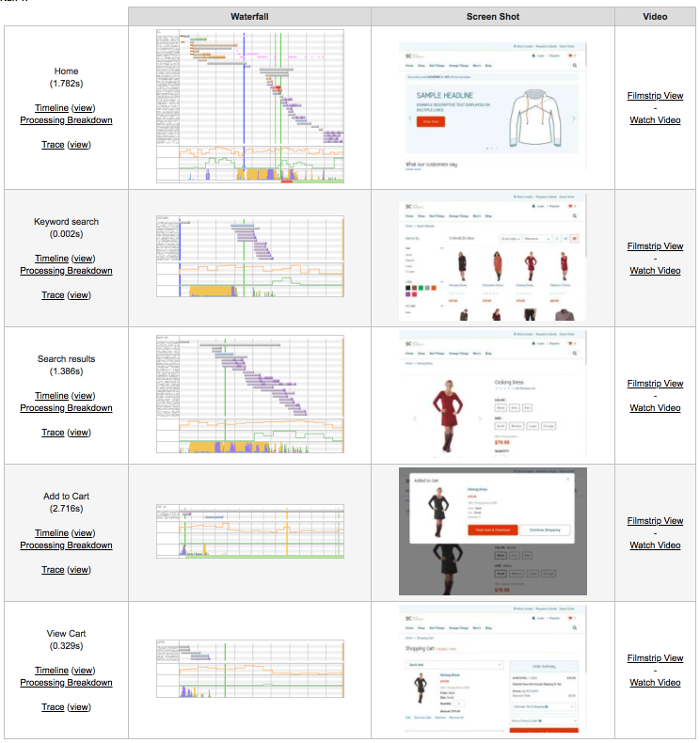
What's going on here? Let's look at the code.
There's plenty of new stuff here; first: let's look at exec and execAndWait. These two commands are how we execute JavaScript. The crucial difference is that execAndWait essentially operates synchronously: we wait for the browser to complete the JavaScript before running the next bit. Generally speaking, it is preferable to exec because it gives time for the code to complete. I've used exec in one of the steps above because the JavaScript we're using in the PDP step makes UI selections that do not trigger long-running operations, such as HTTP requests.
The other significant new stuff is the JavaScript commands we're using. Broadly speaking, there's two kinds:
- Navigational commands — using
Backbone.history.navigateto trigger in-app redirects (ie navigate around the site) - jQuery — for easy site UI interaction
Now, navigation could be handled by interacting with site elements (eg clicking the buttons to go the cart) rather than Backbone, and that is up to you but I've included the Backbone stuff because you may just find it easier to write the routes in, rather than use selectors. Also note that in my example, the classes I've used are specific for my site (.custcol_gen_color-controls is the name given to my color selector).
As for the jQuery: again, this is an optional style choice, but in the examples above, you can see how easy it is to construct instructions for the robot using a jQuery selector and a method like click(). In the examples above, I'm using a variety of different selectors. While these would not be considered clean enough code for a production site, it is fine for testing purposes. Note that when we're using something that might ordinarily return multiple results (eg using a class) we specify the first result with [0].
Placing the Order
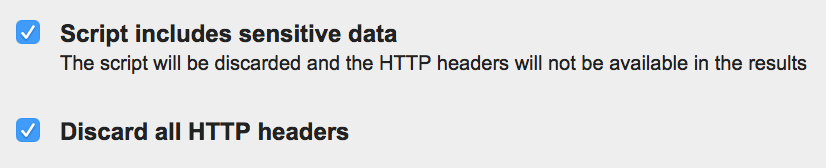
The final part of the exercise is to log in, place an order, and then ensure that the cart has been cleared.
We're going to use an test existing account for this. We're also going to specify on the script page that we're going to specify that the script contains sensitive information, and to discard it (ie not to save the username and password).
In addition to the previous script, append the following:
//              Proceed to checkout
setTimeout      20
setEventName    Proceed to checkout
execAndWait     jQuery('#btn-proceed-checkout').mousedown().click()

//              Enter login information
setTimeout      10
setEventName    Login
exec            jQuery('#login-email').val('test@example.com')
exec            jQuery('#login-password').val('password')

//              Submit login information
setTimeout      40
setEventName    Login
execAndWait     jQuery('.login-register-login-submit').mousedown().click()

//              One page checkout page 1
setTimeout      60
setEventName    OPC Step 1
execAndWait     jQuery('.order-wizard-step-button-continue').mousedown().click()

//              One page checkout page 2
setTimeout      30
setEventName    OPC Step 2
execAndWait     jQuery('.order-wizard-step-button-continue').mousedown().click()

//              Confirm empty cart
setTimeout      30
setEventName    Clear Cart
navigate        https://www.example.com/app/site/backend/emptycart.nl
Some new stuff here too: the most immediate thing is perhaps that we're using mousedown().click() for the buttons. This a quirk of HTML/jQuery where buttons don't respond purely to click() events.
As for the login information, you'll obviously need to change those values for your own uses.
Then, you'll notice I've also set high timeout values for some of these steps. In testing my test site, I noticed that navigational errors were being returned if I didn't set high values, so adjust them to suit your site.
The rest of the script should be relatively straightforward — if you don't use a one page checkout, then you may need to adjust the number of steps, the classes used, etc.
Finally, we hit app/site/backend/emptycart.nl — this isn't strictly necessary in this script but it is important for any script that doesn't end with an order being placed. Test scripts that add items to carts but don't do anything with them can mess up your internal reporting (eg conversion rates), and could potentially cause performance issues (carts with lots of items in them can degrade performance). We recommend always visiting emptycart.nl to make sure that the cart is empty at the end of the test.
And all in all, that's essentially it. That's a simple script that you can use for performance testing. Now, let's look at the REST API.
Testing with the API
Using the API for your testing instead of the interface can have some benefits. It can be particularly useful for automation: you could use some sort of scheduler to perform the tests regularly and then build up a database of times; or you may just be the type of person who prefers the command line interface to the web one.
Regardless, if you're going to use the API, you will need an API key, which you can get from https://www.webpagetest.org/getkey.php. Signup is free and your key should be emailed to you straight away.
Once you have your API key, you can get started quickly using a community created Node testing wrapper. For example, I'm going to use this one by Marcel Duran, but note that Oracle NetSuite does not officially endorse any particular package.
To install the package, you run:
npm install webpagetest -g
When it finishes, you can run the most basic test by doing something like this:
webpagetest test https://www.example.com -k YOURAPIKEY
Swapping out the domain and API key for your own.
After it finishes scheduling the test, it will return a JSON object with a number of properties; many of them will be links to the test results (which probably won't have completed by the time you get the results). You can visit the URL for the web by copying and pasting the userUrl address into your browser, or you can copy the test ID and run the following command:
webpagetest status YOURTESTID
This will return another JSON object, this time with a results summary of the test, or information about how the test is doing.
Run a Test Script
It's of course possible to run the test script from the command line too. You will need to copy the full script to a file. In my example, I have copied the script to webpagetest/_webpagestestscript.html and then I'm going to run (from my user directory):
webpagetest test webpagetest/_webpagetestscript.html -k YOURAPIKEY
This will return the familiar JSON object with links to the results. You can use webpagetest results RESULTID to get a full response JSON blob of the results, but unless you have something to parse them, you're unlikely to get meaningful information out of it. Instead, you can just visit the URLs for the WebPagetest site. Here's my results:

The GitHub page contains a lot of commands that you can use this project for. You can provide options to the call so that certain data is produced. More advanced users could take it much further by, for example, creating your own NPM package that runs these tests and then parses the results. We could look at that in a future blog post.
Final Thoughts
WebPagetest opens up a lot of avenues for developers to run performance tests on their sites. Performance testing is a vital part of your site, and we've dedicated a lot of resources on the developer portal on describing ways to improve performance; WebPagetest will give you the information you need to focus on to improve your site's performance.
The option to add scripts to your testing means that you can test the whole site experience, from entering the site to placing an order. You can obviously test other areas of your site, and we looked at how you can use JavaScript to run commands in conjunction with the built-in scripting language.
We also saw how you can use their API and a Node package to run tests from the command line, including the script that we just put together. With this sort of access, you can create your own testing program — for example, you could run test every night and store the results; you could create a database of your timings; you could even create automated alerts to notify you when there are particular problems with your site.
Finally, a word of advice from our performance team: create an account with WebPagetest and you will be able to aggregate your results and revisit them whenever you need to do. You could also run your own version of WebPagetest on your own servers. Also, as usernames and passwords are potentially stored in plain-text, you should only ever use them on a testing site for an account that has no real user data (eg credit card numbers, addresses) in them. More advanced scripting methods can store and retrieve user details securely, but that is beyond the scope of this post.
Code samples are licensed under the Universal Permissive License (UPL), and may rely on Third-Party Licenses