Add a Third-Party JavaScript Library
Caution: this content was last updated over 4 years ago
Third-party JavaScript libraries can be a quick and effective way to fill the gap in any JS-powered application. NetSuite Commerce sites include a number of these libraries (such as jQuery, Bootstrap and Underscore already, and it is not unreasonable to want to include your own third-party libraries.
This article appears quite long but note that this isn’t because the process is complicated, it’s just that there are a number of different ways doing it — and some are better than others, and some can/should only be used in certain scenarios.
General Approach
Out of this, there are typically two important questions to consider:
- What’s the best way to store the file (eg do you create your own module to store it, or do you call it from a third-party URL?)
- What’s the best way to call it (eg AJAX, AMD / as a dependency?)
To summarize, the answers are: if you can, store it locally among your source code and call it as a dependency to an existing file. You may want to keep all your third-party JavaScript files together, or you may want to break them up into individual modules/extensions. There’s no best practice for this per se, more of a personal preference. You could have a ‘libraries’ extension that has all your library files in it, for example, or you could break them up and store them in the modules where you need them. Think about how they’re going to be used — or could be used and make the best decision.
Additionally, if you’re developing on SuiteCommerce Advanced (as opposed to SuiteCommerce) then you may wish to take advantage of shimming, which is a feature of RequireJS that lets you directly change a site’s build configuration.
Let’s review some key areas of consideration.
Store Locally
If you’ve found a third-party library file you want to use from a repository like GitHub, then you will typically want to download the file and store it with the rest of your code. This is generally recommended.
Because of the way SuiteCommerce and SuiteCommerce Advanced is built, our developer tools take all the individual JavaScript files used to make up your site and processes them so that they are outputted to individual files for each application (shopping, checkout and my_account). Extension JavaScript is rolled into another three files for each of these applications. This minimizes the number of HTTP calls and is good for performance.
Therefore, downloading and storing the new library’s JavaScript as part of these JavaScript files is much more performant than having it stored somewhere else and called with a script tag or an XMLHttpRequest.
Before doing this, of course, you should check whether the library’s license allows for this and whether it makes sense. For example, some vendors will insist that you always call the latest version from their servers.
What if I Cannot Store it Locally?
Before beginning, it is worth remembering: rather than making an HTTP request to a third-party party URL, it is generally recommended to use third-party scripts as part of your source code. When you include JavaScript in your extension code or SuiteCommerce Advanced source code, it is rolled into a single JavaScript file for that application, which means it is all loaded at the same time in one HTTP request. This is good for performance.
If you’re working with a file from a third-party URL then note that this isn’t covered in detail in this article. In these cases, it is straight forward to use XMLHttpRequest or jQuery.ajax() to call the file in an entry-point or view file. If it will return a valid data model or collection, then you could also use a model or collection file and put the fully-qualified URL as the value for url or urlRoot.
Note however that this means your are side-stepping the dependency management features of the application, which may cause problems for you down the road.
Call via AMD
The ideal scenario is that once your file is living locally among the rest of your module/extension’s JavaScript, you just add it to a file’s array of dependencies, give it a name, and go from there. However, to do this, you will need to ensure that it is structured to be compatible with this format.
We use RequireJS and almond to handle and load JavaScript dependencies. These libraries are part of a conceptual framework called AMD (asynchronous module definition), which essentially adds a structure to JavaScript files that makes them easier to work with, manage, concatenate and build.
If you are using a third-party JavaScript file that is both AMD-compatible (ie has a define statement) and fulfills the almond’s requirements, then you actually just put into a module’s JavaScript folder and use it like any other file.
Seriously, that’s it. Conceptually it’s no different from other AMD/almond-compatible JavaScript. You can then just call it as a dependency whenever you need it.
However, note that some library files (such as jQuery plugins) just modify existing libraries. In these cases, they do not need to be called as separate dependencies: you just call the original library (eg jQuery).
Converting a File to be AMD-Compatible and almond-Compatible
If your desired library is not AMD-compatible and it needs to be, then it will require modification. Whether or not you are allowed to modify the file, however, will depend on the library vendor’s license, so make sure you have permission to do so first.
If you are allowed to then there are, generally speaking, two changes you would need to make:
- It needs a
definestatement that encapsulates the library code - Its
definestatement must give it a name
It is quite common for AMD-compatible libraries to be ‘anonymous’, which will throw errors on NetSuite Commerce sites because we use almond, which requires all modules to be named.
Error: See almond README: incorrect module build, no module name
If you get this error then it is probably because your library is AMD-compatible, but it is anonymous. If allowed to by the license, you should modify its define statement so that it gives itself a name.
Side-Stepping AMD with Shimming
If you cannot modify the file to be compatible with AMD and almond (or do you not want to) then an alternative is shimming. Some libraries, such as jQuery plugins (and others that modify libraries also used by your site’s source code) need not be converted at all and shimming can be a fine approach.
This mechanism is built into RequireJS and allows you to add script files that do not express themselves through AMD. Other than plugins, shimming is typically used for ‘older’ style JavaScript that introduce things like global variables (which AMD can help prevent).
In addition to namespace pollution, shimming has a number of other limitations and, in the scale of a web application like a web store, it’s less preferable to using AMD. If you’re going to be modifying an existing library (eg jQuery) then it’s generally fine because it already has a global namespace, but overuse can lead to your code becoming a bit unwieldy and you may run into collisions.
Fore more information on how to do this, including on its limitations, see https://requirejs.org/docs/api.html#config-shim. There is an example further down this page.
Note that shimming requires modifying the distro.json file, which is a definition file that determines what modules are built into the core code bundle. Shimming is, therefore, only available to developers modifying SuiteCommerce Advanced — it cannot be used on SuiteCommerce sites as this is a ‘core code’ file.
Alternative But Not Recommended Practices
None of the methods listed in this section are best practice and should be used by developers only if they cannot use better alternatives and understand the risks.
One of the standard content types of the site management tools (SMTs) is an HTML block. This can be used to load or execute JavaScript. Typically, these blocks are to be used for small UI features so managing scripts here is slightly odd.
Another (not recommended) practice is to modify your site’s SSP files to call the JavaScript file using script tags. As SSP files are where the main application layouts (ie the HTML containers) are created, then this would give you the opportunity to call your script directly into the head (which some scripts mandate). But this has the potential for causing significant problems for your site, particularly if this call is not asynchronous. It can also make distributing your customization difficult.
I think the worst option I have seen is to put a script tag into a template file. This is not where this should live, and we therefore advise against it. Templates are there for presentation purposes, not for loading JavaScript.
Finally, don’t forget that services like Google Tag Manager can be used to manage some external scripts (such as those used by analytics, tracking and advertising services). Using GTM for those purposes is actually perfectly fine, but you wouldn’t really use it for a library file or the like.
Adding a Library Using an Extension
I show you how to shim later on, should you wish to, but for now I want to focus on using an extension. I think adding a library using the extension framework is better practice because it means touching the source code much less — it also means that it is applicable to SuiteCommerce sites as well as SuiteCommerce Advanced sites. (The limitation being, of course, is that SCA sites must be running Aconcagua or newer to do this.)
Our devs think that if you're going to use this, it's probably best that you approach the situation with a 'one library per extension' mindset. What this means that if your site requires a number of separate, independent library files, break them up so that they are separate, independent extensions.
This isn't a requirement, but the idea is that should your site's circumstances change, you can quickly turn off a particular library by re-activating your site's extensions without it enabled. If you have all of your libraries in one place, then you'll need to edit the code, remove any files you don't want, and then re-upload and re-activate. You'd be just giving yourself extra work.
For the purposes of this tutorial, I'm going to be lazy and put all of my libraries in one extension, but only because this is a teaching experience.
Adding an AMD-Compatible jQuery Plugin to an Extension
The first one I am going to use is a jQuery plugin called jquery.matchHeight. It is a library that a customer asked me about. As you can read on their GitHub, it is a jQuery plugin that makes the height of all selected elements equal. This might be useful for SuiteCommerce sites on product list pages, where, for example, differences in the lengths of item names can cause irregularities in the presentation of product list pages.
This plugin is AMD-compatible, so it’ll be easy to work with, and it modifies an existing library so it’s usage is straight-forward. It’s not, however, compatible with almond, so we’ll need to change that. Luckily for us, the license is MIT and allows modification; it can be found at https://github.com/liabru/jquery-match-height/blob/master/LICENSE and in the source of this page.
Basic Setup
So, as I said, I'm going to use a single extension for all of my library files. In your developer tools, create an extension — I'm naming mine Libraries and setting myself as the vendor.
After doing the initial prep work, head into Workspace directory and create a folder structure like this:
Libraries
- assets
- Modules
- Libraries
- Libraries.js
- Libraries
- manifest.json
We're going to add more folders for each of the library files we're going to experiment with, but for now this is fine.
So, as mentioned, I’m going to be using a plugin that accepts a selector for elements and then sets their heights so that they are all the same.
To illustrate the problem, take a look at this row of products on an example product list page:
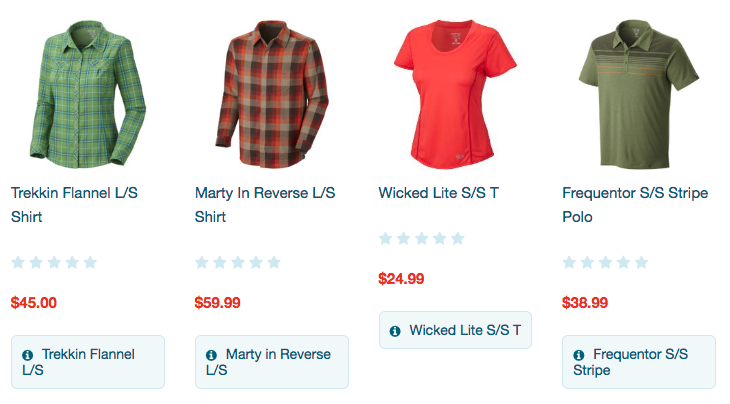
The third item in this row has a name that fits on one row, while all the others go onto two; this has the knock-on effect of pulling up all the other elements in the item cell. This is the sort of thing that this plugin fixes and it's something we can add to our site.
What follows in the rest of this section is the only required step to add a jQuery plugin. In other words, this describes the mechanism itself — everything else is to getting the particular plugin to work.
To start, I’m going to create Modules > jquery.matchHeight > JavaScript and put the latest version of jquery.matchHeight.js in there.
If you open the file and take a look, you’ll see it has a conditional statement at the top that returns different code depending on the type of dependency management the application is using. Ours is the one that’ll return the define statement, but note that it won’t return something that is named. Accordingly, this will fail if we try to load it.
Lucky for us, however, this is all a simple change. I am going to make the following modification:
// Replace this:
;(function(factory) { // eslint-disable-line no-extra-semi
    'use strict';
    if (typeof define === 'function' && define.amd) {
        // AMD
        define(['jquery'], factory);
    } else if (typeof module !== 'undefined' && module.exports) {
        // CommonJS
        module.exports = factory(require('jquery'));
    } else {
        // Global
        factory(jQuery);
    }
})(function($) {

// With this:
define('jquery.matchHeight', ['jQuery'], function ($) {
At the bottom of the file, I am also going to put the following to close out the file:
})
Initializing and Running the Plugin
The above just covers the mechanism itself, but it also needs to ‘run’.
For the purposes of this tutorial, I'm going to add it to Libaries.js (but you probably want to add it to the place where you keep all of your PLP customizations):
define('Libraries'
, [
    'jQuery'
  ]
, function
  (
    jQuery
  )
{
  'use strict';

  return {
    mountToApp: function mountToApp (container)
    {
      this.PLP = container.getComponent('PLP');
      this.testJqueryMatchHeight();
    }

  , testJqueryMatchHeight: function testJqueryMatchHeight ()
    {
      if (this.PLP)
      {
        this.PLP.cancelableOn('afterShowContent', function ()
        {
          jQuery('.facets-item-cell-grid-title').matchHeight()
          jQuery('.facets-item-cell-grid-link-image').matchHeight()
          jQuery('.product-line-stock-description-msg-description').matchHeight()
        });
      }
    }
  }
});
As it's now an almond-compatible module, we add it as a dependency, just like any other. If we don't, it won't be included in the compilation process and we won't be able to access it.
Then, in our mountToApp method, we're going to set up the PLP component and call a method to test that it works.
This test method, testJqueryMatchHeight(), is going to run the jQuery after the PLP has run its showContent() method (which renders the page). At that time, we'll call the matchHeight() method that the library adds, by targeting the class that every item title has.
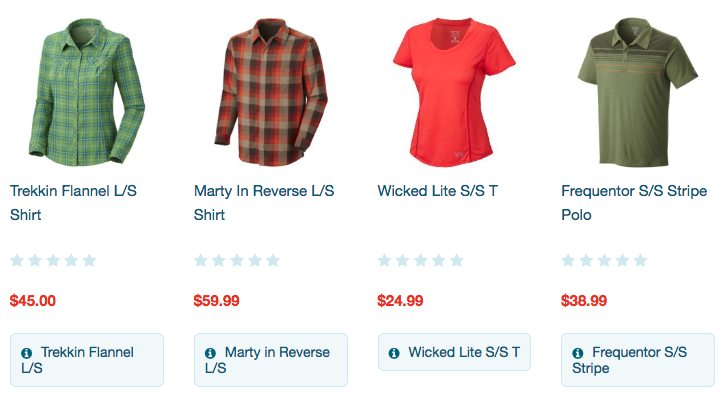
If we spin up our local server to test this, we can see that it has taken effect and that it now looks like this:
Adding a Non-AMD Compatible Library to an Extension
The above example was easy to deal with because it is both AMD-compatible and code that modifies an existing library. But what about something where it’s just an old-school JavaScript file — one that you cannot make AMD-compatible? In these scenarios, you can treat these files as an ‘asset’ and use AJAX to call it.
As I said before, it truly is beneficial to rely on AMD where possible, but if it’s not possible then this is the least worst solution.
In this example, I am going to use an implementation of the Mersenne-Twister pseudo-random number generator algorithm.
The script and license is available at https://gist.github.com/banksean/300494 and in the source of this page.
In a scenario like this then you can call the script via AJAX. The general idea is this:
- Create a separate module or extension for the library
- Add the library to the extension's assets folder
- Use
jQuery.ajax()to call the script in its entry point file - Return the deferred object so that we can wait for it to load before using its functionality
The prime drawback with this is that you must wait for the script to load before you can use it as you are not using normal SuiteCommerce code to manage dependencies.
Basic Setup
For this, I am creating Libraries > Modules > MersenneTwister > JavaScript > MersenneTwister.js.
Then, in Libraries > assets, create a folder called javascript and put a copy of mersenne-twister.js in it.
Asset files cannot be served from your machine for testing and must be uploaded to NetSuite first. You can do this by deploying your extension and activating, or by uploading it to the place it's going to be served from in the file cabinet. For testing purposes, I'd recommend the latter. For me, this is going to be in Web Site Hosting Files > Live Hosting Files > SSP Applications > NetSuite Inc. - SCA Aconcagua > Development > extensions > Steve Goldberg > Libraries > 1.0.0 > javascript. The exact path for your extension will differ, but it must be uploaded to the correct asset folder for this extension as this will enable us to version the file each time the extension’s version number changes. You can upload it to a generic folder in your file cabinet, if you wish, but you need to make sure it is accessible from the internet.
General Philosophy
With everything in place, we can get to work on calling it.
For this, we're going to use jQuery.ajax() because it gives us a few extra features that will be useful: in particular, we can attach success and error handlers, which means that we don't have to use the deprecated async: false XHR flag. If you don't know, AJAX calls are made asynchronously by default (the clue's in its full name) which means that when we call the script, we don't lock the browser until it finishes (as this is a bad user experience). Note, however, that depending on your library, you may still want to do this, although web standards are changing and the recommendation is that you don't. Loading this script asynchronously will mean that we will have to do a bit of extra work in our code whenever we want to use it; or you may consider the library so important that you want to have finished loading before, say, the page is rendered. I'll leave that decision up to you (but I recommend asynchronous loading generally).
The reason we can rely on asynchronous loading is because we're going to use the fact that the ajax() returns a deferred object to ensure we don't run code that relies on the file before it's finished loading. Deferred objects pop up all the time in SuiteCommerce code — for example, when we fetch data using a model or collection, we will create a deferred object and only resolve it when we know the data has finished being sent from the server.
Another general idea is that we still want to do AMD as much as possible, so we're going to create a module for the library, with the entrypoint file acting as an API for it. So, for example, we can add a random() method to the file that wraps the random() method of the MersenneTwister namespace. That way, after we've added the file as a dependency to our other file, we can just use MT.random(). This might be too much for your uses, but this is up to you.
Set Up the Entry-Point File
Anyway, in MersenneTwister.js, put the following code:
define('MT'
, [
    'jQuery'
  , 'HandlebarsExtras'
  ]
, function
  (
    jQuery
  )
{
  'use strict';

  var promise = jQuery.ajax({
    url: getExtensionAssetsPath('javascript/mersenne-twister.js')
  , dataType: 'script'
  , complete: function (e)
    {
      console.log('Mersenne-Twister: ' + e.statusText)
    }
  , cache: true
  });

  return {
    promise: promise

  , random: function random ()
    {
      return new MersenneTwister().random()
    }
  }
})
First, we are calling the file MT rather than MersenneTwister because the latter is the global namespace that the library itself uses; if we were to call our file that, we could run into some issues if we use the same name when we require it in another file as a dependency (so best to pick an alternative).
Then, after adding jQuery as a dependency, we make the AJAX call. Note that we're using getExtensionAssetsPath(), which is actually a Handlebars helper we provided to make the handling of versioned assets easier. Yeah, we're not in the context of Handlebars here, but this is what the method is designed to do: fetch the correct path for an asset file.
dataType specifies that we're fetching a script, and complete is simply a callback that runs when the request has a response (success or fail) from the server (this is optional, so you can remove it if you like); we include cache: true to store a copy of the file on the user's device so that subsequent calls are fetched from the their cache, rather than the web server (this should help cut down on redundant calls, should they occur).
Then we just return the promise object, which will be used to check whether the file has been loaded successfully before trying to use its methods. You'll note that we're using also returning an interface method for the random() method: as previously mentioned, you can use this so that you never directly use the constructor's functions... or not, it's up to you. This library creates a global namespace, so we don't have to worry about it in this example, but you may need to do it depending on the file.
Call the Library in Another File
So, it's kinda set up and ready to use, so let's just take a look at this.
Back in Libraries.js, add MT as a dependency, and then the following code to your mountToApp() function:
MT.promise.done(function ()
{
  console.log(MT.random());
});
What this will do is check the state of the promise and when it's done, run some code. In our simple example, we're just going log a random number to the console, but if you were going to do something more complex, that whole code would need to be contained in a done() method for the promise, or else you risk throwing errors stating that the thing you're calling is undefined.
Anyway, if you save your files and restart your local server, you should see this in your console when you visit any page:

Adding a non-AMD-Compatible Library with Shimming
If you don’t want to add your library as an extension, and you have SuiteCommerce Advanced, then you can use shimming.
For the purposes of this tutorial I have the use case of wanting to add a field to the Profile Information page to capture the customer's preferred delivery time for any orders they place. I have found a jQuery plugin called ClockPicker that provides a neat interface for selecting a time, but you can of course whatever you want. For the sake of brevity, I'm not going to include the steps for storing the data on the backend as that is out of the scope of the article.
Also, keep in mind that this process is only applicable to SuiteCommerce Advanced sites.
The license for this plugin is MIT can be found at https://github.com/weareoutman/clockpicker/blob/gh-pages/LICENSE and in the source of this page.
General Approach
Essentially, we need to:
- Create a module folder to store the customization
- Add the module to the
modulesarray in distro.json - Add the module to the
javascriptarray for each application’s JavaScript export file (as required) - Add the module to the
amdConfig : shim— depending on the library, you’ll need to declare its dependencies if it has them, and its name (exports) if required
Once you have completed this, you’ll be able to call the file. If you set an exports name for it, then you add it is a dependency to another file. Keep in mind: even if your library file adds a global variable, you may want to add it is a dependency to your files so that you can keep track of where you’re using it.
Basic Setup
Once you've found the library you want to add, you will need to create a module folder for it. Like all site-specific customizations, we recommend that you put them in the folder under Modules where you keep your site's customizations. When naming it, it's good to use the name of the library as the folder name and the version of the library as the version number. So, for me, I'm creating a folder called jquery-clockpicker\@0.0.7.
In this folder I'm putting the files that I need for the library to work: one JavaScript file and one stylesheet file. Now, for the Sass compiling process to work I'm going to change the file extension on the CSS file provided to .scss and put an underscore (_) in front of the file name. Keep in mind that CSS is still valid Sass, so this isn't an issue, just a nuance of the compiler. Finally, the folder needs a ns.package.json file so that Gulp picks it up; thus the final list of files is simply:
- _jquery-clockpicker.scss
- jquery-clockpicker.js
- ns.package.json
Then you need to put the right things in your ns.package.json file, e.g.:
{
  "gulp": {
    "javascript": [
      "jquery-clockpicker.js"
    ],
    "sass": [
     "_jquery-clockpicker.scss"
    ]
  },
  "jshint": "false"
}
The only thing in here that you may not have seen with other modules is the "jshint": "false"; this is because one of the Gulp tasks you can run is JSHint, which is a utility that checks JavaScript for errors, and we don't want to run that on well-written third-party JS (but you can if you want).
You may ask why we haven't replicated the folder structure common to the other modules, this is mainly because the jQuery library only has two files that we want to use. We could also modify the source code so that it is in the AMD format, but the flexibility of this method means that we don't have to. One side-effect of this, however, is that we'll have to make some unconventional modifications to our distro.json file.
distro.json
First things first: you need to register your module like you would any other module at the top. I'm adding in "custom/jquery-clockpicker": "0.0.7" to the modules array at the top of distro.json.
Now, normally at this point you'd go and add the JavaScript to the dependencies of each application. This time you're not going to do that. If you've spent time looking at the distro.json file, you'll notice that when it comes to jQuery plugins, we use shims. If you do a search for "shim" in the file you'll see a number of other jQuery plugins that SCA uses (like jQuery Zoom and jQuery bxSlider); you essentially need to do the same for your jQuery plugin. Therefore, in each application under tasksConfig : javascript : amdConfig : shim I'm adding:
"jquery-clockpicker": {
  "deps": [
    "jQuery"
  ]
}
After that, I need to register the module's Sass as a dependency in the Sass task for each application. If you wish, you may just register them only with the applications you plan to use the library with, but if your aim is to make it available globally then it's simple to register it with them all.
In total, if I add in lines for each application, my new module will be mentioned seven times in distro.json file:
- Once, at the top, in the
modulessection - Once for each application when configuring
amdConfig - Once for each application when registering the Sass
Save the file!
View and Template
So the final bit for me to do is to actually use the JavaScript library I've included. I want to add the functionality to my Profile Information page, so I need to extend the necessary view and modify/override its template file.
The view in question is Profile.Information.View.js, which already has jQuery as a dependency — so we don’t need to add it as one.
Now, specific to ClockPicker, is a small JavaScript initialization snippet that needs to be run on the page the functionality appears on. This is quite common for jQuery plugins. Seeing as we must never put JavaScript into template files, we need to find a way to inject it into the page after the DOM has loaded. In the initialize function in the view we need to add something like:
var self = this;
this.on('afterViewRender', function()
{
  self.$('.clockpicker').clockpicker();
});
You should not modify the view directly, so you’ll need to extend it so that this is called in addition to the view’s current code (eg, using Underscore’s wrap()).
The afterViewRender event is when Backbone has finished rendering the DOM; seeing as we would normally put this JavaScript at the bottom of our HTML page, this is the perfect event to use to render some arbitrary JS that manipulates the DOM.
After saving the view, the only thing left to do is to modify the template. Obviously, this part is specific to the library that you're using and there no special tips other than to read their documentation and make sure you include the appropriate data elements, classes, IDs, or any other code that is required for the library to work. I've included the code below, for reference:
<div class="profile-information-row clockpicker" data-placement="top" data-input="clockpicker">
    <label class="profile-information-label" for="clockpicker">Preferred Delivery Time</label>
    <div class="profile-information-group-form-controls">
        <input type="text" class="profile-information-input-large form-control" value="09:30" name="clockpicker">
    </div>
</div>
Note how I'm able to use my own classes and structure, just so long as I include the clockpicker class. Make sure with your choice of library that you include all the relevant parts. A good way to start is to include just the bare minimum to get the JS to work, and then build it out from there.
Test Your Code
After of all this, you will need to stop your local server (if it is already running) and start it again. When you visit the page where your library is called, you should see the changes you made take effect. Here's what my page looks like:

That’s it!
Summary
There’s a lot in this page, so let’s summarize:
- Rolling the JavaScript into the rest of your site’s JavaScript is better than calling it via HTTP, especially if it’s on a third-party server (ie outside of the NetSuite file cabinet)
- If the file is AMD-compatible and almond-compatible (ie it has a name in its
definestatement) then it can be plugged into your JavaScript just like any other script - If it’s not AMD-compatible and/or almond-compatible, see if it’s possible to convert it
- Where possible, use extensions to manage your files — one library per extension will make them easier to manage, but this may get cumbersome if you have a lot
- jQuery plugins and other scripts that modify existing libraries are easier to work with and in some cases can just be ‘shimmed’ into the application’s JavaScript
Code samples are licensed under the Universal Permissive License (UPL), and may rely on Third-Party Licenses