Add a New Module to the Checkout with the Extensibility API
Caution: this content was last updated over 4 years ago
The extensibility API has made it a lot easier for developers to make customizations to the checkout process. In this post, we will at the structure of the checkout wizard, and how you can add a new module to a checkout page to capture a custom transaction body field.
It is worth noting that there is an extension built by NetSuite that accomplishes this task. Therefore, if you are reading this because you want to implement a new custom transaction body field in the checkout, you should consider using our extension instead. See Custom Fields for Checkout for more information.
Understanding the Checkout Wizard
Let's talk about the checkout on SuiteCommerce sites.
Firstly, let me say that as a very important part of your site, it's quite complex. When customizing your site, you will typically need to spend a lot of time thinking about it and getting used to it. However, with the advent of the configuration tool a while ago, and extension framework more recently, this has become significantly easier.
If you want to make changes to your checkout, it's good to try and figure out if it can be achieved through configuration (including the web site setup tool) and theming, as these will be the easiest and safest ways to make changes.
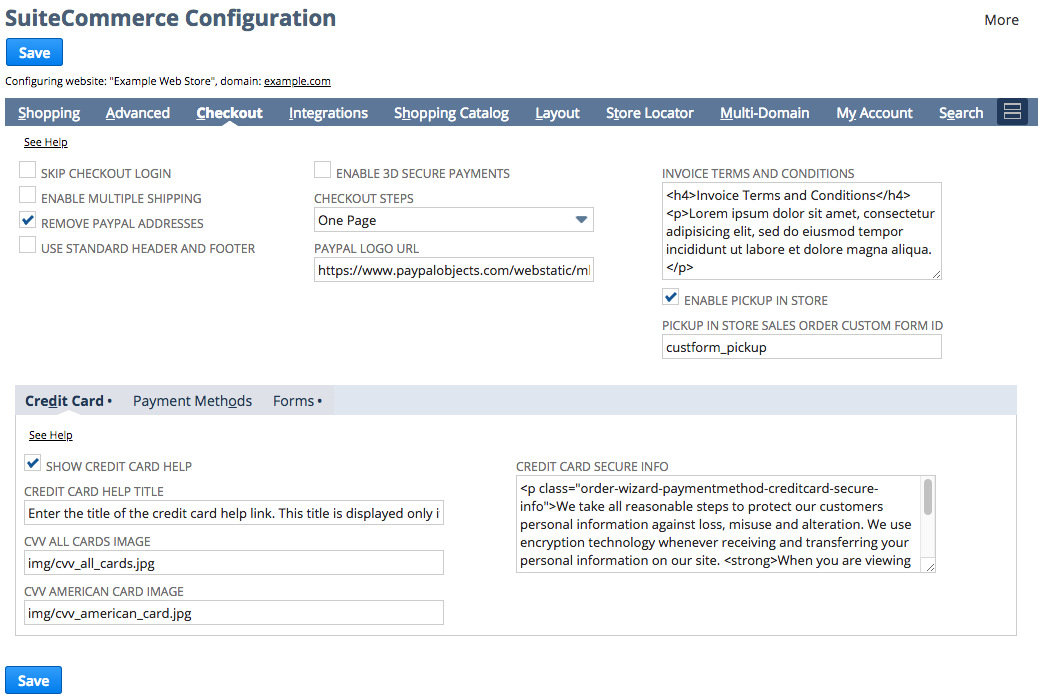
In the example image above, you can see some of the functionality items you can tinker with without ever having to touch a line of code. For example, recently I was asked how to change the JavaScript and templates associated with the checkout's header and footer so that it shows the standard links, information, etc. Don't bother! If you want it, just toggle it in the settings.
However, if you are determined to make changes, you need to realize what the checkout is and how it's operates.
The Wizard
In software parlance, the checkout operates as a wizard. No, not the wand and robe carrying type: but a series of well-defined steps that take the shopper through the complex process of converting a list of items into an order. In SC namespacing, the majority of the modules associated with this begin with OrderWizard.
Within this wizard, we have three distinct containers to help organize the fields of the checkout:
- Step groups — in sum, all of the groups form the whole of the checkout, but individually they might be the shipping address form, payment form, or order review
- Steps — each group has at least step, but maybe more
- Modules — individual blocks of functionality that do specific things
Groups are really there for visual representations to the shopper. Think about the groups that might appear at the top of the checkout indicating where in the process they are, eg: shipping address, payment, review.
Each one of those could have multiple 'steps' within them, and you may choose to organize them that way; however, most of the time, you'll likely do a 1:1 step to group ratio.
Take, for example, the shipping address. Setting a shipping address is considered a step group — it's a top-level concept — however, within that may be two steps: one where the shopper can choose an existing shipping address, and another where they can enter a new one.
Within those two steps will be a number of modules, many of which will be repeated across both steps because they perform the same jobs (eg we might show a cart summary, or allow shoppers to redeem a promotion code).
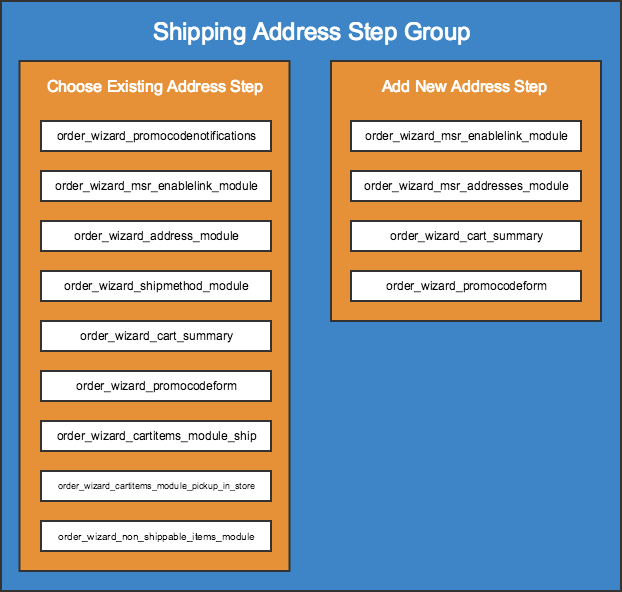
I've mocked up the step group in the image above. The outer blue area envelopes everything and refers to the shipping address step group. Within that are the two individual steps highlighted in orange, showing the two possible steps the shopper could interact with. Finally, within each of those, are the individual modules that compose the steps, in white.
The Flow
One configurable setting is how the checkout flows. In terms of what we just talked about, this means changing what groups and steps are presented and in what order. By default, SuiteCommerce includes three flows:
- Standard
- Billing first
- One page checkout (OPC)
Despite its name, 'standard' is becoming increasingly less standard; a better name might be 'traditional'. The idea is that you minimize the amount of information that you show to a shopper at once, breaking up the process across strict contextual lines. For example, you would start with the shipping address only, the shopper clicks to move on, then they select their shipping method, then they click again, then the enter their payment details, etc. There's a certain neatness to this, and for large orders, it helps pages from getting long.
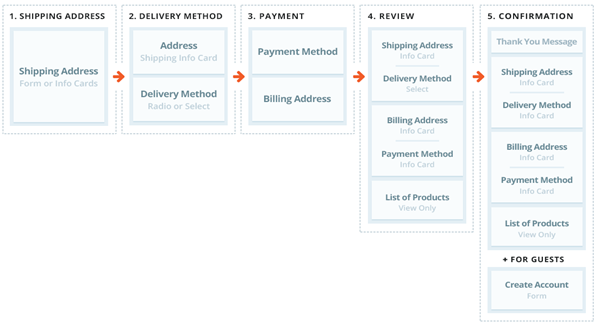
A modification of this schema put the billing address first, as a separate page. In the standard checkout, the addresses are entered on the same page; this method splits it off, emphasizing it. This effectively meant that there were pages the shopper had to complete before their order was complete (not including the login and confirmation pages).
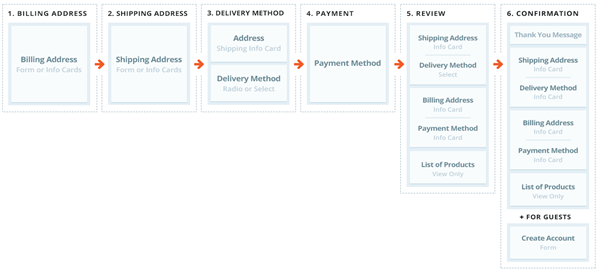
Thus, there was a push towards fitting as much onto one page as possible, creating the one page checkout. More often than not, shoppers prefer conflating groups together as this streamlines the process. For returning customers, it makes the process feel a lot speedier as their details are often saved and don't need to be provided again.
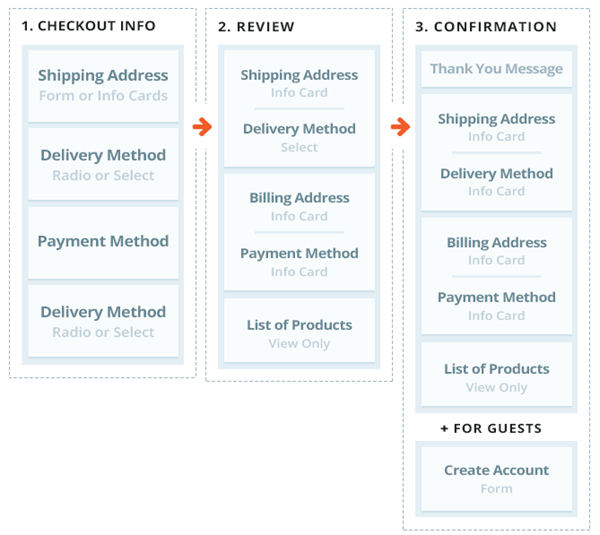
Despite the name, it's not entirely one page. The point is that the form that the shopper can edit is on one page, and then there's a review step before the order is purchased. The flow is quite hasty, so if your customer make low-volume high-value purchases then they may find it a bit jarring (and you should consider adopting the standard flow instead).
The Checkout Component
With all of this in mind, let's take a look at the tools available to us via the extensibility API. As a reminder, we use JSDoc to generate documentation for the API and it's available via the NetSuite help center, or you can follow this link directly to jump to the checkout component.
If you take a look at the methods available, you'll see that there's a lot that reference what we've just been discussing. In particular, we have soem very useful methods for logging steps and groups, including the currently active one.
Of particular interest for getting started are:
getStepsInfo()getStepGroupsInfo()getCurrentStep()
The first two each return an array of objects, detailing, in order, what the steps or groups are. The third essentially plucks the step info for the current step and returns that specifically. For example, if I run getCurrentStep() on the first page in my site's checkout, I get this:
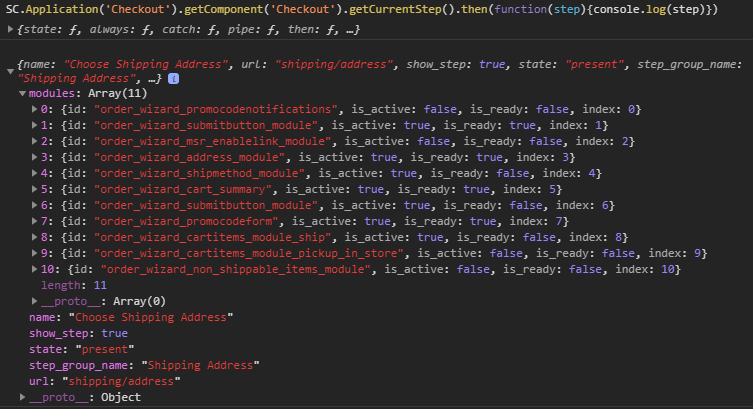
Let's run through the values quickly:
- modules — an array of objects, where each object is a module that has loaded into the current step
- name — a descriptive name of the current step (sometimes it's not set)
- show_step — if the step will be shown in the page or not (ie due to configuration)
- state — either
presentorfuture, indicates whether it is currently in use or if it will be used later - step_group_name — the name of the group to which the step belongs (a group of steps is shown if there is at least one step of the group that is visible)
- url — the unique identifier for the step (we'll need this later — also note how it appears in the address bar too)
Let's take a look at an example now.
Add a New Module to Checkout Step
In assessing what to teach, I thought about common customizations. One that we document is how to act a custom transaction body field. We have documentation that shows you how to do this, and it correctly points out that the correct way of implementing this functionality in your template is to modify the theme's templates. However, the question arises: what happens when you've created a new extension that adds this functionality? You can't just override each site's templates — you need to inject a new one.
For the purposes of this tutorial, the custom transaction body field is going to be used to capture the shopper's preferred delivery date. Remember, this tutorial is to show you how to inject new functionality in the checkout, so this isn't going to be a fully fleshed out implementation — there would be a lot more work that needs to be done! It will, however, capture the date effectively and store it correctly.
The full code for this tutorial can be found in our GitHub repository.
Implementation Strategy
So, in the grand scheme of the checkout, a module is the smallest of the big three checkout groupings. It is for significant, independent functionality too small to be broken into its own step. Typically this is because you associate it with other functionality similar to it, and want them to live together.
One of the generic methods available across all components is the ability to add child views; however, for the checkout, there are additional methods we can use that more closely integrate it into the checkout wizard that we should take advantage of instead.
The template we'll render will look very similar to the one in the documentation. We will set the type of the input to date so that it is formatted correctly. The user can enter their date manually, or they can use a date picker than will appear when they select the field.
The view will be very simple: it'll just render the template. However, in order to make it work within the context of the order wizard (eg to handle data correctly), we will need to extend a special kind of class built for all views within the checkout process: Wizard.Module.
Finally, we'll also have an entry point file, which will be where we connect to the extensibility API and add our new module. This is perhaps the most interesting part of the tutorial.
Create and Set Up the Custom Transaction Body Field
As previously mentioned, we have documentation on transaction body fields that you can follow for an explanation of how one might implement this functionality without an extension. As it says, we don't need to do any SuiteScript work to get it surface to the model, unlike older versions of SCA, but what we do need to do is set it up and configure our site so that it's included.
In NetSuite go to Customization > Lists, Records & Fields > Transaction Body Fields > New and set it up as follows:
- Label — Preferred Delivery Date
- ID — _preferred_date
- Type — Date
- Store Value — (checked)
- Applies To — Sale, Web Store
- Access > Role — Customer Center, Edit
When that's configured, we need to surface it to the SuiteScript.
Go to Setup > SuiteCommerce Advanced > Configuration and select your site and domain.
In Advanced > Custom Fields, add custbody_preferred_date to the table and save.
We're now ready to begin coding.
Create a New Extension
In your extensions developer workspace, create a new extension using gulp extension:create. Configure it with the following:
- Fantasy name — Preferred Delivery
- Extension name — PreferredDelivery
- Vendor name — Example (or your own)
- Version number — 1.0.0
- Description — Allows the capture of a preferred delivery slot
- Supports — SCA, SCS
- Application — Checkout
- File types — Templates, Sass, JavaScript
- Module name — PreferredDelivery
Next, we need to clear out the directories: we're not going to use the dummy files that were generated for us.
- Delete the contents of Preferred Delivery > Modules > Preferred Delivery > JavaScript, and Sass and Templates
- Delete the Assets directory
We should now have clean directories from which to work.
Create the Entry Point File
We're going to need two JS files for this extension: one to act as an entry point file, and the other to be the view that's going to render the input field.
In JavaScript, create Example.PreferredDelivery.PreferredDelivery.js and in it put:
define('Example.PreferredDelivery.PreferredDelivery'
, [
    'Example.PreferredDelivery.PreferredDelivery.View'
  ]
,   function
  (
    PreferredDeliveryContainerView
  )
{
  'use strict';

  return  {
    mountToApp: function mountToApp (container)
    {
      var checkout = container.getComponent('Checkout');

      checkout.addModuleToStep(
      {
        step_url: 'opc' // if you're using a non-OPC checkout, then you will need to put the specific step URL in instead
      , module: {
          id: 'PreferredDeliveryView'
        , index: 6
        , classname: 'Example.PreferredDelivery.PreferredDelivery.View'
        }
      });

      checkout.addModuleToStep(
      {
        step_url: 'review'
      , module: {
          id: 'PreferredDeliveryView'
        , index: 99
        , classname: 'Example.PreferredDelivery.PreferredDelivery.View'
        }
      });
    }
  };
});
So, this file starts out like it normally would: we define what the file is going to be called, and list its dependencies. Note that we've required a view that doesn't exist yet — no worries, we'll sort that out later.
We return a mountToApp function so that whatever's enclosed will run as soon as the module loads. Then we build a variable by calling the checkout component from the application (container). Once we have that, we can invoke the addModuleToStep method. Remember, what we want to do is make a small bit of functionality into an existing step, and this is how we do it.
Look at the object we're passing it:
- step_url — this is the url of the place we want to add it to. Remember, URLs are treated like IDs in the checkout wizard, so you'll need to find the right one. If you're running a one-page checkout, then this'll likely be
opc. - module — an object containing the data you want to pass to it:
- id — the unique ID you want to give it.
- index — the location in the module stack you want to insert it. This will affect rendering position, and will take precedent over other modules that have the same index.
- classname — the name of thing you want to render (ie the name you've given the view in its
definestatement). - options — an optional value that will be passed along with it. As the docs say, you can pass an ID of a container in which to render it, but, by default, it'll be rendered in the main container (
#wizard-step-content).
You'll see that we're adding the module twice: that is because in the one-page checkout screen, we're going to make editable so that the shopper can add a value; on the review step (step_url: 'review'), we're going to show their submitted value as read-only.
The big differences are that we've set a different step to render it on, and then set the index value to different values (6 will cause it to render in the middle of the page; 99 will force it to render last).
Create the View
OK, so we've told it to render the view but we've not made it yet.
In JavaScript, create Example.PreferredDelivery.PreferreDelivery.View.js and in it put:
define('Example.PreferredDelivery.PreferredDelivery.View'
, [
    'Wizard.Module'

  , 'example_preferreddelivery_preferreddelivery.tpl'
  ]
, function (
    WizardModule

  , example_preferreddelivery_preferreddelivery_tpl
  )
{
  'use strict';

  return WizardModule.extend({

    template: example_preferreddelivery_preferreddelivery_tpl

  , getContext: function getContext()
    {
      return {
        isReview: this.step.step_url == 'review'
      };
    }
  });
});
The crucial thing here is that we are extending a different base view than normal: Wizard.Module. When adding a new value to the checkout wizard, we have to use this view because it has been specially set up to work within the checkout.
Other than that, the file is pretty unremarkable: it renders a template and we're passing one value via the context object. In our case, you'll see we're passing a boolean that analyzes whether the current step is the review step or not. You'll see that we're referring to this.step, which gives us step information, which is a factor of the wizard module view.
Anyway, with that file set up, and the information passed to the template, we can create the template itself.
Create the Template
We're going to re-use the same template for both the editable and read-only parts of its journey. Therefore, we need to do add in a couple of conditionals to make sure we render the correct content at the right time.
In Templates, create example_preferreddelivery_preferreddelivery.tpl and in it put:
<h2 class="preferreddelivery-title">{{translate 'Preferred Delivery Date'}}</h2>
<div id="preferreddelivery-container" class="preferreddelivery-container">
    {{#if isReview}}
        {{#if model.options.custbody_preferred_date}}
            <p>{{model.options.custbody_preferred_date}}</p>
        {{else}}
            <p>{{translate 'No date selected'}}</p>
        {{/if}}
    {{else}}
        <input class="preferreddelivery-input" type="date" name="custbody_preferred_date" data-todayhighlight="true" value="{{model.options.custbody_preferred_date}}">
    {{/if}}
</div>
Again, there should not be anything here too surprising. We check to see if we're in the review step; if we are then we check to see if the customer set a value, if they have then we show that, else we just tell them that no value has been set. You'll note how we access the custom field: {{model.options.custbody_preferred_date}} — this is how the docs teaches us to do it and it is the best way.
Then we set up the input field for all other cases (ie when we expect the user to set a value). Note that we've set the type to date, and that we've set the name to match the ID of the field in NetSuite.
You may also be wondering why, at no point, have we added dependencies for a calendar plugin, and the reason is that it is automatically picked up and displayed on input fields that have the date format. We use the Bootstrap date picker plugin for this, and it 'just works'.
Add the Sass
In Sass, create _preferreddelivery.scss and add in the following:
.preferreddelivery-title {
    @extend .order-wizard-title;
}

.preferreddelivery-container {
    @extend .box-column;
}

.preferreddelivery-input {
    @extend .input-large;
}
These are just basic improvements to the template, they extend existing classes and don't make it too fancy.
Test and Deploy
And that's it. Now we can run gulp extension:local and test out our extension.
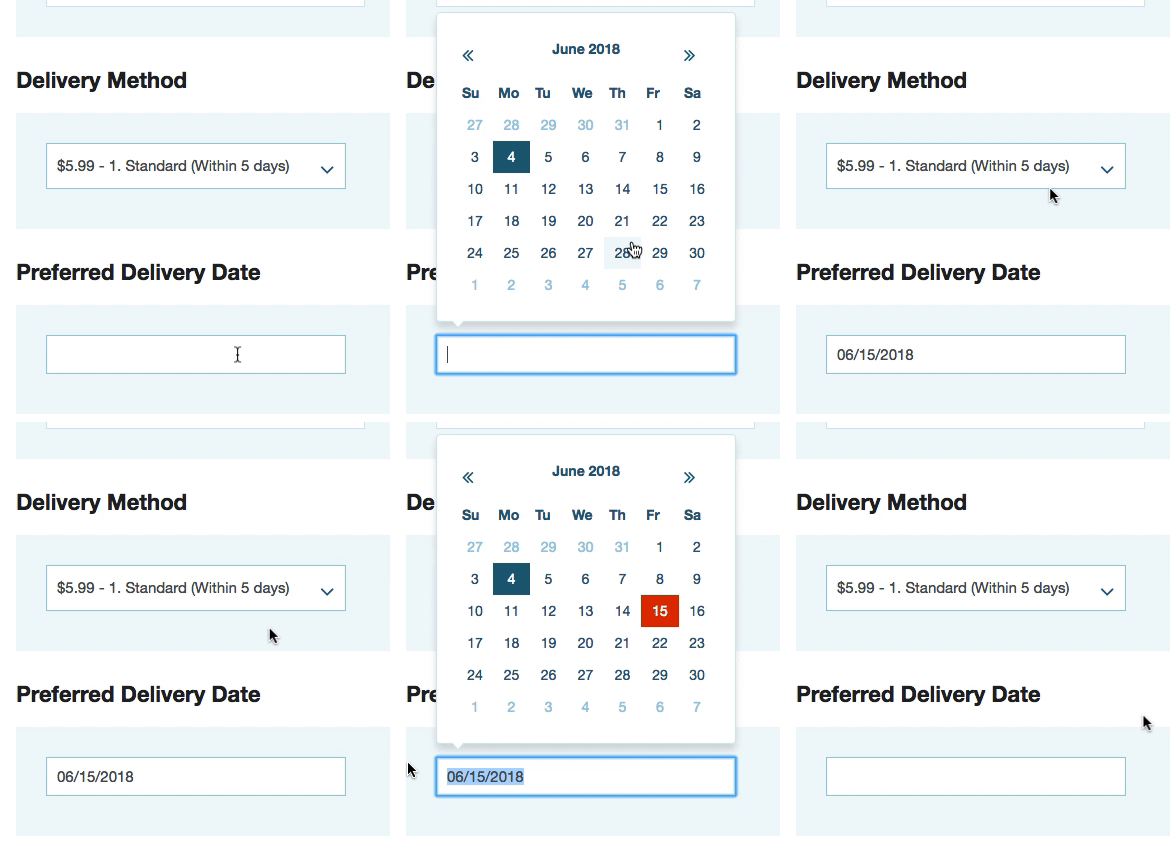
After spinning up the local server, you can visit your local version of your site, add something to your cart and proceed to checkout. After logging in, make sure you change the URL to the local SSP version. When you're in the checkout, you should see your new field about halfway down. When you click on it, it should spawn something like this:
Select a date and move on through the checkout. Place your order and then look it up in the backend, and you should see the date has been set in the Custom tab:

Neat! 👍
From here, you can deploy it up to NetSuite and activate it on your site. If your code isn't working, I've added a zip of commented code at the bottom of the page.
Add a New Step Group and Step
In the above customization, we added the field to an existing step and step group. However, if your customization requires its own space then you can create your own step group and step to add it to.
Before sharing the code, it is important to highlight that in addition to using addModuleToStep(), we’re also going to use addStep() and addStepsGroup(). I mention this because a common mistake would be to invoke these commands independently of each other, but a quick look at the API documentation reveals that these methods return deferred objects. This is important because if you were to invoke them separately, your code would not function: you would try to add a module to a step that does not exist at the time of execution, nor a step group that exists at the time of execution. Accordingly, we will need to chain them so that they are added sequentially.
Another common mistake is that, like addModuleToStep(), both of these methods accept named objects as parameters. That is, when we pass in a step group, for example, to addStepsGroup, we must pass it like this: addStepsGroup({group:{...}}). Passing in a raw object will not work.
Finally, note the mandatory properties. Importantly, the step you are adding has two properties that must be functions. They can very simple functions or very complex ones — it all depends on your step.
- isActive — is a function that determines whether the current step is in use. Generally speaking, this can just be an empty function:
function () {}. - showStep — is a function that determines whether the step should ever be shown to the customer. By default, you can just set this to be a function that returns true (
function () {return true}) but you could have it more complicated. For example, if there is a property or custom field on the user profile that determines whether to show this step, then you can conditionally return true or false based on that value. This also could be a value in the site configuration or web site setup records, for example.
OK, here is the code using the above example:
define('Example.PreferredDelivery.PreferredDelivery', [
    'Example.PreferredDelivery.PreferredDelivery.View'
], function (
    PreferredDeliveryContainerView
){
    'use strict';

    return  {
        mountToApp: function mountToApp (container) {
            var checkout = container.getComponent('Checkout');

            checkout.addStepsGroup({group: {
                index: 3,
                name: 'Preferred Delivery',
                url: 'preferred-delivery'
            }})

            .done(function () {
                checkout.addStep({step: {
                    group_name: 'Preferred Delivery',
                    index: 3, // suggested match the step group index if you're adding them at the same time
                    isActive: function () {}, // yes, an empty function
                    name: 'Preferred Delivery',
                    showStep: function () {return true}, // can obviously be more complicated than this
                    url: 'preferred-delivery/date'
                }})

                .done(function () {
                    checkout.addModuleToStep({
                        step_url: 'preferred-delivery/date',
                        module: {
                            id: 'PreferredDeliveryView',
                            index: 0,
                            classname: 'Example.PreferredDelivery.PreferredDelivery.View',
                            options: {container: '#wizard-step-content'}
                        }
                    })
                });
            });

            checkout.addModuleToStep({
                step_url: 'review',
                module: {
                    id: 'PreferredDeliveryView',
                    index: 99,
                    classname: 'Example.PreferredDelivery.PreferredDelivery.View'
                }
            });
        }
    };
});
We add a step group by passing in a group object with our group’s properties.
Note how we use .done() to chain the methods together. Once we add a step group, we wait for it to a resolved promise. Once that’s done, we move on to add the step. Similarly, we pass in a step object with our properties; as mentioned above, note the properties that are functions.
Once that method returns a resolved promise, we can then add our module to the step.
If you experience difficulty, remember that you can log step and step group information to your console with: getStepGroupsInfo() and getStepsInfo().
Code samples are licensed under the Universal Permissive License (UPL), and may rely on Third-Party Licenses