Add a Button to Download Order History as a CSV File
Caution: this content was last updated over 4 years ago
In this example customization, we will add a button to the Order History page in My Account that, when clicked, will generate a CSV file of the current page of orders and trigger a download to the user’s device. Aimed at extension developers, it will show you how to use helper and service files in your extensions, as well as conditional rendering techniques.
It is important to keep in mind that this example extension (along with all other examples on this site) are neither fully featured nor fully tested. The point of this is to teach some techniques and features of developing on SuiteCommerce through example customizations. If you plan to implement this functionality, you shouldn’t certainly spend some time ensuring it is robust and covers all of your requirements.
So, what's going on? The idea is that when a shopper visits their order history page in their account area, they'll be shown a button offering a CSV export of their order history. If they click it, we will need to parse the order history data, generate a CSV file of it, and then trigger a download of that data as a CSV file.
Now, what I think will make this blog post interesting is that I want to talk about some interesting approaches to coding extensions that you may not be aware of:
- Non-operational entry point files — dummy JavaScript files that get called when an application calls our extension in places we don't need it
- Helper files — companion JavaScript files that can be used as a place to put utility functions associated with your new code
- Calling services — if you're not using a service to populate a model or collection, what's the best way to get data from NetSuite?
- View-conditional rendering — how to check whether a user is on a particular page (view) before running code
- Download an XHR response as a file — while you get the data back, it doesn't trigger the familiar Save As dialog / download process, so we need to figure that out
In short, the headline functionality of this blog is really just a vehicle for me to talk about these things, so that you can think about this stuff in your own extensions.
You’re encouraged to code along, otherwise you can download the full source of this sample extension in GitHub.
Let's get going!
Basic Setup
I'm going to skip documenting the extension creation process: it's pretty normal. I'm using my name as the author, and the module/extension name is DownloadOrderCSV, and we're going to use JavaScript, SuiteScript, templates, and Sass.
One thing I want to point out now is the auto-generated service file in the assets > services folder. Note how its name follows a different naming pattern to other files. It matches the file name of the service controller, but in this case, its going to be named differently within the file. We'll talk about this later.
Create the JavaScript Entry Point File
In JavaScript > Example.DownloadOrderCSV.DownloadOrderCSV.js, put:
define('Example.DownloadOrderCSV.DownloadOrderCSV'
, [
    'Example.DownloadOrderCSV.DownloadOrderCSV.View'
  ]
, function
  (
    DownloadOrderCSVView
  )
{
  'use strict';

  return {
    mountToApp: function mountToApp (container)
    {
      var Layout = container.getComponent('Layout');

      if (Layout)
      {
        Layout.addChildView('ListHeader', function () // Sadly, this will add this functionality to every List Header view, so we will need to do some work to minimize this
        {
          return new DownloadOrderCSVView({container: container})
        });
      }
    }
  }
});
What we want to do is add a button in the order history. In order to do that, we're going to use the layout component's addChildView() method (available in Aconcagua R2) to add our view into the list page. However, there is a slight problem with this: we re-use the list header view through the account area for all the various different types of lists a user might look at: order history, re-orders, wish lists, et al. Normally, we would just be precise about where we're adding our view but this is not possible in this case because the generic view does not have a data-view attribute that allows us to be specific. We will have to add our new view to all applicable views and then find a way later to make sure it only renders where we want it.
Create a Non-Operational Entry Point File for Outside of My Account
At the moment, this entry point file will be used throughout the entire site, including outside of the My Account application (which is the only place we want it to run). We don't to run outside of this one part of the site for two reasons:
- It's unnecessary (ie it's effectively just bloat if we load/run it in places we don't need it)
- Our yet uncreated view will throw an error outside of My Account
It's the second point I am most concerned about. You see, we're going to add the OrderHistory.List.View as a dependency to our view and this will error if the code is run in the shopping application. Why? Because when the underlying source (ie the SuiteCommerce / SuiteCommerce Advanced bundle) is compiled, this class will not be included in the shopping application. Thus, the call to include it as a dependency will fail, returning an error.
The best-practice way of avoiding this scenario is one of two options:
- Remove the keys in manifest.json for the applications your extension will not use
- Have different entry point files for the different applications (if you're going to run different functionality in different areas of the site)
By default, your extension will be configured to include all three applications and to run the same entry point regardless, but there is a mechanism in manifest.json. For the sake of this tutorial, I am going to introduce a concept of noop entry point files that run but don't do anything, by keeping the application keys in entry points object but having the unnecessary ones point to a file that does nothing.
Open the manifest file and find the "javascript": "entry_points object and change it to this:
"javascript": {
    "entry_points": {
        "shopping": "Modules/DownloadOrderCSV/JavaScript/Example.DownloadOrderCSV.DownloadOrderCSV.noop.js",
        "myaccount": "Modules/DownloadOrderCSV/JavaScript/Example.DownloadOrderCSV.DownloadOrderCSV.js",
        "checkout": "Modules/DownloadOrderCSV/JavaScript/Example.DownloadOrderCSV.DownloadOrderCS.noop.js"
    }
Now create JavaScript > Example.DownloadOrderCSV.DownloadOrderCS.noop.js with the following in it:
define('Example.DownloadOrderCSV.DownloadOrderCSV.noop'
, [
  ]
, function
  (
  )
{
  'use strict';

  return {
    mountToApp: function mountToApp (container)
    {
      return undefined
    }
  }
});
I'm using 'noop' as a keyword here to cite the computing concept of the same name. It is used to refer to a function that does nothing ("no operation"), and that's kinda what we want to happen here: when in the checkout and shopping applications... do nothing. The functionality we want will run in the customer's account area, but no where else.
So, in short, we can use non-operational entry point files to exercise some control over the context of where our extension runs. Keeping the architecture in place can make things easier for developers to introduce new functionality later on down the line, should you need to. However, generally speaking, it is best to simply remove keys that you don't need.
Out of all of this, there's still a related question: how do we do that with the view? How do we get the view to run only in the place we want it?
Create the View
The (operational) entry point file returns a view. One of the view's job is to render the button template, but we also need some code to perform the transformation of the order history list page data into a CSV file. We're going to delegate some of this to the service file, but we're going to do some of this locally too.
Here's JavaScript > Example.DownloadOrderCSV.DownloadOrderCSV.View.js:
define('Example.DownloadOrderCSV.DownloadOrderCSV.View'
, [
    'Backbone'
  , 'jQuery'

  , 'OrderHistory.List.View'

  , 'Example.DownloadOrderCSV.DownloadOrderCSV.Helper'
  , 'example_downloadordercsv_downloadordercsv.tpl'
  ]
, function
  (
    Backbone
  , jQuery

  , OrderHistoryListView

  , Helper
  , example_downloadordercsv_downloadordercsv_tpl
  )
{
  'use strict';

  return Backbone.View.extend({
    template: example_downloadordercsv_downloadordercsv_tpl

  , initialize: function ()
    {
      this.application = this.options.container;
      this.parentView = this.application.getLayout().getCurrentView();
    }

  , render: function () // this will overwrite the inherited render() method
    {
      // "How do I conditionally do something based on what the current view is?"
      if (this.parentView instanceof OrderHistoryListView)
      {
        this._render(); // this is the 'real' method
      }
      // by doing nothing if it is false, it won't render on pages that aren't the order history list view
    }

  , events:
    {
      'click [data-action="downloadordercsv"]': 'downloadOrderCSV'
    }

  , downloadOrderCSV: function downloadOrderCSV ()
    {
      var orderHistoryModels = this.parentView.collection.models // get order data straight from the view's collection's models
    , orderHistoryColumns = this.application.getConfig('transactionListColumns.enableOrderHistory') ? this.application.getConfig('transactionListColumns.orderHistory') : Helper.getDefaultColumns() // Does this site use custom order history columns? If so, get them, otherwise provide some defaults
    , orderHistoryMap = Helper.mapList(orderHistoryModels, orderHistoryColumns) // map the data into JSON format that the parsing system can understand
    , CSVServiceURL = Helper.getServiceUrl() + '?orderHistory=' + JSON.stringify(orderHistoryMap); // generate the URL for the service, to which we will attach a stringified version of the processed of the data

      // So, here's the thing. If you have a service you need to call in your extension then you can use jQuery/XHR to get it. BUT if you're going to use this GET to get model/collection data, then you should use standard Backbone model/collection stuff. This is only if you need to make a call to NetSuite for other uses.
      jQuery.get(CSVServiceURL).then(function (CSVfile)
      {
        // After calling the service and getting our response, we need to do something with the file. But unfortunately the download / 'save as' mechanism won't automatically trigger :(
        // The web standards folk *were* going to make downloading files super easy with an API but they canceled that idea, sadly.
        // Some people have tried to resurrect it by creating a library, etc, but that's a bit overkill, I think: https://developers.google.com/web/updates/2011/08/Saving-generated-files-on-the-client-side
        // The reason I think that is because there are a couple of easy ways to do it that are 'hacky' but reliable (and, to be honest, the library just wraps those hacks up and makes them look pretty)
        // Anyway, you basically create a fake link that reads the data and converts it into a file.
        // We then trigger a click() event and download it.
        // Wait. Does that mean we don't even need to bother generating the file on NetSuite? :thinking_face:
        var element = document.createElement('a');
        element.setAttribute('href', 'data:text/csv;charset=utf-8,' + encodeURIComponent(CSVfile));
        element.setAttribute('download', 'OrderHistory.csv');
        element.style.display = 'none';

        document.body.appendChild(element);
        element.click();
        document.body.removeChild(element);
      });
    }
  })
});
A lot of what I want to talk about is included in the code comments. But I'll expand each one.
In the initialize() method, I've done a normal thing of attaching the container object to the class as application, which is useful for when you want to gain access to the extensibility API. However, immediately below it, you'll see we're doing something different: we're attaching the 'current' view to the class as well (although I've named it parentView because from a context point of view, this makes more sense). Why? Because we weren't able to add our view to the specific view we wanted (only to the type of view) we need to figure out how to get our code to render in the specific view of our choosing. This is what is commonly called conditional rendering.
View-Conditional Rendering
What does application.getLayout().getCurrentView() do? Well, it returns the object of the main view (the parent view) that the user currently has rendered. What this means is that if the user is currently on the order history list page, this method will return the object representing that. What does this mean for us? It means that we can perform a check on that and solve our aforementioned problem: we can choose to render the view's content based on the values of this object.
When you have this object, how do you check that it is the view we want? There are some things you could do which are not particularly robust, such as checking the title property, or analyze the ID/class on the element itself ($el) but these are subject to change and are flimsy. The best thing you can do in this scenario is make use of the instanceof operator. If you are unfamiliar, what this lets you do is compare an object against a constructor. Specifically, to quote MDN, it tests whether prototype property of a constructor appears anywhere in the prototype chain of an object.
In other words, we want to render a child view only when the user is on the order history list view. We know that the order history list view must have been created from the OrderHistory.List.View class. All we need to do is get a copy of the view constructor and compare it against the currently instantiated view to see if there's a match.
To do this, we add that class to our list of file dependencies at the top of our new child view (naming it OrderHistoryListView), and then do something like this:
this.parentView instanceof OrderHistoryListView
You'll note that this is exactly what we do in the render() method: does the parent view have the prototype chain indicating it was created from the constructor of the order history list view class? Yes? Then render our child view; otherwise... don't.
Speaking of which, what are we doing with the render() method?
Overriding the Default Render Method
Built into every Backbone view is the render() method that determines what happens when the page is rendered. Like many methods on this class, it is designed so that it can be replaced with your own should you wish to (but as long as you do it carefully). In order to accommodate this, there is a private method which actually does the work: _render(). What this means is that you can overwrite the public render() method with whatever you want, just so long as you call _render() when you actually want to render the view.
Now, I'm probably going to get Slack/email messages about this, so yeah: it's not strictly best practice to do this. This falls into one of those tools available to developers but should be kept in reserve for when you need it. Our advice is that you shouldn't mess with base classes, and Backbone.View is one of those. However, in mitigation, we are only messing with our extended version of the class (not the prototype of the base class), plus I think this is actually the neatest way to accomplish what we want.
So, how are we actually achieving what we want? We're overriding the default method to provide it with the aforementioned condition: is the current (parent) view an instance of the order history list view? If yes, run the (private) render method; if it's not, do nothing. Neat.
Helper Files
Before we talk about downloading the CSV file, I want to introduce a concept that we talked about in my and Juan's SuiteWorld: helper files.
Helper files are JavaScript files attached to a module or extension that provide utility functions to your other files. They are particularly useful in two ways:
- You can move out utility function definitions to separate files, so that your views and other 'main' files are cleaner
- The functions become reusable, so they can be easily called throughout your extension's different files
Even if you don't plan to reuse your functions, the first point is still very strong: moving out functions that do mapping or calculation can make your views much neater.
Anyway, here's the code for Example.DownloadOrderCSV.DownloadOrderCSV.Helper.js:
define('Example.DownloadOrderCSV.DownloadOrderCSV.Helper'
, [
    'underscore'
  ]
, function
  (
    _
  )
{
  'use strict';

  return {
    getServiceUrl: function getServiceUrl ()
    {
      return _.getAbsoluteUrl(getExtensionAssetsPath('services/DownloadOrderCSV.Service.ss'))
    }

  , getDefaultColumns: function getDefaultColumns ()
    {
      return [
        {'id': 'trandate', 'label': 'Date'}
      , {'id': 'amount', 'label': 'Amount'}
      , {'id': 'status', 'label': 'Status'}
      ]
    }

  , mapList: function mapList (data, orderHistoryColumns)
    {
      /* Example data:
      {
        "page":"1",
        "recordsPerPage":20,
        "records":[
          {
            "recordtype":"salesorder",
            "internalid":"13257",
            "tranid":"SO111259",
            "trandate":"4/30/2019",
            "status":{
              "internalid":"pendingFulfillment",
              "name":"Pending Fulfillment"
            },
            "amount":1138.27,
            "currency":{
              "internalid":"1",
              "name":"USD"
            },
            "amount_formatted":"$1,138.27",
            "trackingnumbers":null
          }
        ]
      }
      */

      var orderHistoryJSON = [];

      _.map(data, function (oldrec)
      {
        var newrec = {'Purchase Number': oldrec.tranid};

        _.each(orderHistoryColumns, function (column)
        {
          if (oldrec[column.id])
          {
            // Most values in the object are strings, but in same cases they are objects
            newrec[column.label] = _.isObject(oldrec[column.id]) ? oldrec[column.id].name : oldrec[column.id]
          }
        });

        orderHistoryJSON.push(newrec);
      });

      return orderHistoryJSON
    }
  }
})
This file is slightly longer than it needs to be because I have included example data that will be put through the mapping function in case you want to play around with it.
So, what's going on with our helper file?
getDefaultColumns()— in 2019.1, we added a new configuration feature where you can customize the transaction columns used in the tables when displaying transactions (such as order history, returns, and quotes). When deciding what columns to include in our CSV file, we need to know which ones to include: we're going to use the ones from the configuration file, if they're present, otherwise we need to have some defaults — so we're gonna store those in our helper file.getServiceUrl()— if you're not calling using a collection or model but you still need to make a call to NetSuite, then you will need to use an alternative method. How you do that we'll take about in a moment, but for now, we can use the helper file to store the service file URL and then call it with a clean method name.mapList()— like we did in the other CSV tutorial, we will need to take the data provided and then re-map it so that it's in a format that we want. This doesn't need to live in the view file, so let's move it out to the helper file.
Helper files are neither particularly new nor specific to extensions (nor are they unique to SuiteCommerce) — we use them throughout the bundle, for example in the Facets module which has a helper file and a translator file, both of which providing extra functionality to our module, outside of the files where their functions are used. Also, while we're using them for our frontend code, there's no reason why you couldn't have them in your backend code either.
An interesting code design concept here is to make everything a function. When I was discussing this with my colleague Joaquín, he pointed out that this helped cut down on refactoring when new features or changes are introduced in later versions. For example:
- Our default columns could just be a property that has an array as its value, but what if we wanted to expand this so that additional work is done? What if we needed to perform an additional check or transformation? We would have to refactor more than just this property, and that means more work.
- It is not uncommon for future iterations of functions to add or remove parameters. Functions can be easily adapted to support this, but, again, converting an object or array property to support this will require extra refactoring. This, again, means more work.
Think ahead and work smart!
Download Order CSV Call
OK, so we've looked at all the supporting functions, let's swing back to the downloadOrderCSV() function.
After the download button is clicked in the template, this function is called. We start by building up a number of useful variables:
orderHistoryModels— this is the raw data that the parent view has been given. Now, I was thinking about the best way to get this data and I'm using this. I suspect I will also get letters about this. However, this method is not unprecedented in core code. On the plus side, it saves on making a duplicate call for records to NetSuite and it uses the data that is live and showing in the page. And that's what we want, right?orderHistoryColumns— I talked about this a little bit already, but we need to know which columns to show in the CSV file. When we get the models back (see the example data I put in the helper file), there is a lot of data that we don't want. Therefore, when we create the map we need to decide which bits to include. This ternary operator checks the config object to see if the option to use custom columns is enabled; if it is, we use the config values from the config record, otherwise we use the defaults programmed into the helper file.orderHistoryMap— once we have the models and columns, we need to process them so that we produce data in a format the parsing library can understand.CSVServiceURL— when we have the map, we need to figure out how to send it to the service. We're again calling on the helper file to provide us with the base service URL, and then we're tacking on a URL parameter which will have a stringified version of the mapped data.
With those variables defined, we make the call.
Now, if you're not using a model or collection, then you can make calls to NetSuite using an XHR (or, if you prefer, a jQuery wrapper function). Once it's done, and the results are passed back, we can process the result. We'll look at what actually happens in the service file, but, in the context of the view, know that the returned data is a CSV file.
Knowing that, you'd expect that the returned file would automatically download onto the user's device. But what's interesting about this interaction is that a file returned by JavaScript in this manner will not automatically trigger the download. This is something that has been known for a while in the web development community, and for a while it was argued that there should be an API for this. Sadly for us, however, this effort was discontinued and so people have tried to resurrect/patch it in by creating a library that you can use to handle this. I was thinking of including it this tutorial, but I decided against it. There is a simple solution you can use which covers most use cases (which is what we're going to do), but the library covers a myriad of uses cases and edge cases (such as download files to iOS devices). If you're serious about this feature, then you should probably take a look at that.
The simple solution is just to create a fake hyperlink that points to the downloaded file, and then simulate clicking on it. This will work in most cases and — I should remind you — this is a tutorial on design features / coding techniques, not the functionality itself!
Note the download attribute and the file name we give it: if you wish to, you can dynamically set the name of file to whatever you want. For example, if a user is downloading a lot of files at once, then you could dynamically change the name to include the dates of the transactions or when the file was created. Again, I'll leave this up to you.
Create the Backend Files / SuiteScript
We have referenced the service file in our frontend code, and now we need to create it. There are going to be two files that we're putting in the backend: a service controller and a backend entry point file.
Create the Service Controller
For a while now, we've been auto-generating the service files in SuiteCommerce Advanced and this process is no different for extensions. What is has meant is that you typically need at least two files: one file, the service controller, to handle the types of HTTP requests that come in (in our case, just a GET), and another to do something once the request has been 'handled'. This second file is sometimes a backend model, but it doesn't necessarily need to be; frequently in extensions, we use the concept of a backend entry point file.
The service file gets split off from the rest of your site/extension's code and put into a folder with all the other service files, while the rest of the code (eg the backend model or entry point file) get rolled into ssp_libraries.js or ssp_libraries_ext.js (the latter being the backend code that is from your site's extensions).
For now, we just need to create the service controller.
This is SuiteScript > DownloadOrderCSV.ServiceController.js:
define('Example.DownloadOrderCSV.DownloadOrderCSV.ServiceController'
, [
    'ServiceController'
  , 'Example.DownloadOrderCSV.DownloadOrderCSV'
  ]
, function
  (
    ServiceController
  , DownloadOrderCSV
  )
{
  'use strict';

  return ServiceController.extend({
    name: 'Example.DownloadOrderCSV.DownloadOrderCSV.ServiceController'

  , get: function get ()
    {
      var orderHistoryCSVFile = DownloadOrderCSV.get(this.request.getParameter('orderHistory'));

      this.response.setContentType('CSV', 'orderhistory.csv', 'attachment');
      this.response.write(orderHistoryCSVFile.getValue());
    }
  })
})
Note the file name is different to the class name. The tools will automatically prepend the author and extension name to the file name when it is activated in NetSuite.
We extend the base service controller and then add a get() method, which plucks the data from the orderHistory parameter we attached to the request. This is sent to the entry point file for processing.
The processed file is returned, and we do two things:
- Change the content type with
setContentType, which is a SuiteScript wrapper for theContent-TypeHTTP header - Attach the file to the HTTP response with the
write()method; note that we usegetValue(), which is a method that ensures that we just don't just send the SuiteScript object representation of the file
How do we generate this file?
Create the Backend Entry Point File
My SuiteScript > Example.DownloadOrderCSV.DownloadOrderCSV.js file looks like this:
define('Example.DownloadOrderCSV.DownloadOrderCSV'
, [
  ]
, function
  (
  )
{
  'use strict';

  return {
    get: function get (orderHistory)
    {
      var CSVData = this.unparse(orderHistory);
      return nlapiCreateFile('orderhistory.csv', 'CSV', CSVData);
    }

  , unparse: function unparse (jsonData)
    {
      // Define to header rows
      var json = JSON.parse(jsonData);
      var headerRows = Object.keys(json[0]);
      // Deal with null values
      var replacer = function replacer (key, value) {return value === null ? '' : value};

      // Produce the CSV
      var csv = json.map(function (row)
      {
        return headerRows.map(function (field)
        {
          return JSON.stringify(row[field], replacer)
        }).join(',')
      });

      csv.unshift(headerRows.join(','));
      csv = csv.join('\r\n');

      return csv
    }
  }
});
There are two functions: one to handle the get request, and another to unparse the JSON and convert to a CSV.
I’ll start with unparse first: I should state that this is a very simple implementation of converting JSON to CSV. If you look online, you will see that there are entire libraries for this — and with good reason. There are plenty of situations (many of which are everyday use cases, not just edge cases) that could affect the parsing and unparsing of JSON and CSV data. If you plan to implement this functionality properly, I would strongly recommend integrating one of them into your code.
As for the code itself, we are just doing a bit of search and replacing, really. The function receives stringified JSON data from the frontend, and then we parse it into an object. We extract the header rows (which we’ll add in later on), and create a utility function to handle null values. Then we do the parsing to produce the result.
Once we have that, we use a fun bit of SuiteScript: nlapiCreateFile, which is part of our file APIs. While we're not using it here, but you could also use nlapiSubmitField to store the file in the file cabinet, but that's a can of worms. In our case, the nlobjFile object is created with our data and then returned to the service controller (where we saw that it's sent back to the client).
NOTE: when you deploy the extension and activate it, you'll need to elevate the permissions of the service file. Elevated permissions is a compromise between not wanting to give customer users carte blanche access permissions (eg to records or lists) while also letting them perform actions that require those permissions some of the time. We first used this feature in Vinson, when we introduced the store locator.
In our case, because we're going to be using the nlapiCreateFile method, we will need to enable our customer users to have the Lists > Documents and Files > Create permission, as well as permission to run the script without login.
Create a new role and call it something like Access Documents, and assigning it to a custom center of your choosing. You will need to either grant your new role the single permission mentioned above or choose a center that has it built in. For example, if your new role is based off of the Accounting Center then you do not need to explicitly add this permission, but you may want to just so that it is clear (eg for auditing) which permission the service explicitly requires. Alternatively, you could also create a custom center explicitly for your elevated permissions scenario and create a new role for this single scenario.
Regardless of which method you choose, you will then need to assign your new role the service file. Look up the service file in file cabinet and edit its record. In the Permission tab, check Enabled, select your new role from the Execute as Role dropdown, and check Run Script Without Login.

Create the Template and Sass Files
Before we wrap things up, we need to take a quick look at what's happening in the template and Sass files, as they will be enabling this functionality.
In Templates > example_downloadordercsv_downloadordercsv.tpl I have:
<div class="download-order-csv-container">
    <a class="download-order-csv-button" data-action="downloadordercsv" id="downloadordercsv">Download CSV</a>
</div>
There's nothing unfamiliar here. Note the data-action attribute, which is what we're using to link this element to the event in the view that triggers the process.
As for the Sass file, we have Sass > _example-downloadordercsv.scss:
.download-order-csv-container {
    margin: $sc-margin-lv2 0;
}

.download-order-csv-button {
    @extend .button-secondary;
    @extend .button-medium;
}
None of this is mandatory — how you style this is up to you. This is essentially the bare minimum.
Final Thoughts
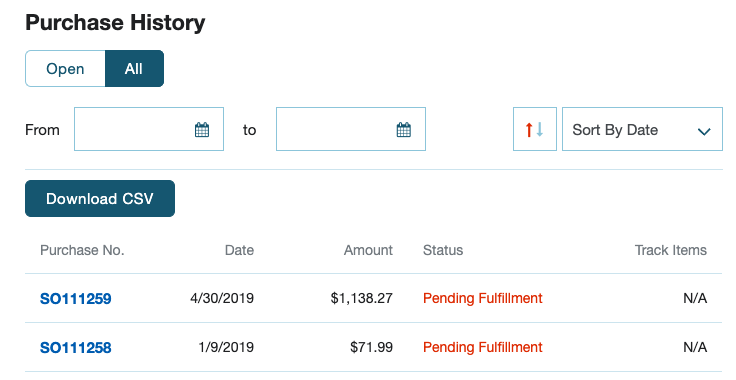
Save all the files and push it up and activate. You should have something like this:
When you click it, you should get a neat little CSV file in your downloads folder (or, you know, a prompt). If you get an error from the service, note the elevated permissions section above. Check out the service request and response in your browser developer tools' network tab.
If you get shown a page saying that you don't have permission, then you will need to make sure your role has the Documents and Files > Create permission. If you get an unhelpful error that says its impossible to parse, then make sure you have checked the Run Script Without Login checkbox.
Now, before I move on, I just want to add that this is something that could reasonably be implemented entirely with frontend JavaScript. The use of service files and SuiteScript is, as previously mentioned, for demonstration purposes. Just note that some of the recommended methods available on the internet make use of JavaScript not compatible with older versions of Internet Explorer — so keep that in mind if you plan to support those customers!
If you do plan to implement this functionality on your site, remember that this tutorial is not really focused on that: it's here to teach you some little-known aspects of extension development, so you can really only use this as a jumping-off point.
If you plan to improve this functionality, you may need to consider adding new features, such as the ability to export the user's entire order history. At which point, the current method of pulling the data straight out of the view's collection will be insufficient; you'll likely need to do a proper SuiteScript lookup in the backend. You could probably reuse a lot of the code that the order history service uses.
Anyway, I hope you've enjoyed looking at things like helper files, file generation, service files in extensions, calling them via a standalone XHR (rather than as a model or collection) and a brief look at HTTP headers.
Code samples are licensed under the Universal Permissive License (UPL), and may rely on Third-Party Licenses