Facets
Caution: this content was last updated over 4 years ago
Faceted navigation are an integral part of the shopping experience as it offers the ability to refine search results and commerce categories by the products’ attributes. Product attributes can be quite simple things such as price, color, and size, or it can be just about any other custom field you have on your item records.
Key Concepts
As a developer, it’s vitally important that you understand this crucial part of your site. Before attempting a code-based solution to your request, however, consider that there are a number of configuration options available to you. These can be found in two main places:
- Commerce > Websites > Website List > (Select Site) > Search Index
- Commerce > Websites > Configuration > (Select Site) > Shopping Catalog
We have extensive documentation on how to set up facets and manipulate these values, and so I won’t repeat it here. Instead, what I will do is highlight some important things that you should be aware of. We will start by looking at the code that provides the functionality and look-and-feel of these pages.
ProductListPage Component
I’m going to preface things by mentioning the extensibility API first. If you are considering modifying the code associated with product list pages (ie search results and commerce category pages), know that the ProductListPage component may be able to perform the task you require.
The component has getter and setter methods for all of the crucial aspects of these types of pages.
You can access this component in your JavaScript so long as you have access to the application or container object. For example, your extension’s entry point file could have this code in it:
mountToApp: function mountToApp (container) {
    var ProductListPageComponent = container.getComponent('ProductListPage');

    // some code that manipulates it
}
Note that you can pass the component as an option to any object (such as a child view) that your entry point file creates/invokes — therefore, you don’t need to execute your desired code in the context of the entry point if you don’t want to.
For more information on this component, see our documentation.
Note that your site must be running SuiteCommerce, or SuiteCommerce Advanced Aconcagua (2018.1) or newer to access this component.
Facet Views
Modifying views is only recommended for experienced SuiteCommerce Advanced developers.
Before beginning, it’s important to understand that the facets page reuses a lot of the same views and templates. These are all contained within the Facets module.
As a reminder, the views and templates are what is shown to shoppers when they visit your site. They display data and allow for interaction.
As mentioned above, if you have access to the ProductListPage component, then I would strongly recommend trying to get your customization to work with that instead of invoking or modifying these files.
- Facets.Browse — this is the container (parent) view for the search results and category page
- Facets.Empty — if there are no results returned, this the page that is shown for no results (eg, you may you want to customize what advice you show to shoppers to help them find what they are looking for)
- Facets.FacetedNavigation… — there are a number here, but this view and its templates control how the sidebar is shown, which is how customers refine their results
- Facets.FacetsDisplay — shows the active refinements
- Facets.ItemCell — the different ways of presenting an individual item in the results (note the associated templates, that are shown depending on the active display option (eg, table, list, or grid))
- Facets.ItemList… — designates the bits around the list of items that can control them (such as the display options, sorting, etc)
There are more views that the ones specified, but these are the ones worth noting.
Faceted Navigation Templates
As a developer, you have some control over how to present your facets by modifying the default templates we include in the Facets/Templates folder:
- facets_faceted_navigation_item.tpl — the default template where items are shown as text links
- facets_faceted_navigation_item_color.tpl — shows color options as swatches
- facets_faceted_navigation_item_range.tpl — shows numerical options as a slider so upper and lower options can be selected
- facets_faceted_navigation_item_category.tpl — like the default template, but specifically for showing child commerce categories when a shopper is on a commerce category list page
Before making modifications, you should check the configuration page to see if there is an option you can change there first. (For old versions of SuiteCommerce Advanced, you will need to make changes to SC.Shopping.Configuration.js.)
Configuring Faceted Navigation
If your faceted navigation is not configured properly, it will look something like this: 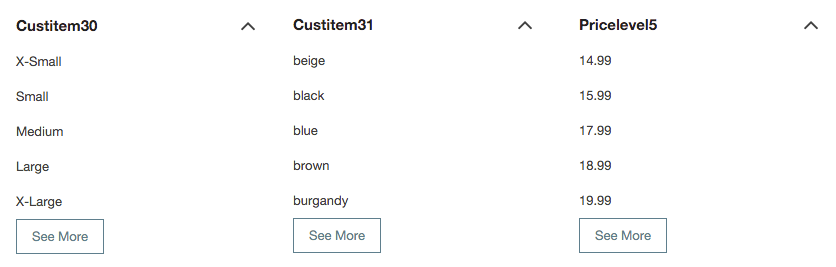
In my example, all require the titles to be labeled correctly. The second faceted navigation list needs to use a color swatch. In the third case, a price slider should be used.
There are two crucial bits of documentation:
- Select and Configure Facet Fields — this describes the Web Site Setup steps
- Facets Subtab — this describes the Configuration steps
Simple Item Setup
In my example, I have already done the first set of steps. The configuration acts like a layer that goes on top of this setup to work to make it behave as desired. You start by specifying the Item Field ID you want to configure in the Facets table in the Shopping Catalog > Facets subtab. For the first one, I’m going to enter custitem30 and then enter Size as the name, which will act as a label. The rest of the defaults are generally acceptable, although you may want to change the Behavior to multi to allow shoppers to refine by multiple values from the same navigation item. For example, for my Size facet, using multi behavior would let user select Medium and Large and see combined results for both.
Color Swatch Setup
If you’re offering refinement by color, then you may want to use a color swatch picker to offer a more visual and compact user experience.
Importantly, if you’re going to do this then you should know that you can either provide images for your color swatches, or you can use any valid CSS definition of a color.
There are two pieces of setup required for this:
- Set up a custom list of colors that are used as matrix option list for your colors
- Set up a custom palette of colors, which is used for showing the color swatches as facet navigation items
You should already have the first one (you can check in Customization > Lists, Records, & Fields > Lists) but you may not have the second one. The color palettes are defined in the Configuration page for your site, in the Layout > Color Palettes subtab.
In this table, each row represents a color value in a palette. You can have more than one palette if you wish (eg, if you have two kinds of color options, then you could have different versions of each color). To do this, simply enter a different value in the Palette ID column for your value. However, most sites will only use one color palette and therefore will set the value for Palette ID to be the same for every color (and will usually choose a name like default for this palette).
For the Color Name, this must match identically with the values in your aforementioned list of colors. This creates a map between the two and is vital for this functionality to work.
Finally, you must then specify what you want to show for this color: a valid CSS value for a color, or an image. For performance reasons, it is better to use a CSS value. The Color Value you specify can be any value you would normally use within your CSS: this includes names (eg red), hex values (eg #123ABC), or even fancy-pants gradients (eg repeating-linear-gradient(45deg,red,green 0.5em,blue 0.5em,yellow 1em)). For maximum compatibility, I would stick to simple hex values where possible.
Anyway, once you have defined your color palette, you then need to set the palette value in the Color Palette cell of your facet. The only other important thing to remember is to use the facets_faceted_navigation_item_color.tpl as the Template.
Price Slider Setup
When the items API returns search results, each item returns a price. If no further configuration is made, each individual value is shown as a facet value as text, which the user can then select from. In order to improve this experience, you should set up a slider for these values. This lets the user define upper and lower amounts, with all items outside of this price range removed. (Note that sliders can be used for any numerical value, not just prices.)
When configuring the price facet, the crucial things to remember are:
- Set range as the Behavior
- Select facets_faceted_navigation_item_range.tpl as the Template
- Select currency as the Parser
- Set something like Price $(1) to $(0) as the Title Format
Each facet’s Title Format specifies how you want the title to change once the facet has been applied. There are defaults, should you wish to leave these blank, but it is recommended to set something for the price. At the time of writing, the price title default incorrectly puts the upper value before the lower one, which is why it is necessary to swap them in your configuration like this: $(1) to $(0).
FAQ
Can Multi-Select Facets Behave as ANDs Rather than ORs?
In other words, the current behavior is that when you select multiple values from a facet, it increases the number of returned results because it matches items that have at least one of the selected values. We are sometimes asked if this behavior can be switched to return results only that have all of the values.
No. This is a limitation of the item search API and not something that can be changed through configuration or should be attempted through clever code customizations.
Are There Performance Concerns With Facets?
Yes! See our page on page on field set and facet performance.
Code samples are licensed under the Universal Permissive License (UPL), and may rely on Third-Party Licenses