Data Flow
Caution: this content was last updated over 4 years ago
Service controller architecture was introduced in Vinson, and so those sections do not apply to Denali and Mont Blanc.
Also note that this article deals exclusively with SuiteScript 1.0.
Data is the lifeblood of NetSuite Commerce: it could be shopper details, it could be what the shopper is buying, it could be newsletter subscription status. And it doesn’t have to be data that’s stored in NetSuite either, you could have pulled data from a third-party site and need to understand how to serve it to the frontend.
Quite often, in order to get data stored in NetSuite you need to use SuiteScript. SuiteScript is our proprietary scripting language that is essentially JavaScript with some custom objects and methods thrown in, which only runs on our servers. To use a different term, it is an API.
In this post, we’re going to take a close look at getting and handling data. Numerous other articles touch on these subjects by way of tutorials; here, we’re going to be doing something similar but from a different approach. Instead of following along, writing the code as we go, the code will be made available at stages, and we will reflect on the changes.
Extraneous code will be kept to a minimum (ie no styling) and we will focus on key concepts to ensure a strong foundation and clarity. Therefore, we will cover things like:
- Key Backbone concepts, such as models, views, collections
- Key SuiteCommerce concepts, such as services, service controllers, and the commerce API
- Key NetSuite concepts, such as records, SuiteScript and Suitelets
- Permissions and performance tuning
Key Concepts
Let’s start with models. Models handle data. In NetSuite Commerce we have two model files: one for the frontend and one for the backend. They’re programmed to talk to each other so that the coding experience for you is as seamless as possible. But why have models in the first place?
NetSuite Commerce uses Backbone for its site architecture, which results in a separation between the view (the presentation layer) and the model (the data layer). This is similar to the common model-view-controller (MVC) architecture, except that there isn’t a ‘controller’ in Backbone. Controller functions are split up, and are handled by the view and router. In general, however, this approach makes things easier to work with as you have one place where you put the logic of a module and another where you put what you want the user to see. Thus we end up with layering like this:
- Template (what shows the user data and captures it from them)
- View (what handles data to/from the template)
- Frontend model (what handles data to/from the view)
- Backend model (what handles data to/from the frontend model)
- NetSuite (where the data lives)
That’s a typical flow if a user submits data from, say, a form on the frontend; if you want to talk about retrieving data then the pattern is reversed — the flow of data is, of course, bi-directional.
Most of the work to get them all to talk to each other is handled by Backbone. Backbone is what provides us with an implementation of the MVC concept, and in the NetSuite Commerce code we have a number of existing, fully functional versions of models and views that only take basic configuration to get started with.

Image from Backbone.js, included under MIT license
To get started with a model or view, you extend it from the base class: this means that you effectively clone an existing, standardized version of thing and then plug in the things that make it specific to your module.
In NetSuite Commerce, when you create a frontend model you typically leave it almost completely empty. This is because the base model is configured to talk to the backend model, so all you really need to do is instantiate the router and move on. Thus, it is in the backend model that you:
- Perform create, read, update and delete actions on the data
- Convert or transform the data as needed
- Validate the data
It is, perhaps, the first one that is the most important. This is where you talk to NetSuite about the data. Leaving aside that you can also use them to call and handle third-party data, backend models are set up to handle NetSuite records because we run them on NetSuite servers. Of course, we don’t run the model per se, instead we run what’s called a service.
Since Vinson, a service file is generated from a service controller; before this version, you had to write each service yourself, despite the fact that they were all largely very similar (quite often you could just take an existing one and search-and-replace the module names). Thus, creating service controllers as a concept enabled us to standardize this.
So how do we interact with the data on the backend? As I alluded to before, this is SuiteScript. SuiteScript is our proprietary language that is based on JavaScript. It largely falls into two types: objects (data records) and methods (things you can do them). SuiteScript is, therefore, an API. SuiteScript can only be executed on NetSuite servers. Thus, if you put some in your frontend JavaScript files, the user’s browser won’t know what you’re talking about.
When you think of the objects that you’re manipulating with SuiteScript, it’s good to think in terms of records and their fields. For example, you might have a customer record (object) and the customer’s first name (field). When you sit down to plan what you’re going to do, you should think about what record you’re going to be accessing and what fields you’re going to updating.
Introduction to the Tutorial
OK, so we’ve had plenty of theory, let’s get to some examples.
Broadly speaking with NetSuite Commerce, there are three types of objects you might use SuiteScript with:
- Transaction objects (eg the cart’s contents, which might become an order)
- Standard, non-transactional records (eg customers and locations
- Custom records
I’ve split them up like this for two reasons:
- They each, usually, have varying levels of performance ‘costs’ associated with them, in descending order
- the difficulty and likelihood to work with, in descending order
In order words, I think that a good place to start is custom records. Because you’re the one creating them and they’re specific to your particular business case, they’re unlikely to impact the standard operation of your NetSuite workflows and data.
Getting started with a basic module structure is something that pops up time and time again when I produce tutorials, so this time I’m just going to skip it and provide you with the starting point. I would advise at least looking at the code, but if you want to download it and run it yourself you can, but note that these are written as customizations to the core bundles, so you’ll need to be running SuiteCommerce Advanced to do this. (They were also written at around the end of 2017.2, so they are pre-TypeScript.)
For all the code mentioned in this article, see the GitHub repo github.com/oracle/netsuite-commerce/tree/master/samples/2017-2-kilimanjaro/ — all relevant files for this article start with Example.
Initial Setup
If you want to follow along, you can ‘implement’ my code. Otherwise, you can simply read about the changes and compare the code within each revision.
Download ExampleSuiteScript@1.0.0 and copy the contents of it to your customizations directory and then update your distro.json in the following places:
- Add
ExampleSuiteScript@1.0.0to themodulesobject - Add
ExampleSuiteScriptto thedependenciesobject formyaccount.js - Add
ExampleSuiteScript.ServiceControllerto thedependenciesobject forssp-libraries - Add
ExampleSuiteScriptto thedependenciesobject formyaccount.css
This registers the module and the service within your NetSuite Commerce code, and adds it to the JavaScript and CSS for use within the account application. We’re using the account application because it requires the user to log in and we need a minimum level of permissions in order to do some basic SuiteScript record updating.
In other words, while we certainly could open up permissions on a custom record so that anonymous users can modify them, this is bad practice and therefore not a good example. We want, for example, for users to ‘own’ their records so that only they can create them, load their own records, and update and delete them if necessary. Furthermore, logged-in users have a number of records associated with them (such as address details) that we can manipulate.
Test the Source Code
OK, so we unzipped the source and added entries to distro.json, so you should now deploy the code up to your site. When it’s done, you’ll need to enable this functionality in your configuration record. Go to Setup > SuiteCommerce Advanced > Configuration, select your site and domain, and then in the Shopping tab, check Enabled under Example SuiteScript Module. Save the record.
Now, on the frontend of your site, log in to a user account and add #examplesuitescript to the end of the URL. You should see something like this:
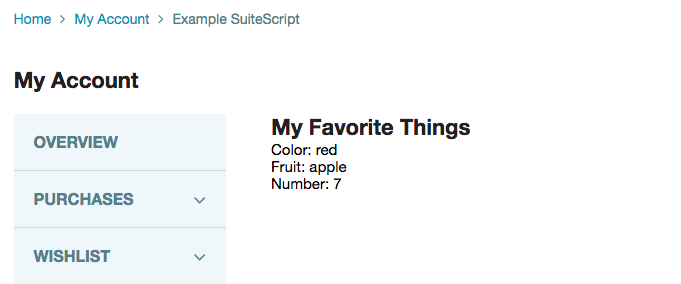
The data is hardcoded into the model, so we’ll have to change that later. For now, let’s take a closer look at what makes this page happen.
How the Core Functionality Works
I’ve written and package up this module, and I want to go through each folder and file so you can understand what each one is doing and why it’s important.
Configuration
In the Vinson release we added a configuration tool which replaced a number of disparate files that could be used to configure the site as a whole, and each individual application. This single record is available via the backend and part of the setup process above requires you to access it and enable some functionality.
If you take a look at the JSON file you can see what we’re doing. This file creates options in the backend configuration record that an administrator can modify. The principal benefit is that once the developer has set up the fields, they’re not required any more to change the values, which means the site administrator remains in control.
There are lot of different types of values you can capture in the configuration record, which can then be referenced in your code. Here, all we’re doing is creating a toggle in the backend that a site administrator can use to enable or disable the functionality.
JavaScript
Starting with ExampleSuiteScript.js, we have the entry point file. This is what defines the module’s name and where the application starts when it kicks off loading the functionality.
There’s really only three parts to this file. The first is that the name we use in the define statement is what we reference in the modules object in distro.json — if we ever want to change the name of the module then we’ll need to do it here.
Secondly, having just discussed module configuration, you’ll see that we wrap the mountToApp code in a conditional that means that it only runs if an administrator has enabled the functionality in the backend. This is kind of a brute-force way of handling this; a better user experience might, instead, serve a page which apologizes to the user and says that the functionality is no longer available; however, this way prevents everything from running. How?
That’s the third part: the main point of this file is that starts up the router. The router is what we’re getting to next.
Open up ExampleSuiteScript.Router.js. The first thing we see is that we list the module view and model as dependencies and you’ll see at the bottom that this is where we load them. When are they loaded? Well, in the routes object we map a URL fragment to a function within the router. In our case this is 'examplesuitescript': 'loadTheModel', which means that when a user goes to #examplesuitescript (like we did earlier) the router is told to run a function called loadTheModel. You can set these keys and values to whatever you want, and you can do fancy stuff such as pseudo-directory paths and wildcards. Check out the Backbone documentation for more information on this.
As for the loadTheModel function itself, this is where we call on the model and the view. We construct a new model using the one we defined as a dependency then call fetch() on it. This calls up the chain to retrieve the data, which we’ll get to in a minute.
As this is an AJAX event that uses jQuery, we can tack on a done() method, which will let us specify a bunch of code to run once the data has been successfully retrieved from the server. When fetching the data, we need to wait for it to load before rendering the view or else the view will render with no data in it.
Within this function we instantiate the view, passing as options the application and the model. When that’s defined, we call showContent() which does what it’s named. So where does the data come from?
In JavaScript > ExampleSuiteScript.Model.js (this is what we call the frontend model) we only do one thing: point the application to the backend service. Note we call a file called ExampleSuiteScript.Service.ss; before the introduction of service controllers, we would have created this file ourselves, manually populating it with all the details on how to perform the relevant CRUD functions, but now it’s auto-generated — we’ll take a look at pre-Vinson, manually created service files later.
So once the router and model are set up, we call the view, ExampleSuiteScript.View.js. The main point of a view file is to pass on the data the template needs to it. The main dependency here is the template itself: each view can only have one template, but you can create child views which have their own templates if you need to.
We pass data to the template using getContext, and here you can see we’re returning an object whose values are pulled out of the model. Of course, you can set whatever values you want — they could be computations and transformations, maybe just some strings.
The attributes object lets us set attributes to attach to the container div that will contain the rendered template, which can be handy for things like styling. getBreadcrumbPages and title are pretty obvious and are a little sprinkle of UX sugar.
Finally one little note: I used generic names when naming dependencies (eg naming example_suitescript.tpl as Template) — while this simplifies things for tutorials like this, we typically don’t do it throughout the NetSuite Commerce code. Having unique names (eg example_suitescript_tpl) makes debugging easier.
And that’s the JavaScript. So the final part is to think about how we actually get the data to the frontend model so that it can be put into the template. The answer is, of course, SuiteScript.
SuiteScript
Let’s take a look at ExampleSuiteScript.ServiceController.js. It actually looks pretty empty, I mean how can this file do all the work we expect? Well, it doesn’t do it alone. When we introduced service controllers in Vinson, we created a standard service controller class that we can extend each time we created a new module. It contains all of the standard, repeatable code. You can see it by looking in Modules > suitecommerce > SspLibraries > SuiteScript > ServiceController.js. Perhaps the two most important functions are handle and sendContent: here you can see we have the code that handles the HTTP methods including actually sending them.
In our extended service controller, you can see the code I’ve included for each method. This is all based off the Address module’s service controller, and as we’re only getting data (not posting, putting or deleting) I haven’t modified it for our code. Plus, if you look at the get, I’ve commented out the original code and put in some code that works for our current scenario.
When creating handlers for your methods you’ve got to think about how they’re going to be used in code. For example, are you going to pass it any parameters. Here’s a typical situation:
get— as we’re retrieving data, we typically need to pass a parameter that identifies what record(s) we want. This is usually the internal ID of the record or the user who owns the records. Thus, we will frequently have two kinds of function that retrieves data: one that retrieves a specified record (get one, by record ID) and one that retrieves a list of records (get all, by owner ID). This is normally determined by whether we supply thegetmethod with an ID or not; if there is one then we get a specific record, if there isn’t then we get them all. We then return the data the code has requested for us.post— this is how we create new records, so it accepts the data we’ve passed it (usually from a form). Depending on the context, we may also need to pass it an ID, usually the internal ID of the user who will own the record (eg, see the case functionality). In the code in the example module, we’re not returning anything either, this is, again, is not always the case and quite often we return agetof the record we just created. This is because once the user has created a record like this, we typically want to show it to them as UX feature.put— this is usually very similar to thepostbut here we require both the ID and the data as we’re telling the system to ‘post’ data to a specific record. Again, we usually return the latest version of the record.delete— this is perhaps the simplest of all methods as we’re telling it to get rid of a record, so all we need to do is pass it the ID of a record we no longer want and then return an ‘OK’ status when it’s done. Typically, for UX reasons, we will redirect the user back to the list of records.
The service controller’s methods can also have events and options attached to them. Events are powered by SC.EventWrapper.js in the SspLibraries module. Typically, you don’t need to make use of them unless you are extending an existing module’s service controller.
As for the options, these are like validation checks that see if they’re allowed to fire. These options are defined and evaluated by SspLibraries > ServiceController.Validations.js. I didn’t actually include any in the example service controller, as I want to go through them later. Nevertheless, they let us check certain things are true before proceeding. For example we might say that a common (ie applies to all methods) validation requirement is that the user is logged in before we execute any HTTP methods; another might be that before we the user request a list of records, the user has the correct permissions to do so. A list of permissions are available in SspLibraries > Application.js within the getPermissions function. We’ll get to those later too.
And that’s the service controller, let’s take a quick look at the model. Open up SuiteScript > ExampleSuiteScript.Model.js. You’ll see that it’s relatively empty: that’s because all we’re doing at the moment is getting data, and even then all we’re doing is returning an object with some dummy data in it. The rest of the functions are unused — technically you don’t need to include functions for unused methods, but I’ve included them as that’s what we’re going to be working on later. It’s also interesting as you can see the functions’ parameters — the same ones we just talked about.
Also missing from this file is all validation. You can (and should, really) include a validation object with your model that whenever you call this.validate it checks off the data against the rules you specify. For example, you might say that the field firstname is required, but how is it validated? We have a Backbone validation file (backbone-validation.server.custom.js) in third_parties > backbone.validation that contains all of the base rules that you can call upon to ensure your data is sound.
Storing Custom Data
OK, so let’s move on from the code and think about how we store data in NetSuite. Typically speaking, there are two parts to data: a record and its fields. On an ecommerce site, a record might be a user or a transaction, and the fields might be the user’s name or the order total. Of course, it’s more complicated than that — you can see all the different custom things you can create in the Customization menu — but for most basic customizations you want either to attach a custom field to an existing record, or create a new record and attach fields to that.
So for example, you could store some data against a customer record when they check out — this would be a good case for a custom field on the user record. Alternatively, you may want to collect data not against a specific user but in a separate record that the user owns, so for this you would create a new custom record.
Displaying a List with a Collection
The module provided is only set up to display a single record. If you try to get it to display multiple records as currently is set up, it won’t work: it’ll display no data. You can try it out and see, if you like, by editing the dummy data so that it is an array containing multiple objects. So what do you do? You use a collection.
Collections are kinda like an additional layer that you add to your module in between the router and the views. If you remember in our loadTheModel function in the router, we instantiated a model, used it to fetch data, and then created a view using that model. If you’re using a collection, your main view (what is usually referred to as a list view) is created using a collection, which then calls the model. Then, you create a separate view for the collection, what we call a child view.
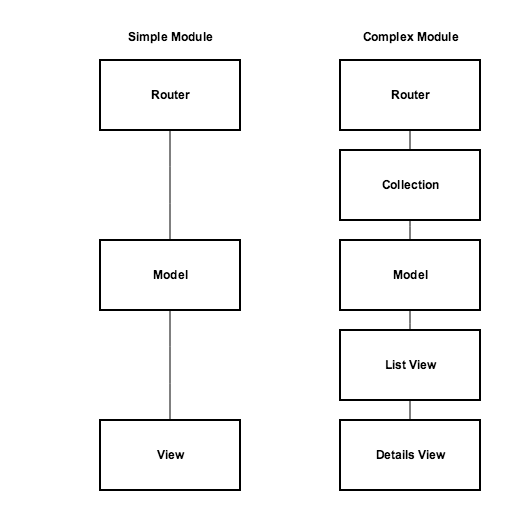
What essentially is happening is that when a collection is told to handle a list of records, it handles a model and view for each record that it has. Perhaps most importantly, it does the same thing for each one; this is important because it means that you can perform repeatable actions on them. So, for example, if we have a bunch of records we can have one parent view — a list view — that provides a container (such as a table heading) and then have the child views display within it (as table rows).
Using our current module as a base, we could implement a collection by making the existing view the ‘detail view’ and then creating another view and template to be used as the list view. In fact, that’s exactly what I did with this version: ExampleSuiteScript@1.0.1.
Copy it and put it with the rest of your customizations, update the version number for the module in distro.json, and then deploy it. When you refresh the page, you should see this:
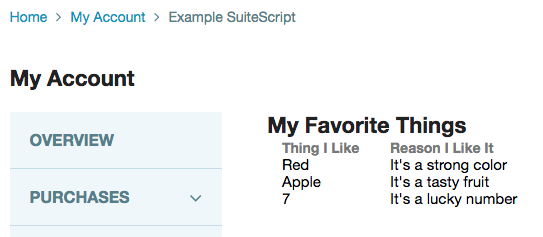
Take a look at the source code and see how it’s changed — I don’t think there’s much. We added a new file named ExampleSuiteScript.Collection.js, which creates the link between the model and the service.
The view has been renamed to ExampleSuiteScript.List.View.js, and you can run a diff between them either by using an online diff tool or by running it in your command line, eg:
diff Modules/extensions/ExampleSuiteScript@1.0.0/JavaScript/ExampleSuiteScript.View.js Modules/extensions/ExampleSuiteScript@1.0.1/JavaScript/ExampleSuiteScript.List.View.js
This assumes you’re running it from your NetSuite Commerce directory and your directory structure is the same as mine (so adjust as necessary).
You’ll see in the diff that we now have the Backbone collection view and a details view as dependencies, and that the template name has changed. We’ll get to those in a moment.
We’ve also added a childViews function, which names the view and includes some values about how to create it. Then we removed the getContext as this view isn’t going to serve anything to the template — we could, but it wouldn’t be the values we previously had as those will now be required on the child view.
The list view’s template has been renamed to example_suitescript_list.tpl and look radically different. I’ve reconfigured it so that it starts to build a table and you’ll note that the table body element has a data-view attribute attached to it and its value is the child view we created in the list view. We’re telling the application to put the generated views in that spot. So what do they look like?
Well, you can find out in ExampleSuiteScript.Details.View.js and example_suitescript_details.tpl. The view is simple, it declares what template to use and then passes it two values through the context object. The template just creates a new table row with two cells. Remember, both of these are repeating elements as they get called for every model that’s created.
Finally, we have updated the dummy data in the backend model so that it’s now an array of objects, which simulates a potential collection of records we might get back.
Create Custom Records
Before we can swap out the dummy data, we need actual data for it to retrieve. And before we can retrieve actual data, we need to create it.
We need to start in the backend by actually creating the record. For this tutorial, I’m going to use a custom record type. Called Favorite Things and identified as _favething, it’s set up with two custom fields: Owner (_favething_owner) and Reason (_favething_reason). The owner is configured to be a list of customers, so that we can associate records with the rightful owners, which is mandatory; the reason is just a free-form text where we’ll capture the reason. Note that we haven’t set up a field to capture the thing itself, that is because we’re using the standard field that comes with all custom records: name.
As for the code, download and take a look at ExampleSuiteScript@1.0.2. If you’re following along with your site, don’t forget to update the version number of the module in distro.json.
The interface for adding data is just like any other website: we need to put a form into a template, and this is what we’ve done in example_suitescript_edit.tpl.
If you’ve worked with HTML forms before, you’ll see that there’s nothing controversial here: we have two inputs and a submit button. I’ve marked them up with the details required for the form to work but left out any classes or other markup we might need to style it or improve the user experience.
To render this template, we obviously need a view, which is why I created ExampleSuiteScript.Edit.View.js. The first thing of note in this file is that we have included a dependency to Backbone.FormView.js, which is a standard view for handling forms. If you ever need to create a form view in your application, you should rely on it as it includes a whole host of useful things to connect the template form to the guts of your site.
After adding it as a dependency, you’ll need to add it to the initialize function; this will enable all the associated functionality and will enable us to use the following.
If you see in the events object, we’ve connected hitting a submit button in the form element with a function called saveForm. This function is one of the standard features we include in the form view and sends the data for processing. So we have the form set up, how do we get to it?
Back in the router, you will see that we’ve added a new route for new things. Below it is a function that will certainly look familiar to you. The new function readies an instance of the edit view with the model. One of the neat things it also does is add a listener to the model or a list of events (such as when we add a new one) redirects the user back to the list route. In other words, we’re saying "when the user has successfully added a new thing, send them back to the list page".
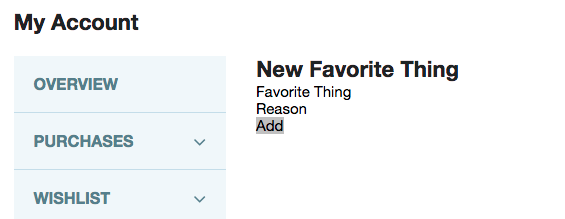
In example_suitescript_list.tpl we have added a little button that links to this route so that a user can click it and navigate to the form. Easy. In fact, you can navigate to the form by going to examplesuitescript/new and you’ll see something like this:
Finally, how do we send this data to NetSuite and create a new record? Go to the backend model and take a look.
We now have a create function that actually does just that. When we create new data, we run validation functions against it. Note, however, we’ve not included any validation yet. When creating fields and records, you can set up validation on them; if you try to submit a new record without meeting the requirements of the field, it will shoot back an error. Of course, this is sub-optimal, and we can add in validation later — right now we’re focusing on the happy path.
For the rest of the function, note that we create a variable out of nlapiCreateRecord. Despite the name, this doesn’t actually create a record in the database, it’s essentially creating an object, a theoretical record so that we can begin setting values in it.
When calling create, the data from the form is passed to it. We set values using setFieldValue by specifying the field name we want to set and then the value we set. You’ll note the object key names match those we specified in the form template (favething and favereason) and that it’s simply a case of mapping those keys to the names of the fields in the backend.
As for the owner field, we set it up to be of list/record type, specifying that we’re using customer records. Thus, in our model, we’re sending it the ID of the current user who’s logged in. The effect of this is that the system will automatically use this to link it to the customer record; in other words, we don’t have to specify who the customer is and do some manual connection-making, it’s done for us by using nlapiGetUser.
To round off the function, we then return nlapiSubmitRecord(record) and this will start the process for creating the record.
To run through the process, picture this:
- The user fills out the form, whose fields have been marked up correctly
- The user hits the submit button
- Hitting the button triggers the
saveFormevent in the view saveFormtriggers the creation of a Backbone model- The addition of a new model calls the service file and triggers a
postcall in the service controller - The
postcall calls thecreatemethod in the backend model - The
createmethod creates a new record and then submits it the database
And in that section is how you create a form and have it connect together so that submitting it. Now that we have records, how do we show them?
Retrieving a Custom Record
After using the above form to create some custom records, we are in a position to update our code so that it can retrieve them.
There’s two parts to retrieving record data: a list of all records of a specific type (eg get me all of my favorite things), and the details of a specific record (get me this particular favorite thing).
Furthermore, viewing a particular record is often a good opportunity to offer the user the opportunity a chance to edit it. For example, we create an edit view and template so that users can input data to create a new record, and we can reuse this template and merely populate the form fields with the existing data. While we’re not going to implement the updating of records in the backend in this section, we’re going to build up the code so that it can be slotted in easily.
Download and take a look at ExampleSuiteScript@1.0.3; you can diff it too.
OK, so let’s focus on the list first. We’ve already set up the front end of it so that it can receive, handle and display the data. The thing that’s missing is actually getting the data.
The first change is to do with the service controller; previously it just called Model.get(), but now we need to differentiate between calls for single and multiple records. I already included the (nearly) correct code in the get method, just commented out — so now it can replace the old code. Note, however, that it now calls Model.list() if no record ID is provided, which is a frequently used mechanism for determining whether to pull a list or a record.
This method needs creating, which is what we’ve done in the backend model, as well as replace the get code. You’ll notice that they’re actually very similar.
To get records you use nlapiSearchRecord, providing it with details on its type, ID of saved search (not used here), filters (ie how to find the ones you want, we’re using the owner custom field we set up) and the columns of those records you want returned. nlobjSearchFilter and nlobjSearchColumn are how we specify these.
The return statements of these methods are slightly different. If you remember earlier when we moved from returning a single object of results to returning multiple objects (ie for our collection), the latter used an array of objects while the former was just an object. It’s kinda the same thing and the _.map Underscore function in the list function lets us take the returned array of items and build a new one out of it in the way that we want.
So that’s what’s required for the list function to work, what about getting a single record?
A good place to start is to think about how the user will navigate to single records. We already have a route set up for the user to go the edit view via appending /new to the end of the URL, and we can follow a similar pattern for viewing a specific record. Thus, for viewing the details of a record, we created a route using :id, which is markup for saying that we’re going to pass a parameter called id.
As you can see in the details function, we are passing it a parameter named id and then using the model.fetch() method to fetch a record with that internal ID. Indeed, this function is kinda like a hybrid of the list and new functions. It creates an edit view, using the model data it has fetched, shows it and then creates an event listener identical to the one in the new function, which will navigate the user to the list page should a change to the model occur.
Thus, with this change, the user can now manually attach the internal ID of the record they wish to view directly to the end of the URL and they will be taken to the page where they can view it. But this doesn’t make for a good interface, does it? So what I did was modify the details view so that it passes the internal ID of each record to the template; with this data I can generate buttons in example_suitescript_details.tpl.
Now, when they click that button they’re taken to the edit page for the record and the final part of this is to populate the form fields with the data for that record.
Standard form markup lets us do this via the value attribute. Thus we can pass the values from the view to the template and simply have them pre-populate in the inputs, ready for the user to modify.
To accompany this, we also have a isNew value that we can use to determine whether the user is creating or editing a record, which is super handy for showing different values on the page. In our example, this equates to changing the text of the title and of the submit button. They’re small things but mean that we’re able to reuse a template, which is neat. We also use this check in the view to change the wording of the breadcrumbs.
And now this means that we have a page that can be used to create and display custom records on our site.

So all that’s really left is to sort out how to update and delete custom records.
Update Records
The process of updating a record is like creating a record. To see the changes, open ExampleSuiteScript@1.0.4 and do a diff.
In this version of the module, we can see only one change that is to the update method in the backend model. Upon inspection, you’ll see that it is remarkably similar to the create method.
The first crucial difference is the parameters. In addition to the form data, we also pass it the ID of the record. This makes sense: when you create a record, the ID is generated automatically by the system; when we’re updating the record, we need to know which record to change.
The second thing is that we use nlapiLoadRecord to define the record template, instead of nlapiCreateRecord. It takes the ID we provided the function and uses it to gather the record. After that, it’s essentially the same (although, of course, we don’t change the owner of the record).
And with that, it means we can change the value of records.
Deleting Records
The backend aspect of deleting records is very easy, you simply issue a delete command via nlapiDeleteRecord. However, it is the frontend aspect of it that makes it slightly more complicated.
If you take a look at ExampleSuiteScript@1.0.5, you’ll see what I mean. In NetSuite Commerce, we tend to avoid to popup-like functionality but there are instances where they are appropriate. Consider this: popups are very intrusive, they interrupt the user’s experience of the website and demand immediate attention. In this sense, a popup is warranted; except, we don’t refer to them as popups in the code, but confirmation views instead.
We have a standard confirmation view that you can invoke in your functionality that ensures the process of adding them to your code is easy, and that the experience to the user is consistent throughout the entire shopping journey.
So, therefore, there are four files we need to modify to make this happen: the list view, it’s template, the details template, and the backend model. We already put in changes to the service controller already, so that would have been a fifth file change we would need to make.
Starting with ExampleSuiteScript.List.View.js, you should see that we’ve started by introducing a new dependency: this is the standard confirmation view that I mentioned.
Further down, we have two new functions: one to trigger the confirmation view (removeRecord) and the other to handle the removal of the deleted model (removeModel).
The trigger function follows the pattern of what is defined by the global confirmation view. You’ll see that it’s intercepting the event of clicking the button and then using that to build a new confirmation view. It’s pretty self-explanatory but note that we’re passing stuff to the other function via the callback, and that we’re passing it in the requisite details via callback parameters. The callback is essentially a command to run another function after this one is done (ie, we want to actually delete the model, not just create a popup for it). Then, the last bit is a fancy bit of code that uses our standardized way of triggering it to appear in a modal (popup).
The handler function simply takes the details it’s been passed and then invokes model.destroy(), which is tied to the backend event of deleting a record. We also added some code to the initialize statement — this creates an event listener for the events specified but, crucially, for when the model is removed from the collection. When triggered, it runs the view’s .render() method, which means that the list will refresh — no longer showing the deleted model in the list.
The event of clicking a button in the template is tied to the view by the events object. You can see that we’ve got the event and its selector, which is then mapped to the trigger function. So now we need to put the button in.
The button goes in example_suitescript_details.tpl and you can see it’s marked up with two attributes: one that we use as a our selector in the events object, and the other that contains the internal ID of the record it represents. If you remember in the confirmation view constructor, we passed it the ID in the callback parameters? Well, this is the value the jQuery reads (id: jQuery(e.target).data('id')). It’s the simplest way of passing a particular record’s ID from a details template to a list view.
Then, in example_suitescript_list.tpl we need to add another column to our table to accommodate it. We do this, but notice that we use the colspan attribute to expand the header of the column so that it encapsulates both the edit link and the delete button.
And that’s kinda it, really. You now have a fully functioning module where you can create, read, update and delete custom records in NetSuite! We didn’t ‘finish’ the module with styling and validation, but provided the bones for explaining how to deal with records with SuiteScript.
Manually Writing Your Own Service File
As previously mentioned, before we introduced service controllers, all service files had to be written by hand. If you truly wish you can continue to do this; however, we advise against this and only suggest its use if you want to maintain backwards compatibility with code written before the introduction of Vinson (although we would recommend updating it).
Check out ExampleSuiteScript@1.0.6. First the small changes: we had to change the ns.package.json file to remove the entry that automatically generates the service file, replacing it with an entry for the services directly.
Not included in the diff is a change to the distro file, where we replace the entry in the ssp-libraries object with ExampleSuiteScript.Model.
With that out of the way, take a look at ExampleSuiteScript.Service.ss. You’ll note that it looks a lot like a standard JavaScript file, that is, without the accompaniment of a define statement. We do, however, have a dependency: we’ve ‘required’ the Application module, which we’re going to use as a way to handle the data and send responses.
Compare this file to the handle function in SspLibraries > ServiceController.js — this is the crux of what the service controllers replace when they usurped manually written service files.
You’ll see that instead of listing out each method using a switch, we just have a handler that checks if it’s a valid method and then executes and it’s code.
Overall, the service controllers do a lot more work and make things a lot more easier for us when it comes to handling HTTP methods. They allow us to execute events, which are built in standard, and generally make our lives easier. Unless you have a specific reason for needing to write a service file manually, you are better off using service controllers.
The Commerce API
In the backend model, you’ll note that I included a dependency, Models.Init, which I named CommerceAPI. None of the code included in the module uses it, but I thought it would be an interesting thing to include.
The commerce API is like some SuiteScript that’s built into the NetSuite Commerce code. You can read about it in the documentation. It provides a number of useful shopping objects and functions that you can use to get and set data from the frontend without having to figure out how to do it with vanilla SuiteScript.
It has access to information about the current shopping session, user (more if they’re logged in), and the current order (ie the contents of the cart). For example, we can use it to get and set the user’s address details, or to update the contents of the cart.
It’s kinda hard to write a tutorial around this API because they all have very defined functions. However, you can take a look at existing backend models that use the commerce API to get a sense of it, and whether you should use it. For example, the Address module handles the getting and setting of the shopper’s addresses. Alternatively, you can take a look at the Profile module, which gets and sets a lot of data associated with the user’s personal details.
Other Uses for SuiteScript Files
Running JavaScript on the backend isn’t only for accessing data stored in NetSuite and using the SuiteScript API. It also gives you the opportunity to run what you might call ‘arbitrary’ JavaScript too.
The NetSuite Commerce application is powered by JavaScript. Given this reliance, there are a lot of processing overheads that go into the final user experience and these overheads can add up and take a toll on the user’s device. Where possible, therefore, you should consider whether it is more efficient to process the JavaScript on the backend rather than the frontend. In other words, consider whether the user’s device needs to do the hard work, or whether it can be done on the NetSuite servers and then sent to the frontend after computation.
Outside of performance concerns, you can also think about privacy, security and secrecy. The contents (code) of SuiteScript files need not be exposed to the frontend which can be particularly useful if that’s what you want to achieve.
A good example might be some sort of competition functionality. A crucial aspect of this functionality might be random number generation (RNG), which would give a fair chance to all participants. If we ran the RNG on the frontend then there was a chance that users could manipulate the result to get the one they wanted. However, by running the code on the backend, we can be reasonably certain that it can’t be manipulated.
Another example could be third-party API secret keys or passwords. You should obviously try to keep your passwords as secret and keys as possible, but sometimes it is necessary to send them to a third-party in order to authenticate with their system. You should securely store your secret keys, which includes not exposing them to the frontend code. By sending a request via a SuiteScript file to the third-party, using a securely stored key, you minimize its exposure, when compared to doing this on the frontend.
What these examples illustrate is that SuiteScript can be like a black box — a thing that takes inputs and provides outputs, without showing how they are being processed. This obscurity is a basic level of security. Furthermore, delegating this work to the backend can make the frontend experience better for the user.
Performance and Governance
On the subject of performance, there is something you should be aware of: API governance. You should read the documentation on this matter in the help center, but let me summarize things quickly.
Every time you use the SuiteScript API (ie use any method that begins nlapi or access any object that begins nlobj) it impacts the performance of the servers it operates on. Many of these commands have such a neglible impact that we’re not concerned about it, but there are some that have a significant impact. You can find the exact numbers in the documentation, but you should be mindful.
Every NetSuite user has limits that apply to their accounts. Using the SuiteScript API moves you closer to reaching that limit. Therefore, you should write and execute code that uses the API as sparingly as possible.
A common mistake that people make when starting SuiteScript is to not use a variable when polling the server using methods such as nlapiSearchRecord. In our code above we used the variable search like this:
search = nlapiSearchRecord('customrecord_favething', null, filters, columns);
If we hadn’t and, instead, returned the values we wanted using nlapiSearchRecord three times then we would have ended up making three calls to the server when only one was necessary.
nlapiSubmitRecord vs nlapiSubmitField
Loading, editing and then submitting on a standard record uses 30 units. There is, however, an alternative if you’re only setting one or two fields (and those fields are inline editable): nlapiSubmitField. Again, this is something we discuss in the documentation.
It’s useful in situations where you know that you’re only going to be setting a specific field, maybe two, rather than catch-all scenarios such as a profile update. So, for example, if the nature of our module above where to change so that we created a page where a user could not edit their favorite thing but merely the reason for it, then we could not only significantly modify the interface for it but also the way but also the way we submit data to the backend to update it.
Thus, instead of our current update function, we could have something like this:
update: function (id, data)
{
  this.validate(data);

  return nlapiSubmitField('customrecord_favething', id, 'custrecord_favething_reason', data.favereason)
}
The end result is that we no longer have to load and submit the record, which are both costly operations, and our field still gets updated.
The benefits of nlapiSubmitField multiply when you have to update individual fields of multiple records simultaneously. An example the documentation gives is where you have to inactivate a number of records returned by a saved search:
var records = nlapiSearchRecord('customrecord_oldrecords', 'customsearch_records_to_inactivate');
for (var i = 0; i < records.length; i++)
{
  nlapiSubmitField(records[i].getRecordType(), records[i].getId(), 'isinactive', 'T');
}
As you can see, it’s quite clever: going through each record from the search, plucking out the record type and ID, and then deactivating the record. Seeing as each time you use nlapiSubmitField it only costs 10 units, but loading and submitting a record costs 40, this very efficient.
One final note: just make sure you actually use it on fields that inline editable. If you try to set a non-inline-editable field then your code won’t error, and the system will process it, but it will perform the full operation of loading a record, setting its field values, and then submitting it — costing you the full amount of units.
Permissions and Elevating Them
These can be a tricky thing to get right. The general rule is that whenever something happens on the frontend that requires access to stuff in the backend, it executes with the permissions of the current user. Therefore, if it’s a shopper then it’ll usually be the customer center role.
This will put limitations on the data that they can access. This isn’t necessarily a bad thing: this is deliberate. It is good security to limit a user/role’s access only to areas they will need to access. However, no role specification is perfect and there will be times when a user has legitimate reasons to access records outside of their usual role.
When granting additional powers to users it is best to minimize this as much as often so that they have as granular additional powers as possible for the shortest time possible. How do you do this? The answer is elevated permissions.
Elevated permissions were introduced with the store locator. The functionality relies on querying location records stored in the system, which is not something typically available to shoppers.
The process for elevating permissions usually involves editing the record for the SuiteScript service file that is making the request to the records and selecting a new value from the Execute as Role field. We do this for the store locator and a similar process for the newsletter functionality.
To reiterate, you should avoid elevating permissions. It grants unusual access to site’s data, which could lead to accidental incorrect updates to data or malicious activity. If you do need to elevate permissions then create a copy of the current role, adding only the specific permission you need to do that particular thing. Then, finally, elevate it on the file and not users as a whole.
Final Thoughts and Further Reading
This has been a rather long introduction to SuiteScript and handling data within NetSuite Commerce. It should be enough for you to get started and achieve basics, such as updating your own custom records or fields. Keep in mind what I said about other uses for running JavaScript on the backend: obscurity and security can be vital.
You should also be aware that there are other ways to run SuiteScript on your NetSuite instance, including NetSuite Commerce. For example, scriptable cart is a kind of SuiteScript (known as client scripts) that operates on a live order, which means the shopping cart and checkout on the frontend, and sales orders in the backend UI. This can be quite powerful, especially as it lets you do things which you wouldn’t be able to do with NetSuite Commerce SuiteScript.
When approaching a new SuiteScript project, remember to build it up in iterations like you would other projects. The downside to SuiteScript development is that you can’t run changes on a local server: each iteration needs to be pushed up to the server.
Going forward, there are plenty of ways to learn more complex, nuanced things about this side of NetSuite Commerce, such as:
- Read the SuiteScript API documentation in the help center
- Look through existing NetSuite Commerce code to get an idea of how we have implemented SuiteScript
- Read other articles that feature SuiteScript (but note these may not be appropriate for your site’s version), such as:
- Consider taking one of our training courses
Code samples are licensed under the Universal Permissive License (UPL), and may rely on Third-Party Licenses