Page Types and Layouts
Caution: this content was last updated over 4 years ago
One of the new features of 2019.1 was the introduction of page types and page layout. They empower business users to make changes to their content and presentational changes web stores, without having to go through a developer.
There are two distinct parts that make up this functionality:
- Templates that can be defined by a developer and then selected as alternatives for existing pages (also known as changing the page layout)
- New types of landing pages that can be defined by a developer and then be added via the site management tools
In the first case, you could, for example, create alternative layouts for the product detail pages or standard landing pages, and your content manager can select from these alternative using the SMTs. For example, if you want to create a product detail page where the the main image is on the right instead of the left, then that new definition can be easily added via an extension, and the business user can then select that layout in the SMTs.
In the second, consider these to be similar to the landing pages that you can currently add. However, they need not be limited to something so plain and empty: you can create your own kinds of pages as CCT elements that can be added with their own URL paths. A developer can define fields, for example, that a business user populates each time they add a new instance of the page.
This article will cover both use cases as well include some simple examples demonstrating how to use them. Before we dive into that, I have enlisted the product manager who led this project, Chad Jaggers, to introduce the functionality.
Feature Introduction
Web store managers are responsible for many day-to-day tasks of their web store. Being able to control the look and feel of their site is important, and, working with their marketing team, they want to have the power to change that look-and-feel to deliver the optimal user experience for their shoppers.
Starting with the 2019.1 versions of SuiteCommerce and SuiteCommerce Advanced, web store managers can now access the layout selector via the site management tools.
With the layout selector, you now have the power to select different layouts for each of your landing pages, commerce categories, product detail pages, and many other pages on your site. Selecting a new layout is simple, and since you're doing the task in the SMTs, you can preview what your content will look like in that layout.
Combine the power of the layout selector with the flexibility of the theme customizer and custom content types, and you have near limitless abilities to change how your site looks and feels.
Before Steve looks at it in more detail from a developer point of view, I'd like to highlight some useful features for business users:
- Content is not lost when you change layouts: any content that might be 'orphaned' is automatically moved to a default CMS content area (don't forget to add a
data-cms-default-areaattribute to your main template div!) - Previews are just that — previews! — so you can cancel the change at any time
- Layout changes are fully compatible with content scheduling (visibility dates)
- CMS content blocks can be arranged and moved around if they you don't like how they've been arranged in your new layout
We're very pleased with this new feature, and we will be looking into adding new functionality and enhancements in future releases.
Thanks to Chad and his team for that introduction. Now, let's look at what this means for developers.
Conceptual Discussion
Before we look at customizations, let's take a look at what's going on here.
To reiterate: page templates enable content managers to select alternative layouts for a particular instance of a class of page. An example of this might be an alternative layout designed for product detail pages: as a developer, you create the alternative template and then a content manager goes into the site management tools and selects specific products that will use this new template.
In this case, the alternative layout is applicable only to pages of a particular class (eg ProductDetails.Full.View) but can only be applied to specific instances of that class. We may in the future change its behavior so that it can be applied to all instances of a class as the default, but I cannot say when or if.
So, at the moment at least, this means that your site's classes have a default template defined by path in the view, and its content by the theme. To put it another way, one of the updates in 2019.1 was to add in a number of page types to the SuiteCommerce code, and these definitions point to particular templates in base theme by name.
If you have SuiteCommerce Advanced, you can see examples of how we use them in our source code. For example, see ProductDetails/ProductDetails.js.
This is partly why I talk about page layouts first: I think they're a higher level concept that is easier to understand. You can see that here we, NetSuite, are enabling the PDP to become a page type in two ways: one for the full view (ie when a shopper goes directly to a PDP) and another when it a product is viewed in the quick view modal.
In the context of page layouts, you can see that one of the properties we define when we enable a page to become a page type is that we define the default template to be used. You'll also note that we are pointing to the file name of the template in the theme. You still need to declare a template property in the view, of course, as this page type declaration is for the sake of the site management tools.
From your point of view, as a customer developer, you need not declare core SuiteCommerce pages as page types: let us do this (we maintain a list in our documentation). Instead, you should focus on your own customizations that add new pages to a site. We've covered a lot of tutorials on this site over the years, and had this functionality existed at the time, we might well have added them as page types too.
Page Types, Routes and Routers
Were you paying attention? Did you notice that the above declarations for the product details module includes routes? Isn't that something you do in a module's router?
🤔🤔🤔
Yes, there is an architectural change in 2019.1 with the introduction of page types: they have routers built into them. In order to understand this, you should spend some time looking at the PageType's JavaScript.
If you look at the PageType.Router class, you'll see nothing remarkable: it's just an extended version of the base router. It, however, is fed into the PageType.Component class and it is there that there are a lot of functions to make page types built using it flexible. In other words, we need page types to work with the underlying SuiteCommerce code, the site management tools, and we need to make adding them super easy to configure.
It also means that, starting from 2019.1, there is now no need for developers to use Backbone.Router. All routes should now be handled through page types.
If you have time, I would look at some of the modules that have become page types, such as Quote and ProductReview and see how these changes have affected the code. A lot of the stuff that would normally happen in the router before creating the view (such as creating a model and passing it to the view constructor) is now handled in the initialize() method.
Compare these two bits of code (and where they're located!):
// Old architecture
// This example code would live in a router (2018.2)
details: function (id) {
    var model = new Model({
        internalid: id
    }),

    view = new DetailsView({
        application: this.application,
        model: model
    });

    // ...
}

// New architecture
// This example code lives in a details view (2019.1)
initialize: function (options) {
    this.application = options.application;
    this.model = new Model({
        internalid: options.routerArguments[0]
    });
    // ...
}
routerArguments is a new property defined by the page type component. Just like in a standard Backbone router, when you create a new route, you need to pass it a view. However, you now need to operate on the basis that your view is automatically created, and then you decide what to do in that view — and you do that by plucking out any additional parts of the requested URL, which are passed as 'router arguments'.
For example, if I am creating a route to load a quote record, then I would declare it as 'quotes/:id': 'details' which, as you can see in the old architecture above, would have meant that the id would have been passed as an argument to the details method. This is obviously no longer the case, and so, in the new architecture, we package them up and ship them across in the options object so that they can be plucked out using options.routerArguments and an integer (eg 0 for the first one, like in the quote example above).
Page Types and Views
Anyway, we're now moving towards views so it's a good time to mention that there is also a special base view for page types now. You should take a look at PageType.Base.View to get a sense.
As you may have noticed, if you've already looked at the documentation for creating a page type view, your new customized view returns an extended version of PageType.PageTypeBaseView where PageType points to the PageType.Base.View class. That class itself returns an object where the PageTypeBaseView property of that object is an extended version of a standard Backbone view. This extended view changes the constructor, to automatically include some useful information, but it also has another method: beforeShowContent.
One of the things you may have noticed, which I omitted with ellipsis above, is the fetching of model data. Typically, you would do this and once it has completed then you will run the view's showContent() method to actually render the page. As you might imagine, I'm going to say that this is now handled in the view (specifically, your customized view).
Continuing with our examination of a details view, we then need to add in some additional code:
beforeShowContent: function beforeShowContent() {
    return this.model.fetch({
        killerId: AjaxRequestsKiller.getKillerId()
    });
}
I've talked about the AjaxRequestsKiller elsewhere, and that's not what makes this interesting; no — what's interesting is that we've essentially just re-engineered when/how the data fetch happens.
As we know from dealing with events elsewhere, beforeShowContent can be used to block a view from rendering. But, from a more positive point of view, we can also use it to ensure that our view has its data model before attempting to render the view.
Any view that it used with a page type will have its beforeShowContent called automatically, and the page type view contains a function built into that returns a jQuery.Deferred object that automatically resolves. Therefore, as a developer, you have control over when the view renders by returning a deferred object that has either been resolved or rejected. If you require a data fetch, then this is where you do it; if there's some other thing that needs to be checked/completed beforehand, put it here. Just remember to return a resolved deferred object on success, and a rejected one on failure.
I should point out (I'll mention this later too) that you must only use the base view if you're going to allow your page types to be creatable through the site management tools — otherwise continue using the standard Backbone view. We converted most of our standard modules to use page type functionality, but they are not CMS-creatable, so they continue to use standard Backbone views.
One final thing I want to mention when it comes to page types and views: keep in mind that you're effectively using this to declare 'layout' views; in other words, this is not appropriate for small child views. Remember, we're using this to change the arrangement of the various elements of the page — not change one particular child view.
Example Use Cases Discussion
Now, as we move on from this discussion, I want to demarcate some use cases here:
- Alternative layouts — change the template that a view uses to render a page (either a landing page or an enhanced page)
- New landing page types — also know as 'CMS creatable', this means not just creating a new layout for the existing landing page functionality but creating a new type
- Enabling alternative layouts in custom functionality — creating your own enhanced pages as part of a custom feature, and enabling them to be touched by the SMTs so they can have alternative layouts applied to them
The first two are the most obvious examples, and they're both quite simple.
I've talked about it a bit already, but the first is about offering different options to content managers when it comes to the presentation of existing pages. The changes have already been determined in advance by a developer, and so the administrator just chooses the one they want for the page they want.
The second is a viable and interesting customization avenue. Either as standalone pages, or as part of a larger customization, you can create new types of landing pages. The default landing page is empty, but there's no reason why it has to be that way. What you can do is combine normal SuiteCommerce goodness into a new type of landing page, which are creatable through the CMS. It's that second point that I want to emphasize: this means that a user doesn't need to create a page using the developer tools (eg with routers) or by setting up their code to interpret records and create record views.
Want to retrieve some data and display it in a CMS creatable page? Want the page to be used for a specific purpose like a blog post or event, while also providing the user some structure for that page? Want a kind of landing page that has customizable fields in the SMTs? This is perfect for that.
Finally, there's a more complex example which is like an amalgamation of the two. The idea for this is that you are going to create some complicated feature and you were going to go through the normal process of creating the views, collections, models, services, etc, but you also want to offer the option to allow alternative templates, and perhaps having some of the pages to be CMS-creatable. This is where things start to get complicated!
Example 1: Register an Alternative Template for the Product Details Page
I think a good to test out this functionality is to take an existing page type and create an alternative template (layout) for it.
Before we start, let me just say that I am not a designer so I'm not going to be suggesting a groundbreaking design alternative here — all I'm going to tell is make a copy of the existing template and make a simple change to it.
In my case, I am using the base theme, which means that there are two clear areas of the page. Typically, on the left we have a section used to show the product image, and, on the right, we typically we have pertinent information about the product as well as matrix options and the button to add to cart. For my example, I am literally just going to swap their positions.
To begin, you will need to create or edit a JavaScript file for your web store: this is usually best delivered in an extension's entry point file, which is what I'm going to use.
My entry point file looks like this:
define('Example.ExamplePageTypes.ExamplePageTypes'
, [
    'underscore'
  , 'example_pagetypes_product_details_full_right_image.tpl'
  ]
, function
  (
    _
  , example_pagetypes_product_details_full_right_image_tpl
  )
{
  'use strict';

  return {
    mountToApp: function mountToApp (container)
    {
      var PageType = container.getComponent('PageType');

      PageType.registerTemplate
      ({
        pageTypes: ['ProductDetails.Full.View']
      , template:
        {
          name: 'example_pagetypes_product_details_full_right_image.tpl'
        , displayName: 'Example PDP Alternative Template'
        , thumbnail: _.getAbsoluteUrl(getExtensionAssetsPath('img/rightarrow.jpg'))
        }
      });
    }
  }
})
When we use the page type component's registerTemplate() method, you can see that we have to pass it an object. Firstly, we're specifying what page type (view) we want to provide an alternative for (you can find a list of supported page types in our documentation). Here, we're going for the 'full' version of the product details page (the 'quick view' version is separate). Strictly speaking, this takes an array of possible views, which means that it is theoretically possible to use this opportunity to supply an alternative template for multiple different views (although I am unsure of a situation when you might want to do that).
Then, we define the properties of the alternative template, which takes an object. Note the name property, which must be the file name of the alternative template. Now, I've included the template in question as a dependency to this file, although it is not strictly necessary; but you may find it useful to include it as a dependency so that you can keep track of the file (eg internal auditing), or as an early warning system (eg if you accidentally delete the file).
The other two properties are for the benefit of the content managers using the site management tools: one is a string for the name of the template as it should appear in the SMTs; the other is a link to a thumbnail image for the icon in the SMTs. As with all images in themes and extensions, you can generate the correct dynamic path with a number of helper functions, which is a best practice for assets as it means you don't type in a absolute URL manually. Be sure to read our docs on how to create layout thumbnails, especially as we have a zip file in that doc with some stock thumbnail images you can use.
After we've made our declaration, we can then move onto the template. I'm obviously including it in my extension's Templates folder and I'm using the file name I mentioned above. I'm not going to give you the code for it — all I’ve done is just swapped the contents of the divs that have the classes product-details-full-main-content-left and product-details-full-main-content-right.
With these two files ready in my extension, but I need to deploy them to try them out — you cannot test site management tools changes locally. To summarize, here are the steps we're going to take:
- Deploy the extension
- Activate
- Open the site management tools
- Navigate to a product detail page
- Go into edit mode
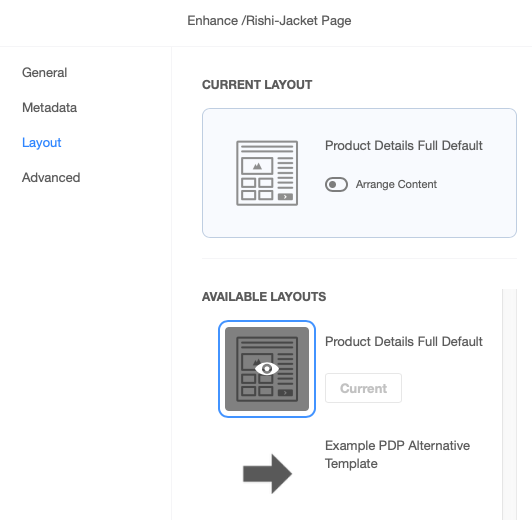
- Click the ellipsis button in the top-right of the page and then Edit Page Settings
- In the Layout section, you can then choose the new layout/template for this page
Assuming everything went well, you should see something like this (the icon is something I have chosen for my extension, but, again, you can choose what you want):
A quick troubleshooting note here: when I first tried out this functionality, I couldn't get my new template to show up as an alternative in the selector. I found that, for some reason, it wouldn't show up in one of my browsers but it would in another. We never found out the reason for this, but if you're having trouble with this: log in to your site's SMTs in another browser and see if it shows up there. It could be a caching issue, so you could also try killing your browser cache.
If you're still having issues, you can call the getPageTypes() method on the page type component to return two objects: layouts and types. The first shows all registered templates on your site; the other shows all page types. If you don't see your template in the first list, and your template in the array for your page type's supportLayoutIds, then you have a problem with your declaration!
Anyway, back on track, after selecting your new template, you should see the page update to reflect the change. If you're happy with this change, push through the change and publish it to the live site. When that's complete, visit the PDP for that product and see the change; for me, it looks like this:
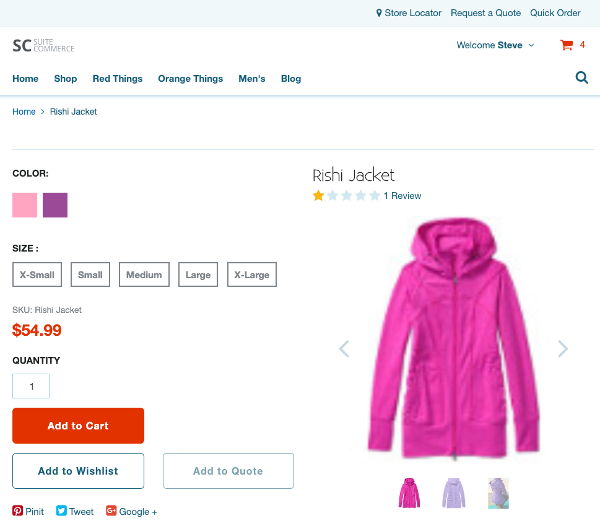
As you can see, I've swapped the content from one side to the other, and it applies only to this item (specifically: this URL path) — so, if I were to visit another PDP, the default template would still be in effect.
And that, in essence, is what registerTemplate() lets you do.
Ideas for Alternative Templates
As developers, this mechanism new opportunities for you to support your site's decision-makers and content managers. Sometimes you may be asked to make a change to a page specific to a situation — now you can create those changes and push them up so that they can make them as ad hoc changes. Of course, this power only extends to individual pages, so if there are cases where this could be automated then you may find yourself having to make the customization at code-level.
However, there are other avenues open to you.
For example, your new template runs in the context of the view that renders it, so you can always add new properties to the view's context object (using addToViewContextDefinition) and only surface those in your template.
You can also add new child views to the main view and, again, only surface those in your new template. You could also make use of the layout component's registerView() method, which lets you make a view available globally (and then just add the data-view attribute in the place you need it).
Finally, don't forget that you can add in containers for CMS objects. You could combine a new template with some custom content types. You could also add some new Sass to your extension, which is only used in your new template.
Example 2: Create a New Landing Page Type
We just looked at how to enable alternative layouts for enhanced pages, when when we changed the layout of a product detail page, so we can now look at the second use case: new types of landing pages.
One thing to make clear is the concept of a landing page. I think this evokes a notion of pages that are quite simple in their nature, like the examples we list in our documentation. It makes me think of standalone pages for help pages, or destination pages with cosmetic URLs used in marketing messages. But this isn't necessarily the case. Just because we say landing page doesn't mean you can't end up creating something as complex as a blog extension, for example. Individual blog posts in this context are landing pages, but the context of a hierarchy and a list page, for example, takes it way beyond the simple concept of unconnected pages.
One of the key aspects of these pages in the SuiteCommerce sense, is that we expect these pages to be created through the CMS. But, again, your new page types don't have to be this way.
Before we look at complex examples, however, I am first going to use a simple example of creating a new type of landing page. But I hope it will get the gears going in your mind about you could use this functionality yourself. It's going to be very plain because I want to show the rawness of it.
Create the Entry Point File
Here is my entry point file.
define('Example.ExamplePageTypes.ExampleLandingPage'
, [
    'Example.ExamplePageTypes.ExampleLandingPage.View'
  ]
, function
  (
    ExampleLandingPageView
  )
{
  'use strict';

  return {
    mountToApp: function mountToApp (container)
    {
      var PageType = container.getComponent('PageType');

      PageType.registerPageType
      ({
        name: 'pagetype_example_landing_page'
      , view: ExampleLandingPageView
      , defaultTemplate:
        {
          name: 'example_page_types_example_landing_page.tpl'
        , displayName: 'Example Landing Page (Default)'
        }
      })
    }
  }
});
If you've been paying attention, there shouldn't be anything surprising here. One thing you may have noticed though is that we are not defining any routes: you do not need to do this for CMS-creatable landing pages.
If you plan to use the new page type to create new landing pages through the CMS, then you can define the base URL path as part of the CMS page type record, and the individual pages' URL fragment as part of the page record.
So, for example, if you were going to create your own blogging functionality then you could configure it like this:
- CMS Page Type Record > Base URL Path — blog
- CMS Page Record > Path — /welcome-to-my-first-blog-post
The built-in power of the tools will build this into the final path of shop.example.com/blog/welcome-to-my-first-blog-post. Therefore, you don't need to define routes at the router level.
Anyway, we're getting a little ahead of ourselves. There's nothing else controversial in this file, so let's move onto the view.
Create the View File
define('Example.ExamplePageTypes.ExampleLandingPage.View'
, [
    'PageType.Base.View'

  , 'example_page_types_example_landing_page.tpl'
  ]
, function
  (
    PageType

  , example_page_types_example_landing_page_tpl
  )
{
  'use strict';

  return PageType.PageTypeBaseView.extend
  ({
    template: example_page_types_example_landing_page_tpl

  , initialize: function initialize (options)
    {
      this.pageInfo = options.pageInfo;
    }

  , getContext: function getContext ()
    {
      return _.extend(this.pageInfo
    , {
        myTestString: 'This is a test string I added in the view'
      });
    }
  });
});
So, this is the page type we specified in our entry point file to be rendered for each and every page of our newly defined type.
I think the important thing to keep in mind for this is that if your new pages are CMS creatable then you will need to use new page type base view. The recommended practice is to add the PageType.Base.View as a dependency and then name it PageType. From there you can extend the base view class itself, which is a name property of it.
We've already talked about how you can use beforeShowContent() to do stuff to block showing the page content; however, our simple example doesn't require any extraneous data so we're not using it. Any data saved to the page record itself (ie its custom fields) will be automatically loaded.
When it is loaded, it is passed to the view in the options to the initialize() method. You can see that is named pageInfo. This data is specific to the new page type views, so you will get errors in your developer console if you try to use the page type base view without first providing it with data from the CMS. So, be careful how you use this view.
Anyway, the object will contain all of the standard fields associated with the record: things like the header, URL, name, title, etc, which is all determined by the values set when creating the record (through the CMS). However, some of the customizability of this comes in the form of the custom fields you want to add.
When you set up your new custom page type, you will need to create a new custom record to store the data in. When you do so, you'll obviously have the freedom to define what fields you want to associate with it. Again, once you have set up this custom record and associated it with your page type record, the fields will automatically surface in the site management tools. Their names and values are sent in key/value pairs along with the rest of the data in the fields object for you to use.
I'm assigning options.pageInfo to this.pageInfo so that I can use it within the view.
With that data, the next thing to do is to send it to the view context object. Now, there are obviously loads of ways to get this data to the template:
- Just return
this.pageInfo - Manually create an object with the properties and values that we explicitly want
- Use
this.pageInfoas a base object, extend it with any additional properties we want to include, and then return that
I've used the third one because it's the cleanest and most flexible, as it allows you to whatever extra values you want. You do you.
Create the Template
Again, I'm not going to do anything fancy for this demonstration, I just want to show you that it's possible to surface the data from the record to the view, and then to the template.
<div class="container">
    <h1><strong>Header:</strong> {{header}}</h1>
    <p><strong>Test string I added to the context object:</strong> {{myTestString}}</p>
    <p><strong>Name:</strong> {{name}}</p>
    <p><strong>Title:</strong> {{title}}</p>
    <p><strong>URL:</strong> {{url}}</p>
    <p><strong>Field 1:</strong> {{fields.custrecord_example_landing_page_field1}}</p>
    <p><strong>Field 2:</strong> {{fields.custrecord_example_landing_page_field2}}</p>
</div>
This will just print out a short list of the field's values. Note the fields object — all custom fields attached to your page type's custom record (which are completed in the SMTs) are surfaced in this object.
Create the Record Types
That's it for the code. Now, in order to get this work, we will need to create two records:
- A custom record type that will be used to store the data of the pages' fields each time a new one is created
- A custom page type record type that will be used to show the option in the site management tools
When creating the custom record type, there is nothing particularly special about it, to wit:
- Name/ID — (whatever you like)
- Access Type — No Permission Required
- Fields — (whatever you like, but I created two text fields called _example_landing_page_field1 and _example_landing_page_field2)
Remember, to add the fields, you'll need to first create the base record type, save it, and then edit it again.
When you have the main record set up, you will then need to create the page type record and have it associated with that.
To do that, you go to Lists > Web Site > CMS Page Types > New. To define your new page type record:
- Name, Display Name, and Description — (you can set this to whatever you like)
- Base URL Path — (if you want each new page's URL to have a prefix then you can set it here, but note that going to just that base URL path will, by default, return a 404)
- Custom Record Type — (select the custom record type you just created)
- CMS Creatable — Yes
Setting a base URL path is a way of namespacing your new content. For example, if you were going to create your own blog extension (hey, just use ours instead!) then you could create the base URL path of blog. Just note that if a user were to go that URL (eg shop.domain.com/blog), it won't return anything. You are also (at the time of writing) prevented from creating a landing page that has this exact URL — if you want to something for that page, you'll likely need to create a router for it.
Deploy, Activate and Test
At this point, we're ready to test it out. Save all your files and deploy them up. Activate the extension.
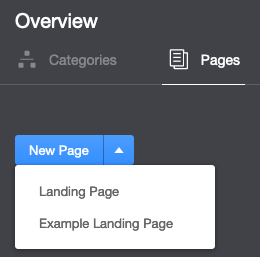
When it's done, you'll need to open up your site's site management tools and then head over to Overview Mode > Pages. In the New Page dropdown, you should see Example Landing Page (or your whatever you named your new page type) in the dropdown as an option:
When you click it, you'll see the SMT interface change to the familiar editor: input the values for your fields! Set the standard values of name, URL path, heading, etc, but also add values to your custom fields.
Save the page and publish it.
When you visit the page URL, you should see something like this:
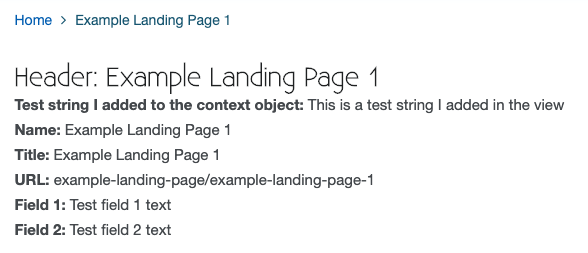
You'll also note that it automatically generates the crumbtrail. Great stuff!
Advanced Customizations
Moving forward, I think we've shown the two key aspects here: providing alternative layouts for enhanced pages (like the PDP) and creating new types of landing pages. But there are other ways to use this functionality.
One of the crucial things that the page type / layout selector functionality has delivered is a change to routers and the handling of routes. As mentioned above, this has meant that we now rely on the idea of page types within our source code, instead of the router class itself.
This means that you can now create new features that uses routes, you should consider using page types as their basis. The grand benefit is the first one we explored: alternative layouts. By building page types into this sort of functionality, you could at least the lay the foundations for future development of page layouts.
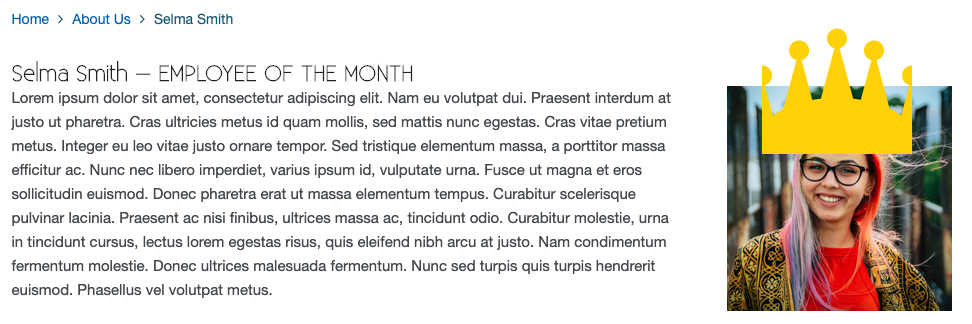
For example, consider that you were writing an extension that added an 'about us' feature to the site (ie an employee list); you would could have one page type for the landing page that showed a list of people who worked in your organization, plus another page type for the pages that show details on individual staff members. The first might not have a need for alternative templates, as they'll likely only be one instance of this page per site, but you could have multiple templates for the second type.
And the alternative layouts don't necessarily have to be purely design driven. You could use them to highlight particular pages for functional reasons. One idea I had in conjunction with the employee list was to add an alternative layout so that one particular employee could be designated as the employee of the month. This could make a small design change (give them a crown?) and perhaps some additional markup, such as explicitly saying that they're the employee of the month. This wouldn't need a change to the data in the custom record, or for the developer/designer to deploy a new template; the change could be made entirely in the site management tools by simply switching the layout.
You also don't have to allow these records to be CMS-creatable in order to take advantage of them. You can keep your feature as close to the 'old school' methods as you like, but swapping in a page type for the router could open up new customization avenues down the line.
About Us / Employee List Example
Before I begin, I want to be clear that I'm coding it in this way in order to demonstrate some additional customization avenues open to you that you may wish to use, depending on your design requirements:
- Pages that are not creatable via the site management tools but can still take alternative layouts (ie enhanced pages)
- Using page types instead of routers
- Intercepting router arguments and using them, for example, to fetch data about a particular record
- Using
beforeShowContentto delay page loading until the model or collection has completed its data fetch - Offering alternative layouts for non-design reasons
I am wary of the length of this blog post already, so I will try to be brief by cutting out a lot of steps (sorry!). If you're interested in all the code, I've made them available in GitHub. Comments will reference this code, so you may want to take a look.
Non-CMS-Creatable Pages
As previously mentioned, one way we divide pages is to specify whether they can be created via the site management tools or not. These are typically referred to landing pages and enhanced pages. To decide when you might want to prefer one of the other, consider whether it is something you want content managers to do through this interface (or whether they should use the backend record creation interface), or whether the data is created by another means.
For example, we certainly wouldn't expect a new product details page to be CMS-creatable because these pages are created based on complex item data in the backend. In my example, I have made the employee list detail pages (ie the pages for individual members of staff) not CMS-creatable in order to demonstrate the router arguments, but they could be converted to be CMS-creatable.
A crucial thing to keep in mind is that if you are not making them CMS-creatable, and you are using a version of SuiteCommerce Advanced older than 2020.2 then you must not use the page type base view (ie use the standard Backbone view, or whatever view you require). If you do use it in 2019.1, 2019.2 or 2020.1, your pages will error trying to retrieve the
pageInfoobject, which won't exist. SuiteCommerce sites must use the PageType.Base.View class for all page types.
Even if a page is not CMS-creatable, you can still swap out the template and use an alternative layout via the layout selector (like we did with the product detail page earlier).
Using Page Types as a Router
When you use registerPageType(), you can pass in a routes array which works similarly to how you would normally handle routes except that you are now expected to do a lot of the normal router stuff in the view, rather than before the view is created. I talked about this at the top of the page, but in the context of my example, we can see that I've registered the list view and the details view as page types, and assigned them routes. For example:
PageType.registerPageType
({
  name: 'pagetype_aboutus_details'
, view: AboutUsDetailsView
, routes: ['about-us/:id']
, defaultTemplate:
  {
    name: 'example_page_types_about_us_details.tpl'
  , displayName: 'About Us Details View (Default)'
  }
});
What will happen when the router is triggered is that it will load the details view straight away, passing the additional parts of the URL (ie :id) as part of the options. When we get to the details view itself, it is here that we begin to process this data.
In the details view's initialize() function we have:
, initialize: function initialize (options)
  {
    this.application = options.application;
    this.model = new AboutUsModel
    ({
      internalid: options.routerArguments[0]
    });
  }
As we're not using the site management tools to do the data handling for us, we need create and instantiate a model. Having defined this elsewhere, you can see that we construct one, passing it the first router argument, which will be the ID number of the record. When the model has been constructed, we need to do a fetch, which you can see we do in beforeShowContent():
, beforeShowContent: function beforeShowContent ()
  {
    return this.model.fetch({
      killerId: AjaxRequestsKiller.getKillerId()
    })
  }
Remember, you can have whatever you want in this function as long as it returns a deferred object. Also note that this particular view extends the standard Backbone view, which also supports this method.
Offering Alternative Templates for Non-Design Reasons
The reason I bring this up is because I think the primary reason for introducing alternative layouts is so that site managers can make design decisions about how they want particular pages to be laid out.
In my example of an employee list, I have decided that site managers should be allowed to change the template of an employee detail page in order to recognize that that employee is the current employee of the month. The template changes the text the of the header to say that they are the employee of the month, and it also renders a crown over their image (with the help of some Sass).
You can see that in the entry point file, I have registered an alternative template which contains our text and the elements necessary to draw the crown (I have already added the required CSS to the Sass file).
Using the layout selector in the site management tools, I can then easily swap out the template for the employee who deserves the accolade.
Summary and Tips
So, in summary, I'm sure you'll agree that there are lots of new avenues open to developers with this technology. Broadly speaking, there are two main paths:
- Create new types of landing pages, so that content managers can create them through the site management tools
- Create alternative layouts for landing and enhanced pages, so that content managers can choose the template they want for particular pages
In addition to demonstrating these, I've also produced an example that takes a look at some more advanced customizations that you could make. For example, you could simply build page types into your next feature so that it enables layout selection. When creating an employee list, I built in an additional template so that content managers could select a particular employee to mark as the employee of the month. While it certainly changed the design of that page, it wasn't for design reasons per se.
There's plenty of new code and classes to deal with, so you should familiarize yourself with them: the new extensibility API component and methods, the new page view base class, and how we've integrated them into all (most) of our internal features so that you can now begin to add your own alternative layouts to base views.
Finally, let me leave you with some troubleshooting tips based on my own experience.
Browsers and Testing
While experimenting with this feature, I noticed that shortly after adding a new page type, it didn't show up and I thought that it didn't work. It did work but the old list of page types was cached in the browser I was using; either do a hard reload or kill the browser and start afresh. I normally keep the SMT tools open in a private browsing window so that it's easy to kill the cache / restart should I need to.
Testing a Registered Type or Template
On a similar subject, you can use the getPageTypes() method on the page type component to get two objects back: one is a list of registered layouts and one for registered page types. If you don't see your newly defined template/type in these objects then you will need to take a look at your definitions to see if they are correct.
Error: Cannot read property 'get' of undefined
This is a very generic error, but in the context of page types I found that it is usually related to the use of the page type base view without creating the necessary records through the site management tools. In other words, if you are using the base page type view then you must use them for CMS-creatable pages, otherwise you will get this error. If you're not using the SMTs to create pages, use the standard Backbone view instead.
Should I Use Backbone.View, SCView, or PageType.Base.View?
In the 2020.2 version of SuiteCommerce and SuiteCommerce Advanced, we made some changes to views, including introducing the SCView class to the extensibility API.
Firstly, SCView cannot be used as the view that is registered as a new page type. Therefore, if you are using SuiteCommerce or SuiteCommerce Advanced 2020.2 or newer, you must use PageType.Base.View in all scenarios.
Secondly, for SCA versions 2019.1, 2019.2 and 2020.1, you can use Backbone.View as part of your page type, if you wish, but only if you do not want new pages to be created through the SMTs. If you do want to allow users to create new pages in the SMTs, you must use PageType.Base.View.
Documentation
Finally, before embarking on a page type project, I would read the myriad documentation on what we've discussed:
- Create Page Types and its children
- Register Page Types and Templates for SMT and its children
- CMS Page Type Record
- Page Type Component
Code samples are licensed under the Universal Permissive License (UPL), and may rely on Third-Party Licenses