Get Started with Version Control (Git)
Caution: this content was last updated over 4 years ago
Version control systems track changes in a specified directory. For NetSuite Commerce, this means that you formalize code changes so that they are easy to track, easy to manage across teams, and back out changes should things go awry.
When getting started with developing on any coding project — not just NetSuite Commerce — it is a good idea to start version control from the moment you get the source code. Starting early will give you the longest view back home, should you find yourself lost later on.
What do I mean by this? Consider four key benefits I think version control systems (VCSes) offer:
- Collaboration — if you have more than one developer, you’ll instantly become aware of a problem where there are suddenly conflicts and overwrites. With version control, you can work concurrently and then merge in the changes.
- Accountability — ever wondered how and when things changed? What about a complete history of a particular file? VCSes track changes and associated metadata, giving you line-by-line details about how things changed at particular points.
- Freedom — OK, this is quite an abstract concept but VCS can act like a safety net: you can make radical changes, save in incremements and not have to worry because, in the end, all the changes are reversible.
- Backups — you should always back up your code, and VCSes can save the day should the worst happen and you lose the latest version of your code. This can be particularly powerful when your repository is saved on a third-party cloud service.
There are plenty more benefits, and given how easy it is to get started, I think it’s a no-brainer for developers about to embark on building a web store. Even if you’re a solo developer, I would still recommend using version control — you never know when someone else might join the team, or you might need to hand over the project (eg if you leave your organization).
If your web store is already live and mature, no problem! You can always start your repository with the code how it is. The best time to start is always today!
For the purposes of this tutorial, we will talk about an open-source and popular VCS, Git.
Note that Oracle NetSuite does not formally recommend Git over any other version control system, it is being used here as an example.
Before using Git, review its license and assess whether it is right for your organization.
What is Git?
Git is the most widely used version control system. From a personal point of view, I find it does the job effectively, is easy to use, and, given its ubiquity, there’s no shortage of resources and services available to help you and complement what you’ve set up.

When you initialize Git in a project, it begins tracking your changes. That directory becomes a ‘respository’. This repository can then be distributed to other collaborators from a central place. This allows multiple collaborators to work at once, in sync with each other.
There are plenty of resources available on the internet that go into much more detail about it, and how to use it, but for now I am going to focus on the basics.
When you initialize Git in a project, it begins tracking your changes. That directory becomes a ‘respository’. This repository can then be distributed to other collaborators from a central place. This allows multiple collaborators to work at once, in sync with each other.
Get Git and Set It Up
Many third-party services offer GUIs for Git, and they are just fine, but, as so many of NetSuite Commerce’s developer tools rely on CLIs, we will be using the CLI version of Git too.
To get Git, visit git-scm.com/download and get the latest version for your computer.
After installation, head over to the NetSuite Commerce source code directory you want to begin tracking. For older versions of SuiteCommerce Advanced, this will just be your SCA directory, but SuiteCommerce newer versions of SCA and can also version their themes and extensions.
When you’re in the directory, initialize it with git init:
git init
Initialized empty Git repository in /Users/sgoldberg/SCA/.git/
This means it’s ready to go.
Check the Status
You can then run git status to see what files and directories it has found. (Note that this can be used at any time in your development lifecycle to check the status of your changes.)
git status
On branch master

Initial commit

Untracked files:
  (use "git add <file>..." to include in what will be committed)

        SC_19.2_Live/
        package-lock.json
        third_parties/

nothing added to commit but untracked files present (use "git add" to track)
- On branch master — Git supports a concept of ‘branching’ where code changes can be worked on separately and then merged in later, keeping the master branch (ie the primary branch) clear of unfinished work
- Initial commit — a commit is a record of a change (thus it is saying that we are at the first point in its creation)
- Untracked files — this is a list of all files and directories it has found that are currently not being watched for changes
- nothing added to commit… — before committing work, you must specify which files you want to record as changed (you can modify files without committing the changes, if you wish)
Ignore Files
Before we track and commit files, it’s important that we first specify the files that we want Git to deliberately ignore. These paths and files are stored in what’s called a gitignore file.
We want to do this because there are a lot of files within the source directories, and most of them are not important to the code itself because they are, for example, library files of the tools (such as the Node modules) or generated files (such as distribution directories of the site, theme, or extension we are working on).
All we need to track, generally speaking, is the source code that will derive the final output code.
If we were to include all files, our commits may end up getting quite noisy, which might make it hard to look back and see what important things had changed, and our repositories will take up a lot of space, which may cause problems with where we’re going to store it and in the bandwidth that we have.
In any case, it’s unnecessary, so let’s just explicitly tell Git to ignore them!
To do this, create a file in the top level of the directory you ran git init in. This must be named .gitignore (note the period at the start of the name).
In this file, we need to provide patterns that Git can use to find the files we want it to ignore.
Because SuiteCommerce Advanced code structure has changed over time, we cannot provide an exact template for each version, so the following applies to 2019.2 only. You can adapt it to suit older versions, the theme developer tools, or the extension tools, by referring to the Git documentation.
# Ignore everything
/*

# Except the SC_19.2_Live and third_parties directories
!/SC_19.2_Live
!/third_parties

# Ignore everything in SC_19
/SC_19.2_Live/*

# Except Advanced, Backend and Commons
!/SC_19.2_Live/Advanced
!/SC_19.2_Live/Backend
!/SC_19.2_Live/Commons
The lines starting with a # are comments — I’ve added them in to explain what’s happening at each part.
Remember, this file operates as a block-list, which means everything will be permitted unless it matches here.
So, in order, we are telling Git to:
- Ignore everything
- Make an exception (
!negates) for two of the code directories - Ignore everything in SC_19.2_Live
- Make an exception for three of the code directories
Make sure you save file.
Track Files
We want to start with a commit — a record of how the files are at the beginning — so, the next step is to tell it which files to track. The only files that can be tracked will be the ones that pass the test we have just set in the gitignore file we just created.
The command to add files to the tracker is git add followed by the path to the file or files. To track all files in the directory, you use put a period as the path: git add ..
Files continue to be tracked for each commit until you tell Git to stop tracking them. Also note that if you create new files, you will need to tell Git to start tracking those too.
After running that command, run git status again: it will tell you about the files that are ready to be committed.
Commit Files
To record changes to files after adding them, you need to use git commit. No changes will be recorded until you commit them, so it’s important to remember to track files and commit them at periodic points (milestones, or perhaps even at the end of a day).
Let’s make our first commit:
git commit -m "Initial commit"
The git commit command takes a number of flags, and the -m flag indicates that we want to attach a message to the commit — I would strongly recommend that you always do this so that you have a written description of what you’ve changed.
Diffing
An important feature of VCSes is that they have tools to show what has changed. To see these deltas, you can run git diff. You can specify a directory or file path, if you wish, and see results for only that specific folder/file.
Note that git diff (without options) will return uncommitted changes. You can diff commits, but this requires you to inspect the log first and get the commit hashes for the two commits. To do this, run git log, and you’ll see something like this:
commit 8317863be090e34189dc30c11f62c20c3ebe9087
Author: sgoldberg <myemail@example.com>
Date:   Tue Mar 24 13:08:15 2020 +0000

Removed console log

commit 8d9d3718b97beaf12ec5ef4ffb6423269c422bdf
Author: sgoldberg <myemail@example.com>
Date:   Mon Mar 23 20:59:35 2020 +0000

Initial commit
Each section represents a commit. The hash strings are quite long but most CLIs let you select them by double-clicking them, but also note that Git can also recognize diffs by using the first 5 characters from the hash.
To diff them, run a command like this:
git diff 83178..8d9d3
If your diff is long (eg many lines or files affected) then it will page the results, which you can go through by pressing enter. Use q at any point to quit the diffing operation.
Remote Repositories
In order to foster collaboration and support the robustness of the backup, repositories can be hosted on a another machine and act as a server. Some large organizations will host these remote repositories themselves, but a lot of people use third-party services.
In addition to providing a place to store a copy of your code, these services will offer additional tools such as easy-to-read diffs, and the ability to step through commits and branches with ease.
Two popular services are Bitbucket and GitHub. There are important differences between the two, and should you use either of them, you should evaluate which one is best for your organization.
An important thing to keep in mind is that if you are going to use a service like this, you must restrict access to it; for example by setting it private or by setting up an access list so that only people within your organization can access it.
For the purposes of this article, I’m going to use Bitbucket. If you are too, you must sign up for an account and agree to their terms of service.
Note that Oracle NetSuite does not formally recommend Bitbucket over any other remote repository service, it is being used here as an example.
- Sign up for the service
- Create a repository, making sure to set it to private
- Then, on the page for setting up your connection to your remote repository, read the instructions and copy the commands
- Run the commands from the root folder of your local repository
The commands will look something like this:
git remote add origin git@bitbucket.org:sgoldberg/sca-mysite.git # connect your local repository with the remote one
git push -u origin --all # pushes up the repo and its refs for the first time
git push origin --tags # pushes up any tags
The commands will give you feedback about what happened but, after completing successfully, you will be able to see your code on the service.
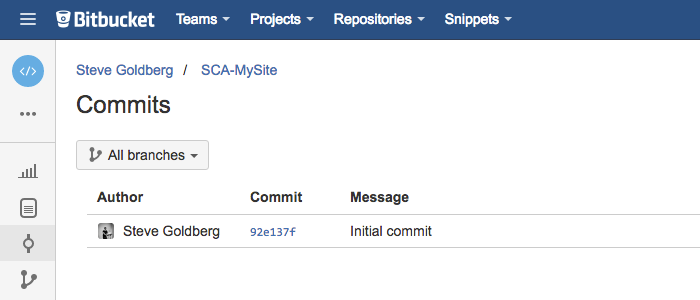
If a new developer needs to access this code for the first time, they can either download the saved source from the Bitbucket UI and overwrite their local version (ie from a fresh developer tools installation), or they can use the git clone command and then copy over all of ‘tools’ part of the developer environment.
Pushing and Pulling Commits
As your remote repository acts as a clone of your repository, there will come times when you will need to sync them — this is true whether your team is just you, or if there are many of you. To do this, you do git pull to get new changes from the remote repository if it is ahead of your local copy, and you do git push to send any new changes to the remote repositories if it is behind.
If you operate your remote repository as a simple backup in a solo developer team, then this probably won’t cause any headaches as you’ll likely be operating the remote repository as simply a backup of your local copy. However, this can grow more complex when there is more than one person involved.
Collaborating
There is myriad advice online about how to use Git effectively across a team of multiple developers, so I would encourage you to seek it out. I have included some pointers below.
Branching
Branching is useful for a developer wants to work on a new feature, and the development team wants to keep the master branch clean. Branching adds a number of new functions and features (such as pull requests) which allow for easy reviewing and code management.
When work on a branch is finished, and it has been reviewed (usually by another developer), it can then be merged into the master branch, ready for other developers to get and use (and pushed to the production instance!).
Branching also has benefits for solo developers too. Because you may want to work on multiple features or changes at once, you can create branches for each bit and store changes related to those specific parts in each branch. For example, say you were working on a branch related to some changes you were making to the header, and then you need to quickly make some changes to the cart, then you can create a new branch from master for your cart changes, switch to that one, and then proceed from there. The existing changes on the header branch are stored separately and won’t affect the cart branch and vice versa.
Here are some commands:
git branch— when used by itself, it will list all available branches, but if you follow it with a string, it will create a branch with that namegit checkout— when you follow the command with a string, it will change your local context to the branch you specified
Pull Requests
When you push your branch up to the remote repository, you can create a ‘pull request’, which means that you are formally requesting the branched code be merged into the original (usually master) branch. The pull request acts as like a master commit for all the changes, and can contain additional meta data such as a title and description.
This feature will give the reviewer a diff of all the code changes, a log of the commits, and a number of additional details about the changes.
Summary
To illustrate what was covered here, let’s go through a happy path example of a customization development lifecycle. For example, if I wanted to make some changes to Header.View, then I could:
- Make sure my local repository is up-to-date with the remote one by doing
git pull - Make a new branch called header-changes by doing
git branch header-changes - Change the tracking location to the new branch by doing
git checkout header-changes - Make my changes to the files
- Commit changes using
git commit -a -m "Extended the header view context object"(making sure to usegit add .first, if I created new files) - Use
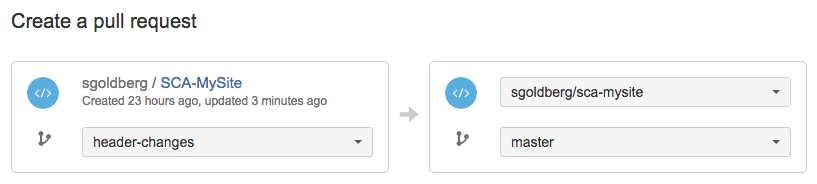
git push originto send the branch up to the remote repository - In the Bitbucket UI, create a pull request to indicate I want the branch to be merged into master branch
- Get someone else then logs in and reviews the pull request (eg the code diff, title, description, etc) and, if they’re happy with the change, they click Merge and add the code changes to the master repository
- Tell my colleagues to run git pull on their devices to ensure they get the latest version of the code
- Run
git checkout masterto return to the main branch and thengit pullto make sure my master has the latest updates - (Optionally) delete the now obsolete feature branch by running
git checkout -d header-change
Code samples are licensed under the Universal Permissive License (UPL), and may rely on Third-Party Licenses