Develop a Custom Content Type as an Extension
Caution: this content was last updated over 4 years ago
If you’re new to extensions or custom content types (CCTs) this tutorial will cover the basics of both. Using the extensibility API, we will plugin in a new content type into the site management tools (SMTs) which a business user can then add to any product detail page (PDP) they like.
The SMTs come with a number of built-in content types, which users can add to their site: text, image, HTML block, etc, but it is entirely possible for a developer to create their own custom content types.
While CCTs can be added to a site via source code customizations, the best way to add them is through an extension, as they will be neatly packaged up, which makes them easy to distribute, and turn on and off.
Therefore, we will explore the concepts of custom content types and extensions at the same time, but just remember that CCTs don’t need to be included through extensions — and extensions can do more than just include CCTs!
Before beginning, we recommend reading our documentation on associated topics, such as:
Example Project Brief
For the purposes of this tutorial, I’m going to create a custom content type for the site management tools that adds a banner that goes on the product detail page, encouraging shoppers to buy ten lots of the orange variation of a particular product. When the user clicks it, it will select that variation and the quantity, encouraging them to add it to the cart.
You can code along with this tutorial, or you can full a copy of the source in the samples repository: 2018-1-aconcagua/SCCCTEncourage.
Prepare Your Developer Environment
We need an environment in which to work. As we will be creating an extension, we will need to use the specialist extension developer tools.
If you haven’t already set up your extension developer tools, see our documentation.
Once you have, open your CLI and change directory to where they are. Before beginning, you will need to have the latest version of your site’s theme plus, optionally, any existing extensions currently active on your site.
To do this, run gulp extension:fetch and enter your account and site details when prompted.
Start Extension Development
With your tools set up, you need to create a new extension to act as the baseline for development. To start this, use:
gulp extension:create
This command starts a process that asks you to make a series of decisions about the nature of your extension. Here are the values I'm setting for my module:
- Extension Name: SCCCTEncourage
- Vendor Name: Example
- Version Number: 1.0.0
- CCT?: Yes
- Description: Encourage shoppers to buy products of a certain color
- Applies To: Shopping
- Uses: Templates, Sass, JavaScript
- Module Name: Encourage
When the process completes, a dummy module is created. If you like, you can take a look at the source code for it to get a sense of what a CCT module can look like. We can, however, use it as the baseline for future development (ie, make it our version 1.0).
Rename Directories and Tidy Up
OK, so, following this tutorial while modifying the automatically generated files would be a bit frustrating, so what I'm going to suggest is that we 'tidy up' by just deleting all of the dummy files, so we can work from a clean slate.
Delete the contents of the SCCCTEncourage directory. Replace it with the following directory structure:
SCCCTEncourage
- assets
- img
- Modules
- Example.SCCCTEncourage.Encourage
- JavaScript
- Sass
- Templates
- Example.SCCCTEncourage.Encourage
With this blank canvas, we can begin to think about how our CCT will look code-wise.
Create the Entry Point File
Just like regular code modules, custom content types have entry point files. These are loaded when the module is called, and they initialize the rest of the code.
In JavaScript, create Example.SCCCTEncourage.Encourage.js.
It's here that we're going to make use of the product details component. This is a part of the extensibility API (you need to be logged into NetSuite to view these docs) that lets you add new functionality to the product detail page — keep in mind we have different components for different parts of the site, and each component (class) has different methods. The methods the API provide are crucial for the extension project as it greatly increases the confidence that we can have in our extensions being compatible across the sites that install them.
A second thing we want to do is register our new module as a custom content type. To do this, we use the registerCustomContentType method on the CMS component by passing it the ID of our new CCT along with the name of the view.
However, while you may be familiar with each of these cases, you have to do things a little different when working with CCTs that rely on components.
Normally, in some non-CCT scenarios, we would pass the PDP component to a child view constructor like this example:
// Example
var pdp = application.getComponent('PDP');
var view_id = 'ProductDetails.Full.View';
pdp.addChildViews(view_id
, {
    'Product.Price':
    {
      'new_price_view':
      {
        childViewIndex: 1
      , childViewConstructor: function ()
        {
          return new MyProductPriceView({pdp: pdp});
        }
      }
    }
  }
);
The thing is, we're not adding a child view this way; and the way we register a custom content type does not allow for constructors (ie the bit where we say return new MyProductPriceView({pdp: pdp});). In other scenarios, we could alternatively just pass the application object as a key/value pair and then use the component in the view — again, however, the registerCustomContentType does not accept key/value pairs other than id and view.
To solve this problem, we can do a simple thing: modify the prototype of the view and pass it the application object, and then pass the view to registerCustomContentType.
Thus, in Example.SCCCTEncourage.Encourage.js, put:
define('Example.SCCCTEncourage.Encourage'
, [
    'Example.SCCCTEncourage.Encourage.View'
  ]
, function
  (
    EncourageView
  )
{
  'use strict'

  return {
    mountToApp: function mountToApp (application)
    {
      EncourageView.prototype.application = application;

      application.getComponent('CMS').registerCustomContentType({
        id: 'cct_example_sccctencourage'
      , view: EncourageView
      });
    }
  }
});
I think the first thing to note about this is the long namespacing for the module and the view. It follows the pattern of <VENDOR NAME>.<EXTENSION NAME>.<MODULE NAME>.<FILE NAME> and so on.
The reason why we are including both a vendor name and extension name is because the namespacing issues you will have to confront are limited to solely your own site, they are ecosystem-wide. If you plan to distribute your extension to other NetSuite users then you might run into problems if someone tries to install two different extensions that use the same namespace.
In our example, if we went with the much simpler name, like Encourage, then it's not inconceivable that another vendor in the ecosystem creates a module also named this. A site can't run code from separate modules if they share the same names.
The second part of the file is where we register the custom content type using the currently undefined view and an ID. The ID is important: it can be whatever you want but, again, note the namespace is ecosystem-wide, and that this will need to match identically the ID we use when we add the CCT into the UI. I have put some advice about this later on.
Create the View
We've referenced a view without even creating it first. Woah.
Before we move onto creating the backend records and fields we need, let's move onto the other crucial JavaScript file: the view. Again, more complex modules could have multiple views; they could also have models and collections, if we so wished, but for now we're keeping it simple with one.
In JavaScript, create Example.SCCCTEncourage.Encourage.View.js, and in it, put:
define('Example.SCCCTEncourage.Encourage.View'
, [
    'CustomContentType.Base.View'
  , 'example_sccctencourage_encourage.tpl'
  ]
, function
  (
    CustomContentTypeBaseView
  , encourage_tpl
  )
{
  'use strict';

  return CustomContentTypeBaseView.extend({
    template: encourage_tpl

  , events: {
      'click [data-banner="encourage"]': 'setOptions'
    }

  , install: function install (settings, context_data)
    {
      this.pdp = this.application.getComponent('PDP');
      return this._install(settings, context_data);
    }

  , setOptions: function setOptions()
    {
      this.pdp.setOption(this.settings.custrecord_cctenc_col_key, this.settings.custrecord_cctenc_col_val);
      this.pdp.setQuantity(parseInt(this.settings.custrecord_cctenc_quantity));
    }

  , contextDataRequest: ['item']

  , getContext: function getContext ()
    {
      return {
        banner: 'img/' + this.settings.custrecord_cctenc_banner
      , alt_text: this.settings.custrecord_cctenc_alt
      }
    }
  });
});
As you can see, there is a base view for custom content types, which forms the basis of all CCT views. It has familiar standard methods like template and getContext but with some additional ones specific to the nature of CCTs. The two crucial additions are the install and contextDataRequest methods.
The install method runs as soon as the content type is dragged from the SMT sidebar into the page, as well as when the shopper views a page the content is on. (It’s kinda like an initialize() or mountToApp() method but for CCTs.) It is passed the settings the user enters (ie the custom fields we are yet to set up) as well as the context data, which is determined by what you set as the value for contextDataRequest. You can read more about these in the documentation.
Note that you do not need to add an install() method to every CCT view: it’s only if you want to run additional code at this particular point in time. When we extend the base CCT view like this and declare an install method, we are overwriting the one that's on the base view with our code.
Now, if you look at the code for this method in your SCA code, you'll see that all it does is call the similarly named _install() method. It is this method that contains all the code the view needs in order to actually install the view. The preceding underscore character indicates that it is a private method, which is in indicator to developers that they shouldn’t modify it (and they shouldn’t normally have to call it). But, seeing as we’re overriding the install() method (which normally calls it), we have to manually call it. By having this separation, you don't need to worry about overwriting important code because you can override the public method and then add a call the private method at the end.
Here's a simplified example to illustrate what I mean:
return ({
  install: function install (a, b)
  {
    return this._install(a,b)
  }
, _install: function _install (a, b)
  {
    this.doSomething(a);
    this.doAnotherThing(b);
  }
})
In our case, we're using it to add the PDP component to the view, and then calling the core code.
If you look at the setOptions method, you'll see why we want it: the PDP component has two very useful methods: setOption and setQuantity. The former is used to select an item option based on the key of the option and the value you want to select. In our example, I want to set the color to orange. To do this, I need to find out the ID of the item option I want to set and the ID of the color I want to set. However, as this functionality is something that could be distributed to other sites, there is the obvious possibility that they will want to find other uses for it and that those IDs will be different.
Thus, we pull these values from the user defined settings when it's added to the page via the SMTs. Remember: a CCT can be set up so that the business user can input configuration options for the specific instance of the CCT when it is added to a page. In our case, we’ve said that there will be some configuration options for the banner, alt text, quantity, and item option — these are all accessible in your code via the this.settings object in your view.
So, the question now becomes about how we trigger these events to happen. Well, in our scenario we want to add in a banner that encourages the user to make this choice — add 10 orange items to the cart — so why not link the action of clicking the banner to the settings of these options? Here we're using Backbone events, which you can see with the events object. We can designate a jQuery selector (eg when a user clicks on an element with a specified data attribute) and then run a specified function (eg setOptions) when it's triggered. Perfect.
The rest is the stuff we specify for the sake of template. We pass it a value for template and then designate what we need for the template's context. In our example, we want to pass the URL of a banner that the user will define, as well as some alt text for screen-readers.
Create the Template
On the subject of the template, let's create it and set it up.
In Templates, create example_sccctencourage_encourage.tpl and in it put:
<div class="sccctencourage-container" data-banner="encourage">
    <img class="sccctencourage-banner" src="{{getExtensionAssetsPath banner}}" alt="{{alt_text}}">
</div>
Note the getExtensionAssetsPath helper. This solves a particular problem that versioning introduces: how to generate the path to assets when they might change between versions. The answer is to store them in separate folders, and then reference the currently activated (live) version of the extension. This helper does that.
See our documentation on the available Handlebars helpers and Sass helpers.
Create the Sass File
There's one final thing to do and that's to add in some CSS so that when a user hovers over the container we want them to click, it changes the cursor to a pointer.
In Sass, create _sccctencourage-encourage.scss and add:
.sccctencourage-banner:hover {
    cursor: pointer;
}
Create the Manifest
Remember, as part of the development for SuiteCommerce themes and extensions, there are neither distro.json nor ns.package.json files. Instead, each theme and extension has their own manifest.json file that is like a mix of both.
I've talked about it before in the previous post so, to summarize, you use this file to specify the module. This means adding metadata to the top and then listing every file that you want included within the extension.
There is a pattern to this, which you should carefully read in our documentation about, but for the timebeing let's just go with the following.
Another very important but cool thing about it is that the developer tools will automatically generate the majority of the manifest. You see, while you need to specify every file that's going to be included in your extension, Gulp can do most of the work. All we need to do is provide the core metadata about our extension, and it'll do the rest.
In Modules, create manifest.json with:
{
    "name": "SCCCTEncourage",
    "vendor": "Example",
    "version": "1.0.0",
    "type": "extension",
    "target": "SCS",
    "description": "Encourages shoppers to buy products of a certain color",
    "cct": {
        "icon": "img/cct_example_sccctencourage_icon.svg",
        "settings_record": "customrecordcct_example_sccctencourage",
        "registercct_id": "cct_example_sccctencourage"
    },
    "local_folder": "Workspace/SCCCTEncourage"
}
Note the cct object. We'll get to adding an icon soon, but look at the settings_record key. Soon, we will need to add a record in the backend to recognize our new extension as an custom content type. This will contain the information on what fields are required for the CCT to work. We can control the name, so we can define it now.
You'll see this namespace in the setting below this one. The registercct_id key will match the ID we're going to designate when we create a CMS content type record. It is vital that this matches the ID we set in the JavaScript entry point file when we used the registerCustomContentType method on the CMS component. By using the same ID throughout, we can link the files, the CMS tool and the backend together.
Also note that we have a version number in here. Whenever you deploy an extension up to NetSuite, you need to consider the version number. If you do not change it, then the existing version that matches that number will have its files overwritten. Changing the version number will force a new, separate version of the extension to be created in the backend.
While developing your extension, you could safely overwrite your current version or even use 'pre-release' versioning, eg 0.0.1, 0.0.2, etc, but generally I would suggest that you just overwrite a base 1.0.0 version until you're finished and ready to publish. But it's up to you. Naturally, I recommend using local versioning anyway.
Now that we have that, let's generate the rest of the file. Run the following command in your CLI:
gulp extension:update-manifest
If you take another look into your manifest file, you will see every file that you added to the extension workspace all neatly laid out in objects. In a familiar way, they are all split up into the various types of file that we include in an extension. We also need to specify which application they are pertinent to; as we are building a CCT we need only specify the shopping application (the SMTs cannot be used in secure areas of the site).
Don't worry about running this command every time you work locally or deploy your code: it runs automatically; we're just running it now so we can develop the rest of the manifest.
Check out our documentation for more information on our special Gulp commands for extensions.
Add the Assets
We've referenced two images in the manifest, and now we need to include them. One is the icon that will be shown in the SMTs when we go to add the CCT to a page, and the other is the banner that we want to include for our specific use of the functionality.
Note that, strictly speaking, including the banner in the extension is not best practice. After all, the banner is specific to my site and how I want to use it; however, I am including it for the sake of the tutorial, in part to illustrate how the getExtensionAssetsPath helper works.
For this specific extension, here are are the assets I'm using. Download and save them to your assets > img folder:
One cool thing about the new development process is that you no longer need to deploy assets before you can reference: extensions and themes can now reference local assets like any other file. Neat!
Set Up Custom Record Type
That's it for the coding. Before we deploy the code, I just want to get the backend stuff set up.
The first part of this is to create a custom record type for the CCT. This will be used to store the settings every time an instance of this CCT is added to the site.
In NetSuite, go to Customization > Lists, Records & Fields > Record Types > New. Set it up as follows:
- Name: cct_example_sccctencourage
- ID: cct_example_sccctencourage
- Access Type: No Permission Required
- Free-Form Text Fields (Description / ID):
- Banner URL / _cctenc_banner
- Alt Text / _cctenc_alt
- Color ID Key / _cctenc_col_key
- Color ID Value / _cctenc_col_val
- Quantity / _cctenc_col_quantity
A couple of important things here. Firstly, you absolutely must remember to set the access to No Permission Required — if you don't you won't get a verbose error on the frontend, but you will see that none of your user's settings get loaded with the install method runs in the view. Thus you'll probably notice your CCT works just fine in the SMTs preview, but fail to load when you visit the frontend of the page. Set your permissions!
Set Up CMS Content Type
The final part of backend setup is to do with the content type record. This is how we let the site management tools know that there is something new and that it is the extension that we just wrote.
In NetSuite, go to Lists > Web Site > CMS Content Types > New. Set it up as follows:
- Name: cct_example_sccctencourage
- Custom Record: cct_example_sccctencourage
- Label: Encouragement
- Icon Path: /assets/cct_example_sccctencourage_icon.svg
You may have to tinker with the icon path once we push the file up, as it may change depending on your instance.
Anyway, the crucial thing here is that you set the name of content type to the value we set for registercct_id in the manifest and as the id value of the registerCustomContentType method in the entry point file.
Deploy and Test
That's the code and setup complete, so we're now in a position to deploy and test it.
While we can test extensions locally, we're installing a new CCT and so need to deploy the code. Note that there is no local version of the site management tools — changes must be made to your production site — but you can change add content to a page and then run a local version of the code, if that makes sense.
To push it up, run gulp extension:deploy.
When the deploy finishes, you'll be shown a message informing (and, in the future, reminding) you that the process is not yet complete: you will need to go to the backend and activate it.
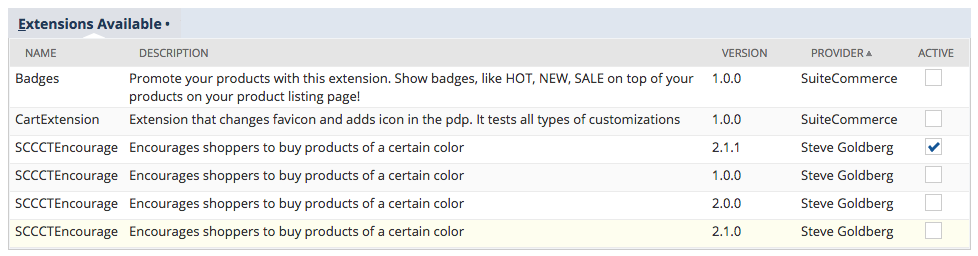
Go to Setup > SuiteCommerce Advanced > Extension Management. In the pages that follow, select your site and domain, and then check the box next to SCCCTEncourage and then proceed.
The process to activate the extension should take a minute or two. When that's done, you can add the CCT to a page.
On the frontend of your website, load the site management tools by hitting Esc and then log in. Go to a page you want to add the new functionality to and then, in edit mode, click the Add button. You should see our encouragement CCT in the New Content panel.
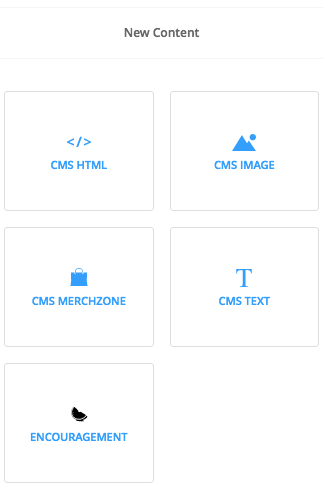
Drag the Encouragement tile onto the This Page area and then configure it.
- Banner URL — buyorange.png
- Alt Text — whatever, really, but it could just be Buy Orange!
- Color ID Key — put in the ID for your instance's transaction item option for color (mine is custcol_gen_color)
- Color Value Key — put in the ID (number) for the color you want to promote (mine is orange, which is 7)
- Quantity — enter a number (I'm going with 10)
Click Save and then proceed to publish it.
When it's live, visit the page and try it out! It should work like this:
And that's basically it; we've just written and published a custom content type as an extension!
References and Notes
Here are some additional tidbits that aren't part of the tutorial but I hope will be useful.
Local Development
Going forward with your extension will lead to questions about development and versioning.
As mentioned, it is possible to work locally with extensions much the same way as it is with SCA development. You do not have to deploy an extension before you use it as long as it's not a CCT or has configuration or SuiteScript files.
To spin it up, run gulp extension:local.
Once the extension:local task has finished, you can visit your site much like you would any other local development site. However, with CCTs, you will need to deploy and activate the extension before it will appear in the SMTs. However, once it is there and active, it will appear on your local site.
Versioning
When it comes to versioning, remember that once you push up your version of a module (say, version 1.0.0) and you're happy with it, you should move onto a new version number so that, should things go wrong, you have a stable version to fall back to.
Remember, once you've deployed a version to NetSuite, you can switch versions on your site anytime by activating a different version of it in the backend. When I was figuring out this module myself, I went through numerous iterations.
Adding a New Module to an Extension
You can just add a new module like you would with any other development project. Create your folders and files like normal, and make sure you update the manifest.
However, to streamline the process, you can also run gulp extension:create-module. This will create the folder structure as well as some dummy files for the types you specify, as well as update the manifest. It's up to you which method you prefer.
Settings and ID Connections
Above I've included a number of IDs and namespaces, and talked about how they are all linked together. I thought it would be useful to list clearly how they all link together using my example tutorial:
cct_example_sccctencourage
- value of
IDin the entry point file - value of
registercct_idin the manifest - name in CMS content type record
- recommended as the code-level namespace
Example.SCCCTEncourage.Encourage
- name of the module folder
- name of the entry point file followed by .js
- name used in the
definestatement for the module name - recommended as the file name-level namespace
customrecordcct_example_sccctencourage
- ID of the custom record (entered as cct_example_sccctencourage)
- settings_record in manifest
_cctenc
- shortened namespace for custom record fields
It's vital that you get these associations correct as they can cause the extension/CCT to malfunction.
Troubleshooting
Here some are common problems encountered when working with custom content types, and how to fix them.
CCT is Grayed Out in the SMTs
The biggest one is likely to be that you go to add the CCT to a page and the tile is grayed out and cannot be dragged onto a page or interacted with.
The underlying issue that causes this is that the CCT module isn’t ‘ready’. Here are some things to check for:
- Typos and spelling mistakes — when I first started learning this stuff, I misspelled the name of my module in my entrypoint file
- The context data isn’t ready, so you either need to wait longer, find out what’s blocking it (or if it’s failing, fix it) or override the validation check
No Core Content Types
If you don’t see tiles for text, image, HTML and merchandising zones then you will need to install the SMT Core Content Types bundle.
CCT Loads Without Settings
I mentioned this above, but to reiterate: if the CCT works fine in the SMTs but fails when viewed as a shopper on the frontend of the site, then your settings are not loading. To diagnose this problem, you may find that when you log the settings object to the console, that it is undefined or empty. This is because the system is unable to load the settings and send them to the frontend (whereas, in the SMTs, the preview loads them directly from what is stored in the SMTs).
To resolve this issue, you will need to do change the permissions on your custom record so that the access type is changed to No Permission Required. Refer to the documentation on setting up the custom record for custom content type.
“Error: No Encourage”
"Encourage" in this instance is the name of the entry point file or module folder. You'll see this logged in your browser console.
This happened to me when I changed the name from Encourage to the properly namespaced Example.SCCCTEncourage.Encourage. This isn't specific to extensions or CCTs and may come up in normal SCA development. Essentially, there's been a call to load a module or entry point file in that module and it can't find the file.
To correct this, make sure that your module name, entry point file and the name you specify in the entry point file's define statement are all the same.
“Uncaught TypeError: Cannot read property 'registerCustomContentType' of null”
This error will appear in your browser's console if you have added content to a page using the site management tools and then disabled the site management tools.
If you want to stop using the SMTs, you will need to re-enable them (Setup > Configuration > Integrations > Site Management Tools), remove all existing content, and then disable the tools.
Server Error When Saving Settings Values
When you go to add a new content item to a page, you may see a server error. If you take a look at the Network tab in your browser’s developer tools, you may also see that a POST failed too. The error returned by the failed POST will usually elucidate the problem.
When Activating an Extension, the Domain Dropdown is Empty
This is usually occurs if you've just set up a site for testing, because you'd probably catch it on a live site.
Anyway, if the dropdown only contains the Pick one option, or not the domain you were expecting, you've probably linked your SSP to your site and not your domain.
Refer to our documentation on how to link your commerce applications to a domain, but the gist is that you need to go to Setup > SuiteCommerce Advanced > SSP Applications, click View next to the SSP you're working on (eg SuiteCommerce Advanced - Dev Aconcagua). When the page loads, click Link to Domain and select the domain for your site — once you've done that, you should be good to go.
Code samples are licensed under the Universal Permissive License (UPL), and may rely on Third-Party Licenses