Bulk Rename Product Images
Caution: this content was last updated over 4 years ago
If you receive product images and descriptions from your suppliers in a variety of different formats, you’ll be familiar with the headache of trying to convert them into a standardized format for your web store. Image file names that follow your site’s convention are important for product detail pages (eg for use with image swapping). This article will show you how you can use a spreadsheeting program to quickly rename them to fit your site’s naming convention.
Step 1: Standardize Image Sizes
This might already have taken place, but if you're receiving images of all different dimensions from your suppliers, it's a good time to get them all into standard sizing so they show up nicely in a grid on the SuiteCommerce product list pages. The best way to do this is to make them all the same height at the very least, and if possible both the height and width to be the same for all images.
You can check the dimensions of images in the Setup > SuiteCommerce Advanced > Setup Website, then edit your website and go to the Advanced tab. In the Image Resizing section, you can see the size that the server uses for thumbnails, main images, zoom images, fullscreen, etc, where the fullscreen size is best to use as this is the maximum zoomed size of the images on your PDP.
On this page you can also see the Images Folder, which is the location in the file cabinet where your product images live. Since we're doing a bulk upload, we'll be using the Advanced Add feature built into NetSuite to upload a zip file of all our images once we've named them correctly.
Also note that the naming convention for the images is also set here. In my example I'm using a field called Image Code as my file identifier, and a period (.) character to separate the categories or matrix options in the file names.
So, for example, if my Image Code field held a value of ABCD1234, and if I was dealing with a matrix item that was the color green, then my image would need to be named ABCD1234.media.Green.01.jpg.These might be different depending on your site settings, so double check before moving.
Here's a screenshot of my demo settings:
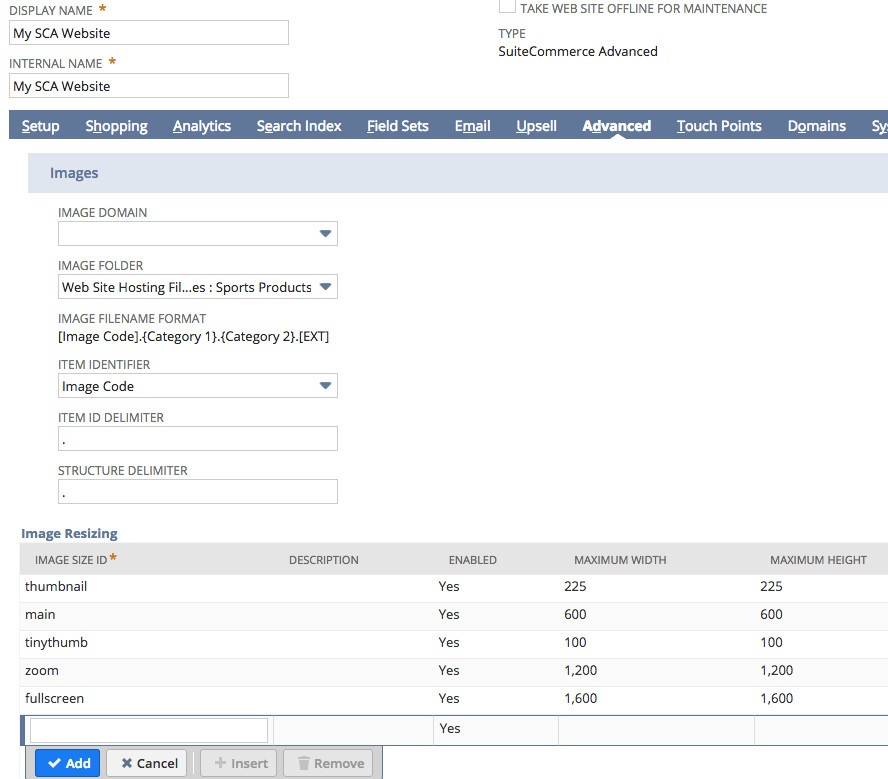
For my site, I have resized all of my images so that they have a maximum height of 1200px — you can do this manually, or there are a number of applications that can do this for you.
Step 2: Item Import CSV
With your naming convention and images prepared, we need to move onto how we're going to generate the correct file names for the images.
The next logical place to go in regard to your image names is to gather up all your image identifiers (eg SKU numbers) in your item import CSV file. This gives us a column that we can use to rename our files based on the image identifier, along with any matrix values that we want to use for naming in the process.
Here’s some example data:
| itemid | displayname | sku | imagecode | listprice | storedisplayname | storedetaileddescription | websitecategory | MatrixColor |
|---|---|---|---|---|---|---|---|---|
| VAZ-2101 | Lada VAZ 2101 | LVAZ2101 | LVAZ2101 | 125 | Lada VAZ 2101 1970 | The VAZ-2101 "Zhiguli" , commonly nicknamed "Kopeyka", is a compact sedan car produced by the Soviet manufacturer AvtoVAZ and introduced in 1970, the company's first product. | Cars | |
| STM-6785 | Pink Steamy Iron | PNKSTMI123 | PNKSTMI123 | 46 | Pink Steamy Iron model 6785 | A clothes iron is a roughly triangular surface that, when heated, is used to press clothes to remove creases. It is named for the metal of which the device was historically commonly made, and the use of it is generally called ironing. | Appliances | Pink |
| MBS-2246 | Mens Brown Shoe | MBSH2246 | MBSH2246 | 110 | Men's Brown Shoe | A shoe is an item of footwear intended to protect and comfort the human foot while the wearer is doing various activities. Shoes are also used as an item of decoration and fashion. The design of shoes has varied enormously through time and from culture to culture, with appearance originally being tied to function. | Footwear | Brown |
| PSD-1478 | Pink Sprinkly Donut | PNKSPD78 | PNKSPD78 | 3 | Pink Sprinkly Donut | A donut is a type of fried dough confection or dessert food. The doughnut is popular in many countries and prepared in various forms as a sweet snack that can be homemade or purchased in bakeries, supermarkets, food stalls, and franchised specialty vendors. | Food | Pink |
| LBG-0123 | Leather Gloves | LGLV0123 | LGLV0123 | 260 | Men's Leather Driving Gloves | Gloves protect and comfort hands against cold or heat, damage by friction, abrasion or chemicals, and disease; or in turn to provide a guard for what a bare hand should not touch. | Apparel | |
| MKB-1967 | 1967 Macbook Pro | MBPR1967 | MBPR1967 | 13000 | 1967 Macbook Pro with Touch Bar | The original 150 Pound MacBook Pro was announced on January 10, 1937 by Steve Jobs at the Macworld Conference & Expo. The first design was largely a carryover from the steam powered PowerBook G4, but uses Intel Core CPUs instead of PowerPC G4 chips. The 15-inch MacBook Pro weighs the same as a small elephant. | Laptops | |
| MBT-8877 | Mens Blue Tie | MBT8877 | MBT8877 | 81 | Men's Blue Silk Tie | A necktie is an article of clothing worn by men. A tie is part of an ensemble (or outfit) of clothing called the "suit and tie." This outfit is worn in Western countries by men in professional jobs such as business, law, and politics. | Apparel | Blue |
| CMR-6756 | Fancy SLR Camera | FCM6756 | FCM6756 | 680 | Fancy SLR Camera with Lens | A camera that takes one picture at a time is sometimes called a still camera. A camera that can take pictures that seem to move is called a movie camera. If it can take videos it is called a video camera or a camcorder. | Electronics |
I've included matrix color options for some but not all of my items — we'll look at this in more detail shortly, but what I want to do is create a process that will rename my image files and take into account the matrix color if one exists.
Step 3: Gather Your Image Files
Next, we want to get all of our image files in one place. These may have been provided to you in a zip file from your supplier, from a download, or directly via FTP.
For now, put them all into a folder that we will use as a working directory, eg:
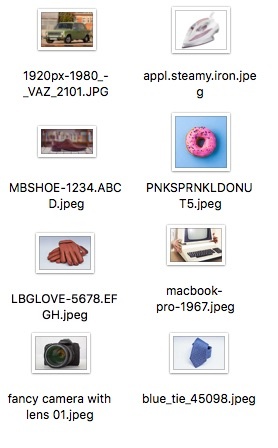
After this, we want to get a nice orderly list of all the image file names in this folder.
Step 4: Get the Image List
My example only has eight images, but most of the time you'll be doing this with tens or hundreds of images at a time, so we want something that will scale for the scenario.
So, let's get a list of images. To do this, we need to go to the command line and move change directory to the folder location. For example:
# Windows
cd C:\Documents and Settings\mike\documents\ItemImages

# Mac
cd /Users/mike/Documents/ItemImages
You should obviously change the path depending on your setup.
When you're in this directory, you'll need to export a list of the file names to a text file. Therefore, run the following commands:
# Windows
dir /b > myimagelist.txt

# Mac
ls > myimagelist.txt
In each scenario, dir and ls will list the contents of the directory, and the commands afterwards will save that to a file.
Using my example images, my myimagelist.txt file contains:
1920px-1980_-_VAZ_2101.JPG
LBGLOVE-5678.EFGH.jpeg
MBSHOE-1234.ABCD.jpeg
PNKSPRNKLDONUT5.jpeg
appl.steamy.iron.jpeg
blue_tie_45098.jpeg
fancy camera with lens 01.jpeg
macbook-pro-1967.jpeg
From here, we can begin to prepare for the final outputted images.
Create a directory called renamed — this is where our final images will end up.
Step 5: Create Copy Commands in Spreadsheet
The trick is going to be that we're going to copy the image files from the source directory into our newly created renamed directory. In the process of copying the files, we're going to rename them based on the data in the CSV file. To do that, we need to generate the correct commands for each one, and, for that, we're going to head back to our spreadsheet.
It sounds difficult, but it's actually pretty simple:
- Create a copy of your item import CSV file and open it up in your chosen spreadsheet application
- Add a new column called something like ImageFile
- Add another column called CopyCommand
Open the text file and paste in the list of file names into the ImageFile column. Note that this assumes that your import sheet rows are in the same order — if they're not, you'll need to sort them correctly beforehand.
Now for the magic!
Put one of the following formulas into cell K2, assuming that this the first cell in the CopyCommand column:
# Windows
="copy """&J2&""" renamed\"&D2&".media"&IF(LEN(I2)>0,"."&I2,"")&".01.jpg &^"

# Mac
="cp """&J2&""" renamed/"&D2&".media"&IF(LEN(I2)>0,"."&I2,"")&".01.jpg &&"
After hitting Enter, it should return something like this:
# Windows
copy "1920px-1980_-_VAZ_2101.JPG" renamed\LVAZ2101.media.01.jpg &^

# Mac
cp "1920px-1980_-_VAZ_2101.JPG" renamed/LVAZ2101.media.01.jpg &&
Let's take a look at the transformation that's happened here:
- The quote marks mean we want to print a string, which we do with
copyandcp, which are the commands to copy a file in each of the environments - In the case where we want to include quote marks in our output, we've put three in a row — this will catch scenarios where file names contain spaces
- We have &J2&, which grabs the file name from the previous column
- There's then three more quotation marks to close it out
- The
renamed/part is the path of the new directory &D2&".media"grabs the value from the ImageCode column and appends.mediato the end- We then check for a possible matrix option, and include it, if it exists, with
&IF(LEN(I2)>0,"."&I2,"")& - Lastly, we append a numerator and a file extension, followed by a command to run another command with ".01.jpg &\^" — this means we'll chain the commands together and run them all at once
Drag the corner of the cell into the remaining cells in this column to generate the rest of the commands.
Step 6: Run the Commands
Highlight the entire CopyCommand column (except for the header text) and copy it. In your command line window, paste it in but before you hit Enter, make sure you remove the final && or &^, as we want the command sequence to end after the final command in the chain. If you're using a version of Windows prior to 10, you might need to select the paste command in the top left corner of the command prompt window.
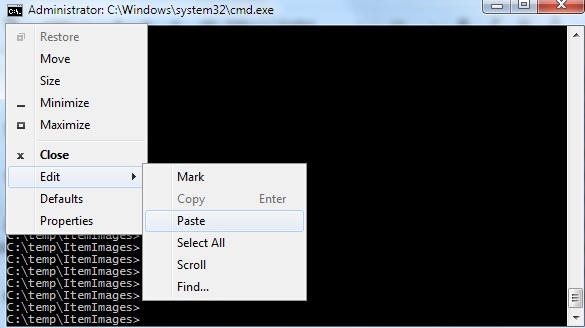
Hit Enter and it should go through each one, creating copies of the images in the destination folder.

All the images should have be in the renamed directory with the correct file names.
Step 7: Zip and Upload Your Images
Select all of your images in your new folder and compress them to a zip file (eg Send To > Compressed (zipped) folder in Windows). Head back to the file cabinet in NetSuite and go to Web Site Hosting Files > Live Hosting Files > Images. Click Advanced Add and begin the process to import the images.
Once it completes, look up one of your products in NetSuite that you uploaded images for, you should see your new image in the Associated Images tab:
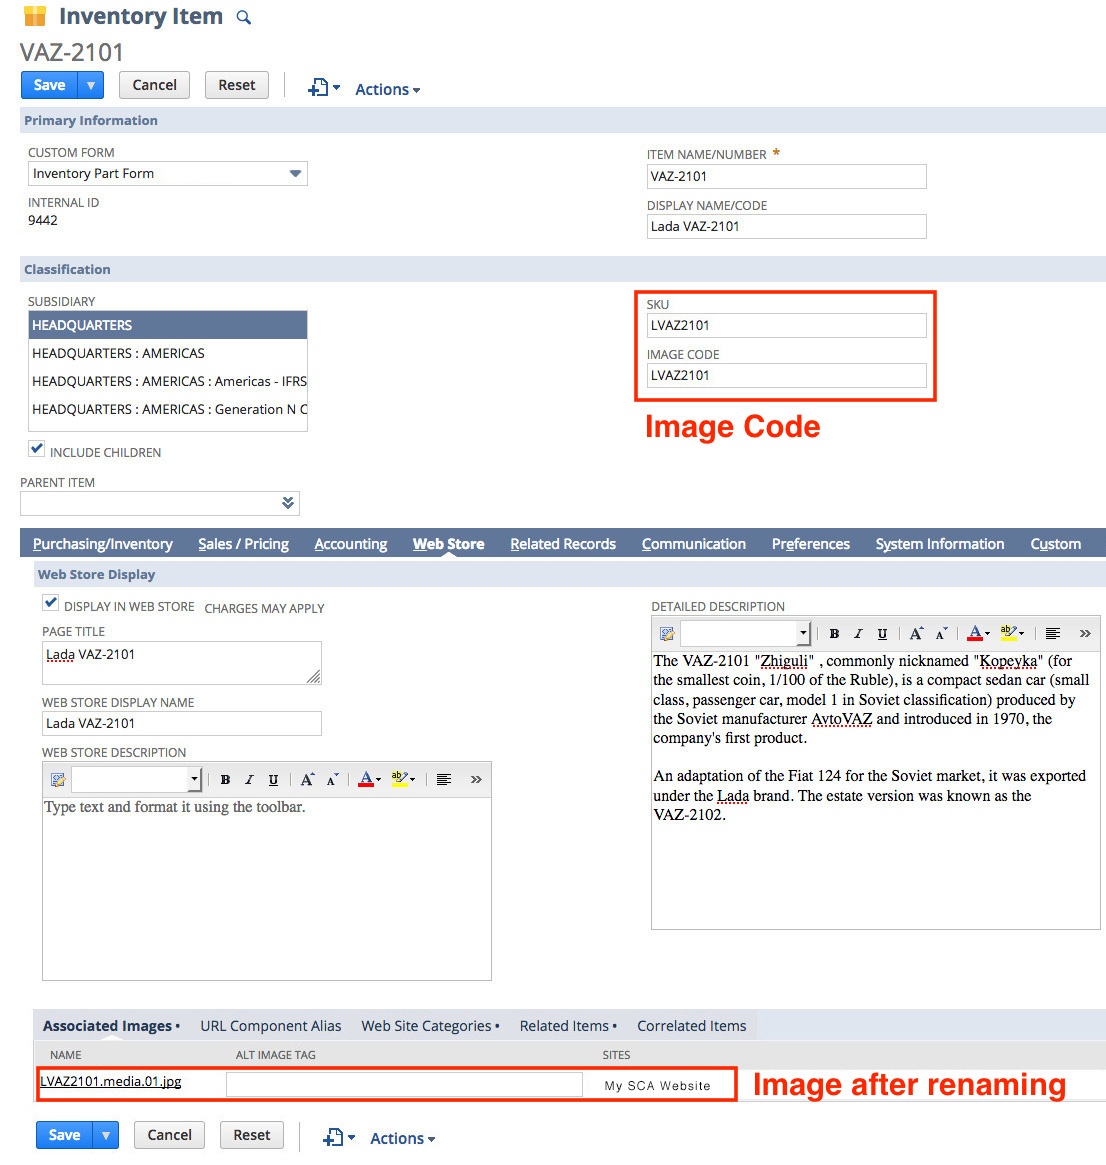
And if you check on the frontend by visiting a PDP, you can also see that it has taken effect:
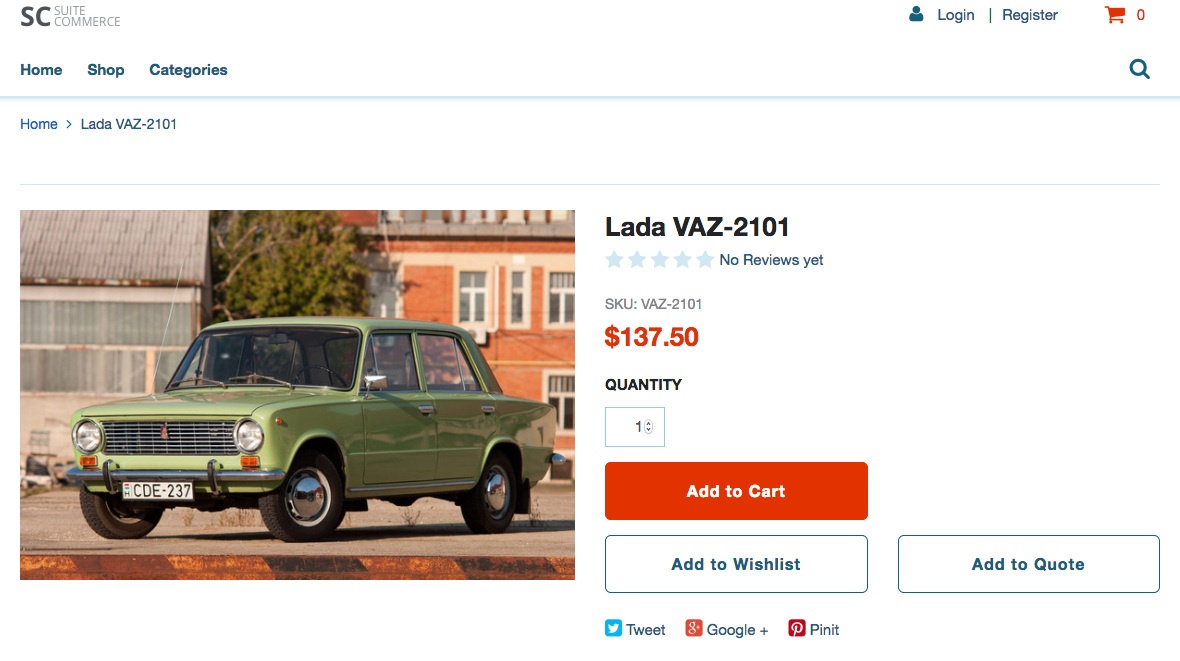
And who said spreadsheets couldn't be fun?
Code samples are licensed under the Universal Permissive License (UPL), and may rely on Third-Party Licenses