Use CSV Imports to Set Item Meta Descriptions in Bulk
Caution: this content was last updated over 5 years ago
By default, NetSuite Commerce sites use the Open Graph tags for description, keywords and item details — these values are derived from the main description fields and also push into the itemprop="description" tags for Schema.org values.
However, Google still recommends setting your own meta descriptions for your items. They are mainly used for the snippets under the item titles on search results, and allow you to curate a small amount of text to show when a user is browsing through results.
Keep in mind that while these tags probably won't improve your rank on search engine results pages, they can improve your click through rate as they can be used to entice a shopper to visit your page.
There are numerous recommended best practices for meta descriptions out there, and your SEO agency should be able to help you optimize them for your industry.
Individual item meta tags can be entered in the NetSuite backend — and we have a guide on how to do this — but what if you already have hundreds of products in the system and need to get the meta descriptions populated quickly and efficiently? For that, we recommend a mass update with a CSV file.
In this guide, we're going to use the existing item description field values from NetSuite (being used to populate the open graph description tags on your PDPs), and pipe them into your meta description tags using NetSuite and the spreadsheet tool of your choice.
The steps can be summarized as follows:
- Export a CSV of all your items' descriptions
- Tidy up the description field data
- Limit the number of words in the meta description, and prepare the HTML
- Import the finished CSV file into NetSuite
Create a List View or Search with the Description Field in the Results
We're going to use our existing item descriptions as the basis for our meta descriptions. In order to do that, we're going to export all of them from NetSuite, in bulk.
Create a search or list view of all your web items and include the description field from the web store tab on the item record. I did this by going to List > Website > Items and then clicking on Customize View at the top.
In the Results tab, select Detailed Description as one of the fields.

Next, as matrix child items share the same PDP as their parents, we need to exclude the children from the exported file.
In the Available Filters tab, add Matrix Child Item — this allows us to select No from the dropdown on the view list page.
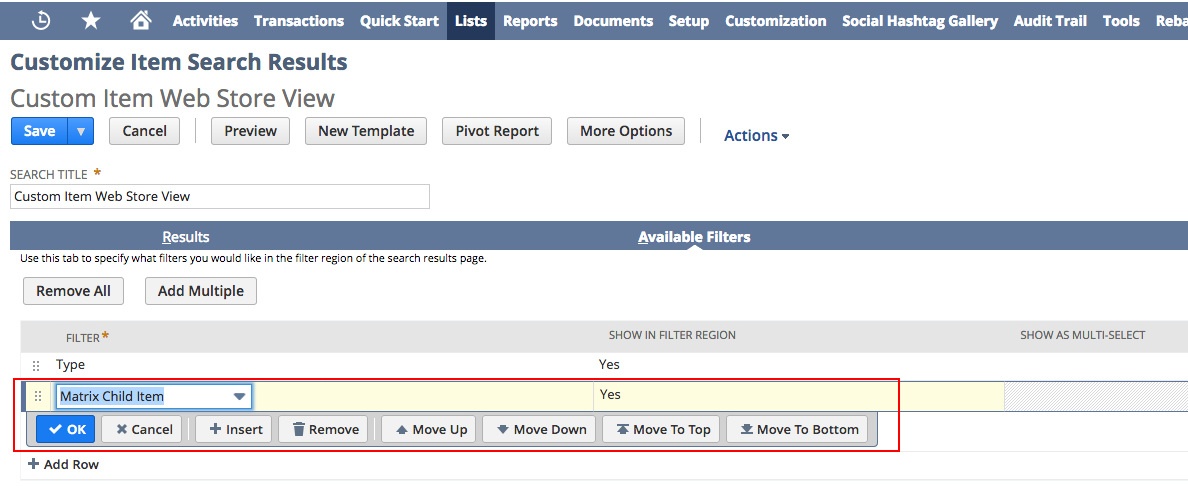
Save the view and you're shown a list of all your items and their descriptions. Select No from the Matrix Child Item dropdown to remove the child products.
After that, click the Export CSV button.
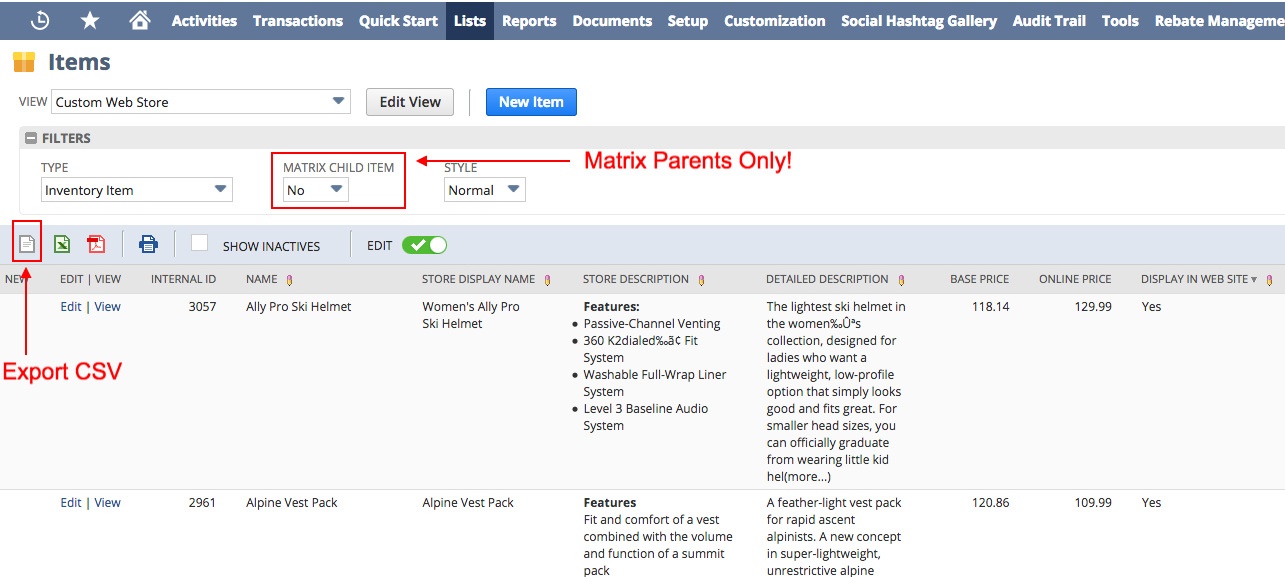
You now have a CSV file of your products and their descriptions.
Remove the HTML Tags from the Description Field
Now we have the CSV, we need to remove the rich text HTML typically found in description fields so that we have only plain text. Luckily for us, common spreadsheeting programs, such as Microsoft Excel and Google Sheets, lets us do this quickly and safely.
Open your CSV in your preferred spreadsheet application and select the column for the description fields
Copy the column to a new, empty one and give it a name (eg Plain Text Description)
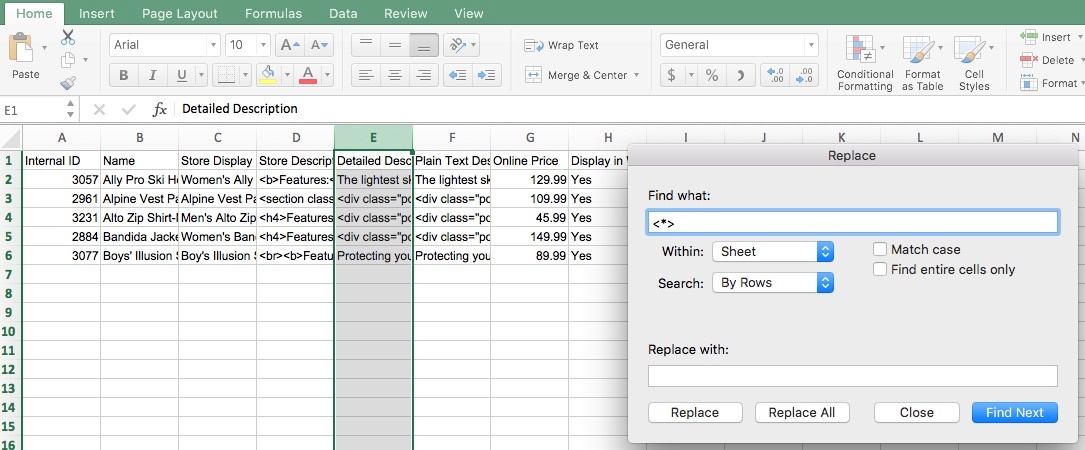
Use your program's find and replace tool to remove all the HTML tags
If you're using Excel, enter <*> into the Find What field and leave the Replace With field blank.
If you're using Google Sheets, check the Search Using Regular Expressions checkbox and then enter </?\S+[\^<>]*> into the Find field, and leave the Replace With field blank.
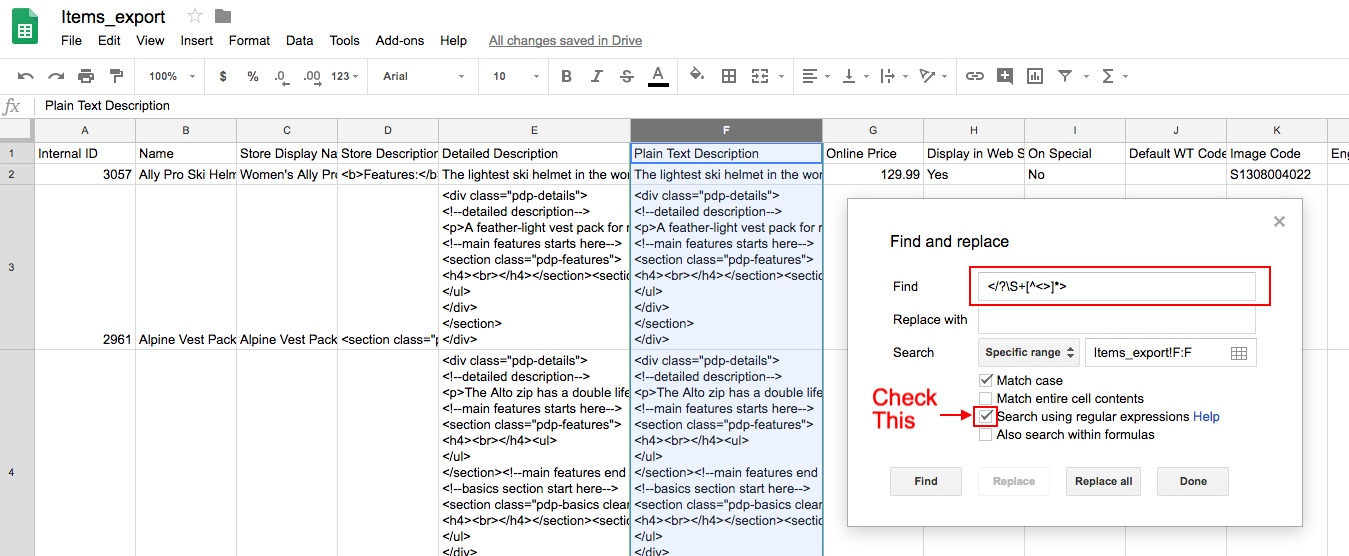
After running this, all HTML fields should have been removed.
Create a Short Description and a Meta Description
Now that we have plain text, we need to do two more tasks:
- Create a short description, so that it's no more than about 300 characters (50 or so words maximum, including spaces and punctuation)
- Create a formatted meta description tag so that uses the short description
SEO experts Moz recommend that you don't go over 300 characters in your meta description, although some put this limit as low as 155. Assuming that each word, including spaces and punctuation, is about 6 characters, we should limit ourselves to around 25-50. For this tutorial, we're going to use 40, but you can change this if you want.
In your CSV, create two new columns: Short Description and Meta Tag Description.
In the Short Description column, add the following formula to the first cell:
=LEFT(M2,(FIND("|",SUBSTITUTE(M2," ","|",40)))-1)
Note that this assumes your first item's description field is in M2 — adjust where necessary. Also note that if an item's description is below 40 words, the formula will throw a #VALUE! error, so, again, make adjustments if necessary (perhaps write a more verbose description!). Make sure you check each one and, if it looks good, copy it to each cell below.
Next to that, in the Meta Description column, we're going to construct the HTML required for the tag using concatenation. In the first cell, add:
=CONCATENATE("<meta name= ""description"" content="""& N2 &""" >")
This should create a formatted HTML tag with the short description (which I've assumed to be in N2). If you're happy with it, copy it to each cell below.
Save the CSV, and you now have your file ready to import into NetSuite.
Import the CSV into NetSuite
As you probably know, NetSuite supports the mass update of item records via CSV imports, and we're going to use them to add our meta description tags.
- Go to Setup > Import/Export > Import CSV Records and set the fields as follows:
- Import Type — Items
- Record Type — Inventory Item
- Character Encoding — Western (Windows 1252)
- CSV Column Delimiter — Comma
- One File To Upload — (selected)
- Select — (select the CSV file on your computer)
- Click Next
- On the Import Options page, select Update (or else it will create new items!) and click Next
- On the Field Mapping page, select the Meta Description column from Your Fields on the left, and then select the Meta Tag HTML field from NetSuite Fields on the right to create a map between the two
- Click Next
- On the Save Mapping & Start Import page, enter a name, description and ID for your import job: this'll make it easy for you to run it again in future
- Click Save & Run to update the item records with the new meta tags
Test
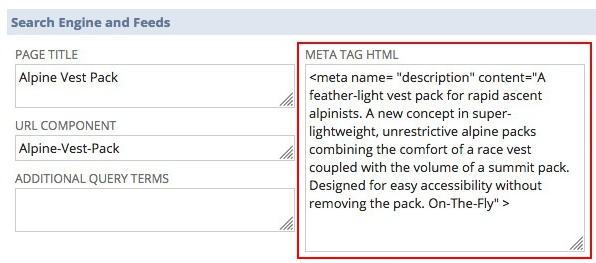
When it finishes, all records should be updated to have the meta tag. You can see the HTML by looking at item records:
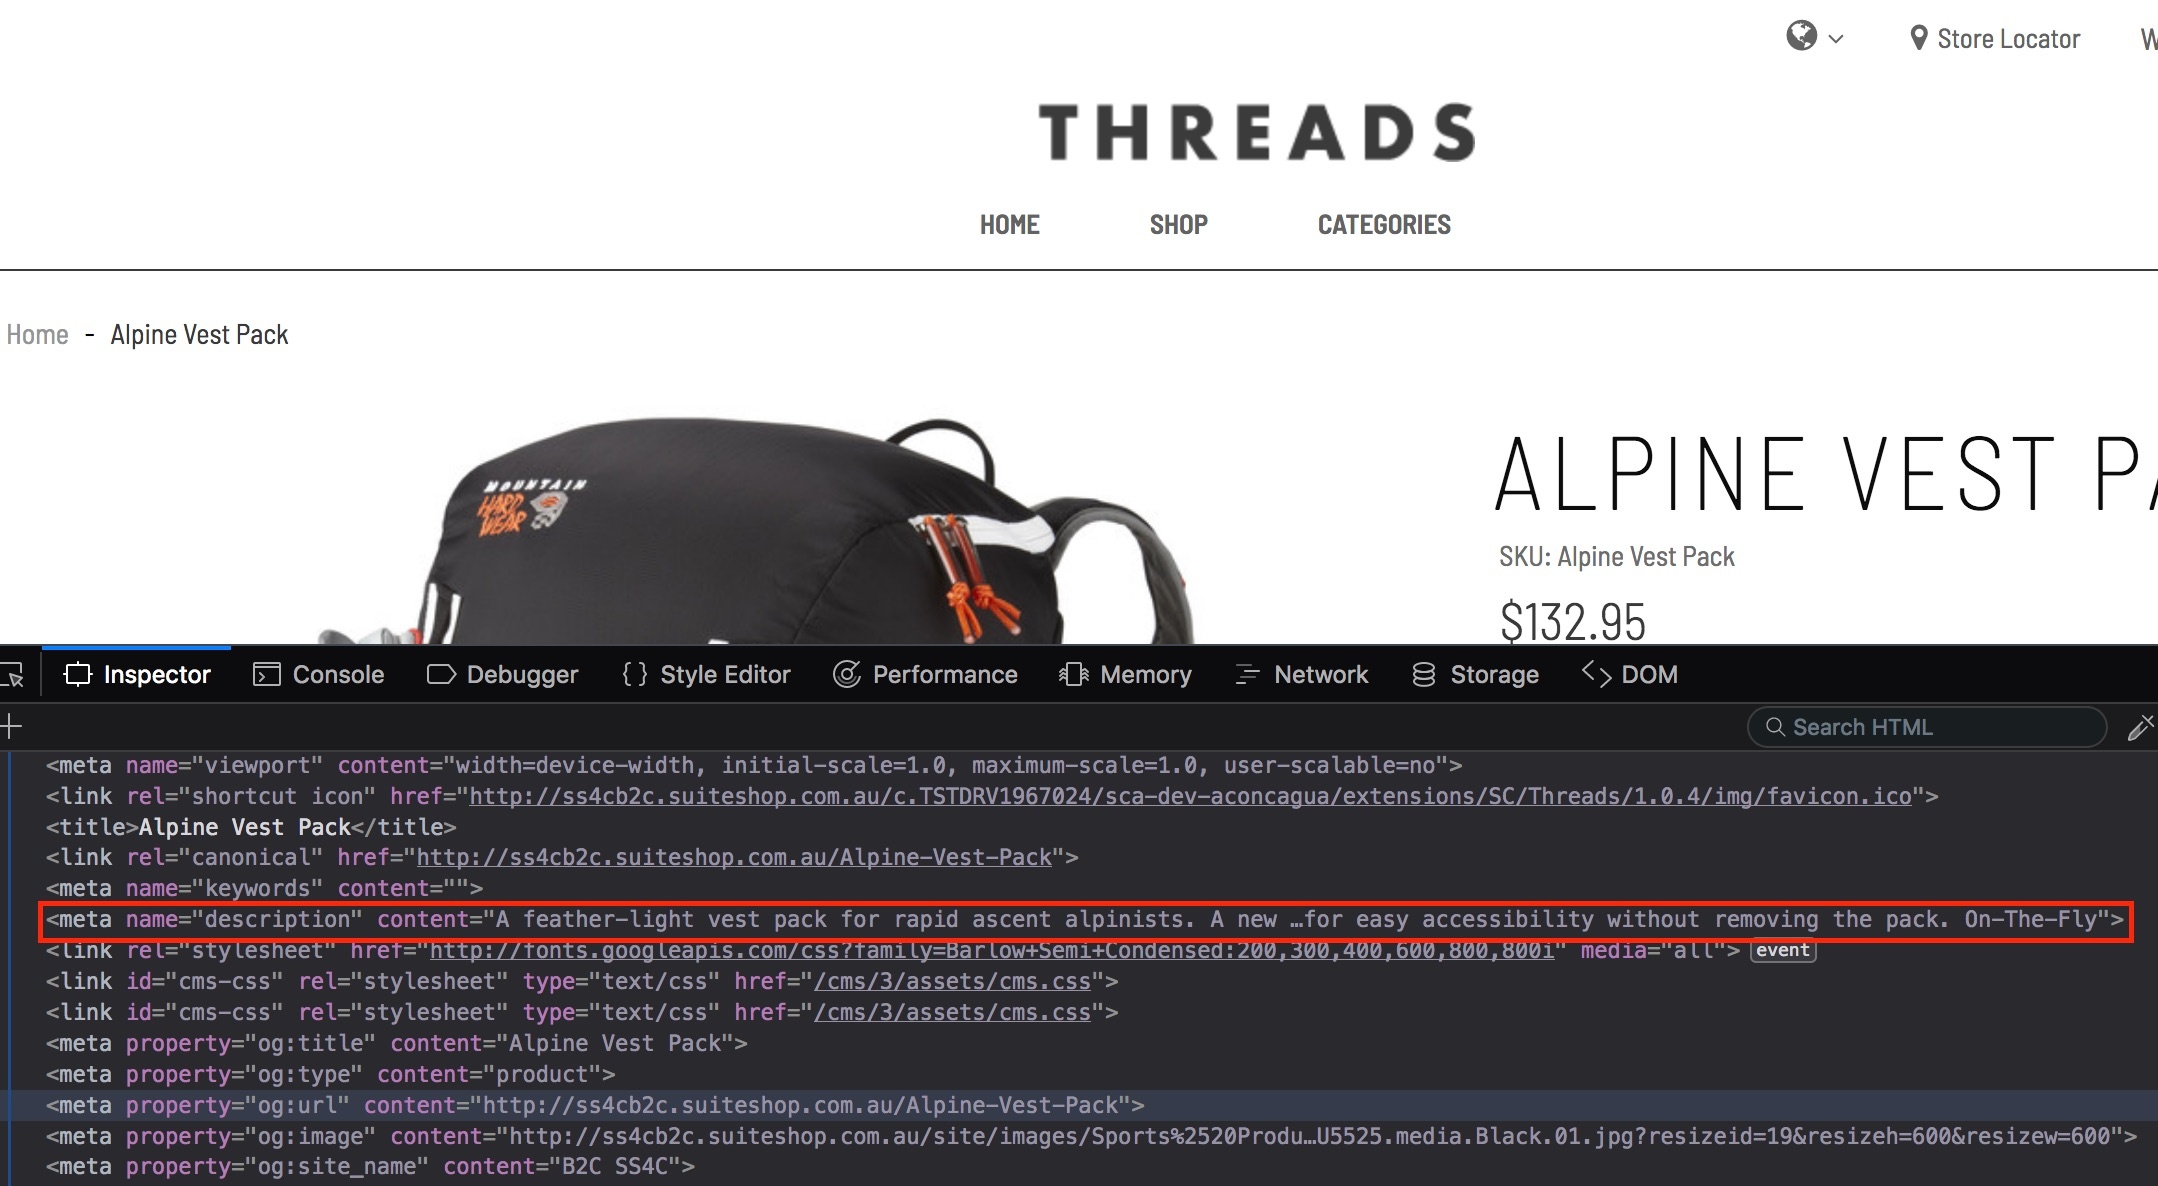
If you head over to one of your product's PDP you should also see the HTML in your site's source:
Code samples are licensed under the Universal Permissive License (UPL), and may rely on Third-Party Licenses