Vinson and Elbrus: Build a Contact Form
Caution: this content was last updated over 7 years ago
This post applies to Vinson and Elbrus. It could be retro-fitted to the older Denali and Mont Blanc versions by replacing the service controller and changing the configuration JSON, and to the newer Kilimanjaro version by changing the Sass variable and classes names.
If you are running Aconcagua or newer, or SuiteCommerce, you should use the Map & Contact extension built by NetSuite, instead of implementing this custom functionality.
Being able to directly contact the administrators of a site is often considered a baseline feature for any site, regardless of whether it is an ecommerce site or not. While we don’t include a public-facing one out of the box in SuiteCommerce, we do support the ability for customers to contact administrators via the my account application.
For whatever reason, you may not think this goes far enough: why should a customer have to be registered and signed in before they can contact you? Surely, if a customer has to do all of those extra steps just to send you a message, they’d sooner switch to another site than have to sign up? Maybe.
So, to address this: you can also add a new way for (anonymous) shoppers to contact you. While this will use the case functionality in NetSuite, you won’t obviously be able to respond to them through it — you’ll have to follow up with an email. But that’s expected, right? Using some standard Backbone code and some SuiteScript, you can create a neat little interface between a case form and the frontend of your site.
This is a two part tutorial: in this article, we’re going to build the barebones of the module so that, by the end of it, you’ll be able to create case records via a form on the frontend. The second part of the tutorial will look at things like validating data and improving the user experience.
Let’s do this!
Backend Setup and Basic Module Preparation
By now, you should know the score: we start as we always do with some basic file structure.
In your customizations directory, create a folder named ContactUs\@1.0.0 and in it put folders for Configuration, JavaScript, Sass, SuiteScript and Templates. Then create an ns.package.json file with the following in it:
{
  "gulp":
  {
    "configuration":
    [
      "Configuration/*.json"
    ]
  , "javascript":
    [
      "JavaScript/*.js"
    ]
  , "sass":
    [
      "Sass/*.scss"
    ]
  , "ssp-libraries":
    [
      "SuiteScript/*.js"
    ]
  , "templates":
    [
      "Templates/*.tpl"
    ]
  }
}
Now we need to create an entry point file. In JavaScript, create ContactUs.js and in it put the following:
define('ContactUs',
[

], function
(

)
{
  'use strict';

  return {
    mountToApp: function(application)
    {
      console.log('ContactUs.js loaded')
    }
  }
});
Finally, you need to update distro.json:
- Register the module at the top of the file
- Add its JavaScript to shopping.js
- Add its Sass to shopping.css
That’s it. Save and deploy and you’ll see a console message saying that the module loaded!
Online Case Form Setup
As mentioned, this functionality relies on the cases functionality. In NetSuite, it’s possible to create forms that can have data submitted to them via our APIs. This is what we’re going to do for the contact form.
In NetSuite, go to Setup > Support > Online Case Forms. Click New Online Case Form and select Default Form Template. Set the title as "Contact Us" and then set up the Select Fields as follows:
- Incoming Message
- Subsidiary
- Title
- First Name
- Last Name
All fields, except for Subsidiary, are mandatory.
Save and then edit the form. Take a look at the External tab: we have URLs for internal and external use — keep this tab open, we’re going to need these in a moment.
Configuration Setup
To speed things along, we’re going to do the configuration stuff now.
In the Configuration folder, create ContactUs.json and in it put the following:
{
  "type": "object"

, "subtab":
  {
    "id": "contactUs"
  , "title": "Contact Us"
  , "group": "shoppingApplication"
  }

, "properties":
  {
    "contactUs.enabled":
    {
      "group": "shoppingApplication"
    , "subtab": "contactUs"
    , "type": "boolean"
    , "title": "Enabled"
    , "default": false
    }

  , "contactUs.formId":
    {
      "group": "shoppingApplication"
    , "subtab": "contactUs"
    , "type": "string"
    , "title": "Form ID"
    }

  , "contactUs.hash":
    {
      "group": "shoppingApplication"
    , "subtab": "contactUs"
    , "type": "string"
    , "title": "Generated Hash"
    }
  }
}
Here we’re adding in three new settings for our site:
- Enabled — a simple toggle we’ll use to enable/disable the functionality via the configuration screen
- Form ID — the ID of the form, which is where you paste the integer after the
formidparameter in the URL for the Internal Form URL - Generated Hash — the hashed ID of the form, which is where you paste the hash after the
hparameter in the URL for the Publishable Form URL
Deploy this file. When it’s done, head over to Setup > SuiteCommerce Advanced > Configuration and edit the record for your site. In the Shopping tab, you should see your fields in the Contact Us subtab; complete them using the information above. For example, mine now looks like this:

Great! Now let’s going with some coding.
Barebones: Template to Router
Let’s get the essential parts of the site in place. The end goal is that when a user visits a particular URL, a page shows with some text on it. For this we’ll need a router (to control the URLs), a view (something for the router to call) and a template (a page for the view to render). We’ll need a frontend model and backend services later, but for now let’s stick to the core stuff.
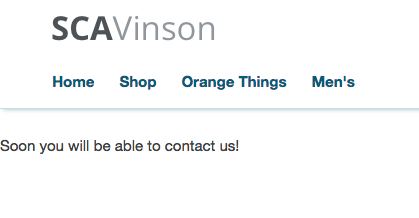
In the Templates directory, create contact_us.tpl and in it put the following:
<p>Soon you will be able to contact us!</p>
This is all we need for now.
Next, in JavaScript, create ContactUs.View.js and put the following in:
define('ContactUs.View'
, [
    'Backbone'
  , 'contact_us.tpl'
  ]
, function
  (
    Backbone
  , contactUsTpl
  )
{
  'use strict';

  return Backbone.View.extend({
    template: contactUsTpl
  });
});
So all we’re doing is telling it to extend the standard Backbone view and render the template we just created.
Next, we need to create the router so that it’s possible to get to a point where we can view our wonderful new view and template.
In JavaScript, create ContactUs.Router.js and in it put the following:
define('ContactUs.Router'
, [
    'Backbone'
  , 'ContactUs.View'
  ]
, function
  (
    Backbone
  , View
  )
{
  'use strict';

  return Backbone.Router.extend({
    routes:
    {
      'contact-us': 'contactUs'
    }

  , initialize: function(application)
    {
      this.application = application;
    }

  , contactUs: function(options)
    {
      var view = new View({
        application: this.application
      });

      view.showContent();
    }
  });
});
A basic router so far: create the routes and tell it to create a new instance of our view once the route is called.
The final part is to update the entry point file so it knows the router exists and that it should create a new instance of it when the application is loaded.
Replace the contents of ContactUs.js with:
define('ContactUs'
, [
    'ContactUs.Router'
  , 'SC.Configuration'
  ]
, function
  (
    Router
  , Configuration
  )
{
  'use strict';

  return {
    mountToApp: function(application)
    {
      var enabled = Configuration.get('contactUs.enabled');

      if (enabled)
      {
        return new Router(application);
      }
    }
  }
});
So what we’re doing is checking if the functionality has been enabled in the backend (if you haven’t already, go and tick the checkbox!) and, if it is, create a new instance of our router.
With all that in place, run gulp local and hit your local site, appending #contact-us to the URL. When it loads, you should see something like this:
Create the Frontend Model
Next up, we need to create a frontend model. Remember, this is the thing that will take data (in this case from a form) and connect with the backend model and service controller so the site can communicate with the backend.
In JavaScript, create ContactUs.Model.js. In it, put:
define('ContactUs.Model'
, [
    'Backbone'
  , 'underscore'
  , 'Utils'
  ]
, function
  (
    Backbone
  , _
  , Utils
  )
{
  'use strict';

  return Backbone.Model.extend({
    urlRoot: Utils.getAbsoluteUrl('services/ContactUs.Service.ss')
  });
});
There’s not much to say here other than we’ve referenced a service that doesn’t exist, so we should probably deal with that in a moment.
Before we do that, we just need to update the router so that when we create the view when the route is called, the model is included.
Head back to ContactUs.Router.js and add our newly created model as a dependency.
Then, add the model as a property to the view declaration in the contactUs function:
var view = new View({
  application: this.application
, model: new Model()
});
This’ll tell it to include the model when the view is created.
Add the Form
OK, we added the model and we referenced a non-existent backend service, which we’ll get to later, but first let’s create the interface for capturing the user’s data.
For this part of the tutorial, we’re going to stick to basics: we can add in extra markup for styling and organization later.
What we need to do is two-fold:
- Create a template that has a form in it that is sufficiently marked up so that the user’s data can be mapped to the fields we set up in the backend
- Modify the view so that it understands that mapped data and can send it on to the model
So let’s create a simple form. Replace the contents of contact_us.tpl with:
<section>
    <form>
        <fieldset>
            <label for="firstname">First Name</label>
            <input name="firstname" type="text" id="firstname">

            <label for="lastname">Last Name</label>
            <input name="lastname" type="text" id="lastname">

            <label for="email">Email</label>
            <input name="email" type="text" id="email">

            <label for="title">Subject</label>
            <input name="title" type="text" id="title">

            <label for="incomingmessage">Message</label>
            <textarea name="incomingmessage" type="text" id="incomingmessage"></textarea>
        </fieldset>

        <button type="submit">Submit</button>
    </form>
</section>
As I said, simple — we can mark it up later.
Next we need to add to our view. Open up ContactUs.View.js. The first thing we need to do is add Backbone.FormView as a dependency, so do that.
With it as a dependency, we need to add an initialize method that adds this view as an instance of it. Add the following:
initialize: function(options)
{
  this.options = options;
  this.application = options.application;

  BackboneFormView.add(this);
}
With the standard form view initialized, we can make use of it. Next, bind the submission of the form with the standard saveForm function (which we’ve built to handle the submission of forms):
events:
{
  'submit form': 'saveForm'
}
This’ll listen for when that submit button is clicked and then process the data.
If you want to, you can stop and restart your local server and see the form load. If you want, you can try submitting the form — if you do, you should get an error that says something like the following:
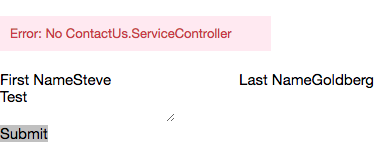
And, with that, we’re temporarily done with frontend stuff, so let’s take a look at the backend service stuff.
The Service Controller
Remember, when dealing with the backend stuff, it comes in two parts: a model and a service controller. The service controller is used to generate a service so that we don’t have to. As most services are very similar, and really only differ in terms of the model they call, they are typically quite simple. Let’s write the service controller and set it up.
In SuiteScript, create ContactUs.ServiceController.js and in it put:
define('ContactUs.ServiceController'
, [
    'ServiceController'
  , 'Application'
  , 'ContactUs.Model'
  ]
, function
  (
    ServiceController
  , Application
  , ContactUsModel
  )
{
  'use strict';

  return ServiceController.extend({
    name: 'ContactUs.ServiceController'

  , post: function()
    {
      this.sendContent(ContactUsModel.create(this.data));
    }
  });
});
This is pretty uncontroversial and should be pretty clear about what’s going on: when the POST method is called, we send the data to the model which will call the create method.
If you’re new to service controllers, you’ll note that we no longer call Application.sendContent (instead we now call this.sendContent). This was one of the changes when we moved over to having one extendable service controller — this method is now contained within SspLibraries — ServiceController.js, which we list as a dependency.
The final part of this, is that we need to tell the application that this service controller exists. We need to do this in two places:
- ns.package.json — we must state that we’re going to be automatically generating a service file for this module
- distro.json — we must state this service controller exists, and must be included with the other service files
So, first, edit ns.package.json and add in an object stating how we’re autogenerating the service file, ie:
"autogenerated-services":
{
  "ContactUs.Service.ss": "ContactUs.ServiceController"
}
Next, we need to modify distro.json. Jump to ssp-libraries and add "ContactUs.ServiceController" to the dependency list.
Done. Now, remember that the model we’re referencing in our service controller is not the frontend model that we’ve already created, but a backend model that we’re yet to make. So let’s do that now.
The Backend Model
The backend model is the thing that handles the data before sending (or receiving) it to the server. What we need it to do is take the form data, process it and then submit it via the online case form we created.
To make things a little easier, I’m going to dump the entire code snippet and then explain it.
In SuiteScript, create ContactUs.Model.js and in it put:
define('ContactUs.Model'
, [
    'Models.Init'
  , 'SC.Model'
  ]
, function
  (
    CommerceAPI
  , SCModel
  )
{

  'use strict';

  return SCModel.extend({

    name: 'ContactUs'

  , create: function(data)
    {
    // Create a bunch of useful variables
      var configuration
      , currentDomain
      , currentDomainMatch
      , request
      , url;

      // Get the config options for the functionality
      configuration = SC.Configuration && SC.Configuration.contactUs;

      // Get the URL for the secure login domain
      currentDomainMatch = CommerceAPI.session.getSiteSettings(['touchpoints'])
      .touchpoints.login
      .match((/^https?\:\/\/([^\/?#]+)(?:[\/?#]|$)/i));

      currentDomain = currentDomainMatch && currentDomainMatch[0];

      // Build the request URL
      url = currentDomain
      + 'app/site/crm/externalcasepage.nl?compid=' + nlapiGetContext().getCompany()
      + '&formid=' + configuration.formId
      + '&h=' + configuration.hash
      + '&globalsubscriptionstatus=1';

    // Include subsidiary data, if relevant
      if (CommerceAPI.context.getFeature('SUBSIDIARIES'))
      {
        data.subsidiary = CommerceAPI.session.getShopperSubsidiary();
      }

    // Make the request!
      try {
        var response = nlapiRequestURL(url, data);
        var responseCode = parseInt(response.getCode(), 10);
        // Just in case someday it accepts the redirect. 206 is netsuite error ('partial content')
        if (responseCode === 200 || responseCode === 302 || responseCode === 201 || responseCode === 404) {
          return {
              successMessage: 'Thanks for contacting us'
          }
        }
      }

      // Unfortunately, even successfully submitting data this way results in an exception, so we need to handle that
      catch(e)
      {
        // The 'successful' exception is a redirect error, so let's intercept that
        if (e instanceof nlobjError && e.getCode().toString() === 'ILLEGAL_URL_REDIRECT')
        {
          return {
            successMessage: 'Thanks for contacting us'
          }
        }

        // Finally, let's catch any other error that may come
        return {
          status: 500
        , code: 'ERR_FORM'
        , message: 'There was an error submitting the form, please try again later'
        }
      }
    }
  });
});
There’s a fair bit going on, which I’ve broken down with code comments. Let’s take a look:
Dependencies
We’re obviously including the standard model that we’re extending, but we’re also including SuiteScript > Models.Init.js. This file contains a whole bunch of useful global variables for use within backend services.
Variables
I don’t know about you, but I like to declare variables upfront so that I have all the pieces ready when it comes to build what I want. The configuration variable is going to be used to pull out the form ID and hash, which we set earlier.
On the subject of the ID and hash, do you remember that we plucked them from URLs? Well, what we’re basically doing now is reconstructing that URL. While the forms subdomain is not available, we can substitute it for checkout one and it’ll still work fine. To do this, we need to pluck it from the list of touchpoints and, for that, we’re going to use a regex.
Then we start building the URL. You’ll note how we build it up from the currentDomain variable and then start attaching URL parameters. We need the company ID, the form ID, and the hash. We also use globalsubscriptionstatus to indicate that we do not want to update any user records.
Next we pull in the subsidiaries information, if available, and then plug it into the data.
Request and Response
Finally, we make the request. For this we use nlapiRequestURL, an application navigation API. The intended use of these kinds of APIs is to redirect users to a webpage; here we’re running it serverside, and can use it to request the form, enter data into it, and then submit it.
The downside to this is that doing it this way is technically incorrect, and will lead to an exception being thrown, even when successful. Thus, the next part is intercepting it and checking it to see if it’s the exception we’re expecting for ‘success’; if it’s not, then we can return a standard error message.
Deploy and Test
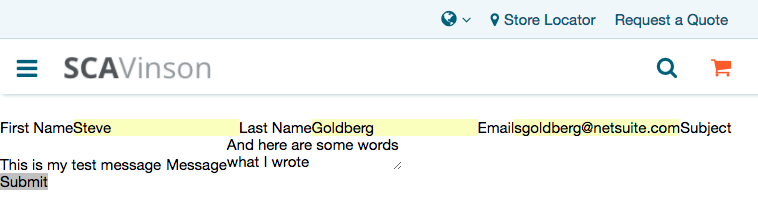
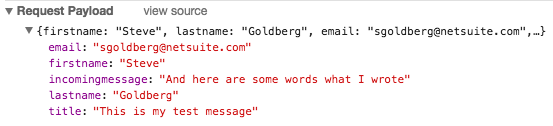
If you’ve gotten this far then you’ve done all the work required to get the bare minimum set up, so you’re now able to deploy and test. Visit #contact-us and you should see an ugly looking form. Fill it in with some test data:
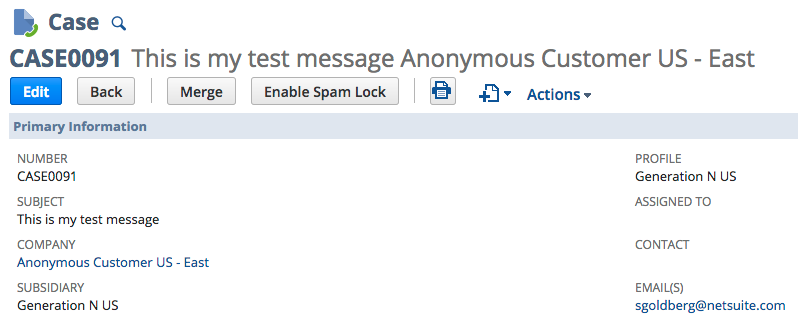
When you submit the form, it should go through and create a case record in NetSuite, which you can check by going to Lists > Support > Cases:
If it doesn’t go through, then check the request payload in the header for the service. In other words, open up the developer console in your browser and (for Chrome) go to the Network tab > XHR subtab > ContactUs.Service.ss > Headers > Request Payload and see what’s being sent. Double-check that the keys are exactly the same as the names we use in NetSuite.
Another common problem is that you get an error that says "JSON.parse: Uncaught SyntaxError: Unexpected token u — what’s happening here is that JSON.parse is attempting to parse the value undefined. Which means, after you made the request, the response from the server was undefined. In my experience, this is usually because I messed up something in the backend model. So, if I were you, I would look there for issues, such as typos in the URL builder and syntax problems.
And, with that, we have the barebones of a contact form.
Validation
Maybe I should have included this earlier: on the one hand, validating data before it is sent to the server isn’t strictly necessary but, on the other, it’s such a good idea that it’s a no-brainer.
Remember, we add in validation in two places: first on the frontend and then on the backend. Frontend validation ensures a speedy summary response about the user’s data, without wasting server time; whereas backend validation ensures that the data is in a valid format, so we can cut down wasted attempts to create/update records.
Validation is built into SuiteCommerce Advanced, so it’s just a case of making some small changes to your code to take advantage of it.
Frontend Validation
Let’s start by taking a look at frontend validation.
I’ve talked about adding frontend validation in numerous articles before but, for the sake of completeness, let’s walk through it with our new module.
Frontend validation is added to the frontend model. We’ve built it into Backbone (via a third-party library), so we do not need to add any dependencies. To add validation, we need add a validation object to the return statement in JavaScript > ContactUs.Model.js.
For each field we want to validate, we then add another object with key-value pairs detailing the type of validation we want to apply (key) and how we want it to be validated (value). Thus, in our model, add the following:
, validation:
  {
    firstname:
    {
      required: true
    , msg: 'Please enter a first name'
    }
  , lastname:
    {
      required: true
    , msg: 'Please enter a last name'
    }
  , email:
    [
      {
        required: true
      , msg: 'Please enter an email address'
      }
    , {
        pattern: 'email'
      , msg: 'Please enter a valid email address'
      }
    ]
  , title:
    {
      required: true
    , msg: 'Please write a subject'
    }
  , incomingmessage:
    {
      required: true
    , msg: 'Please write a message'
    }
  }
});
Because the data we’re submitting is just a number of text strings, there isn’t much to validate other than the fact it exists at all. However, note the email field: we both require it and expect it to conform to a pattern that is an email address.
Each field can have multiple rules applied to it, each with its own message. To do this, you can just create an array of objects for a field rather than going straight for a single object. Alternatively, if you don’t want to have a different message, you can just have the rules in one object. The decision comes down to whether you wish to have a message for each rule, or whether you’re content with the same message being displayed both times.
You can find a full list of validation rules available to you by inspecting Modules > third_parties > backbone.validation > backbone-validation.js, or by reading their documentation.
Anyway, simply adding rules isn’t enough. I mean, if you run your local server now and break one of these rules then your form won’t submit and trigger a request to the server (so that works) but we have no feedback to the user about any of this. They won’t know, and might assume it went through. Let’s add in some feedback to the template.
Modify contact_us.tpl and replace it with the following:
<section>
    <form>
        <fieldset>
            <div data-input="firstname" data-validation="control-group">
                <label for="firstname">First Name</label>
                <span data-validation="control">
                    <input name="firstname" type="text" id="firstname">
                </span>
            </div>
            <div data-input="lastname" data-validation="control-group">
                <label for="lastname">Last Name</label>
                <span data-validation="control">
                    <input name="lastname" type="text" id="lastname">
                </span>
            </div>
            <div data-input="email" data-validation="control-group">
                <label for="email">Email</label>
                <span data-validation="control">
                    <input name="email" type="text" id="email">
                </span>
            </div>
            <div data-input="title" data-validation="control-group">
                <label for="title">Subject</label>
                <span data-validation="control">
                    <input name="title" type="text" id="title">
                </span>
            </div>
            <div data-input="incomingmessage" data-validation="control-group">
                <label for="incomingmessage">Message</label>
                <span data-validation="control">
                    <textarea name="incomingmessage" type="text" id="incomingmessage"></textarea>
                </span>
            </div>
        </fieldset>

        <button type="submit">Submit</button>
    </form>
</section>
Run your local server and go to the page. Hit submit on a blank form and see the page light up! Ever field should throw a validation error message and, most importantly, you shouldn’t see a XHR to the service in the Network tab. If you put a junk string into the email field and hit submit again, you should see a different error message, eg:
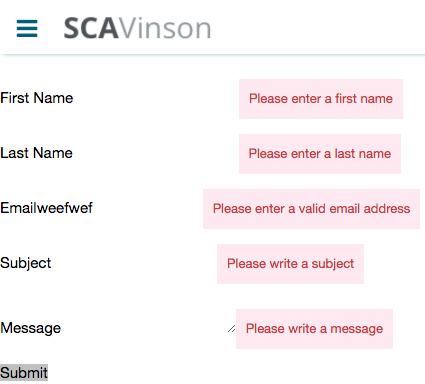
You’ll notice that the first invalid input is focussed on. This is something we have programmed into Backbone.Formview.js: it relies on us using data-validation="control-group" in our templates, amongst other things, so make sure you include them in your templates!
That’s it for the frontend validation: we successfully block invalid data and prevent calls to the service until it’s passes the tests. We also let the user know what’s wrong with their data so that they can correct it.
Now let’s move onto backend validation.
Backend Validation
Backend validation is still necessary even if you have frontend validation. For starters, there’s no real reason not to adopt a ‘belt and braces’ approach to this, plus there’s always a chance that the frontend validation could be disabled, thus allowing invalid data to be sent to the server — and we wouldn’t want that.
Validation for SCA SuiteScript data uses a modified version of the same validation scripts we use on the frontend. The first step is to add the validation rules, which we can just copy and paste from the frontend model and add as a method to the extended backend model.
In SuiteScript > ContactUs.Model.js, copy and paste the validation object into the return statement.
Then, at the top of the create method, add in:
this.validate(data)
We run this first so that we check the data before doing anything with it; if it’s bad then the code stops and dumps out an error.
Finally, so that we get error messages back from the server and show them to the user, we need to update the template again.
Open contact_us.tpl and put this at the bottom, below the submit button:
<div data-type="alert-placeholder"></div>
Save and deploy.
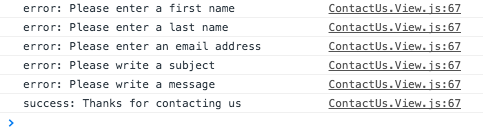
Now, while we still have frontend validation rules in effect, we can’t test the backend ones because the frontend ones fire first and will catch any invalid data. Thus, we need to temporarily disable the frontend validation. The easiest way, in my mind, to do this is to comment out the validation object from the frontend model. Do that, and then restart your local server.
Now when you try to submit, you’ll get an error back from the service. You’ll get a generic "internal error" in the alert placeholder div we created, but if you inspect the response from the service in your developer tools, you’ll see the error messages we coded into the validation. For example, if I complete every field except for the message, I’ll get the following:

Clearly, the next steps is to get all returned server (error and success) messages shown on the page.
First let’s build a skeleton to illustrate how this is done. Head to ContactUs.View.js and add jQuery and underscore as dependencies.
Then modify the events object so that submit form points to a new function called saveTheForm.
Next we need to make this function. Add the following method:
, saveTheForm: function(e)
  {
    var self = this;
    var promise = BackboneFormView.saveForm.apply(this, arguments);

    e.preventDefault();

    return promise && promise.then
    (
      function(success)
      {
        if (success.successMessage)
        {
          self.showMessage(success.successMessage, 'success');
        }
        else {
          self.showMessage('An error occured, please try again', 'error')
        }
      }
    , function(fail)
      {
        fail.preventDefault = true;

        _.each(fail.responseJSON.errorMessage, function(message, field)
        {
          self.showMessage(message, 'error', field);
        });
      }
    );
  }
That’s right, we’re using promises (deferred objects). As a quick summary, promises allow you to bind callbacks to an AJAX call. These callbacks are usually split into two kinds: successful and unsuccessful. By using them here, we can turn the submission of the form into a promise and then tell the view to execute code based on the response from the server.
In order to do this, we’re using jQuery’s Deferred.then() method, which we’ve given two parameters: one for success and one for failures. Each of these are functions, which are passed the response from the AJAX call (which you’ll remember is the thing we saw in the developer tools). From there, we can write some code to handle the messages.
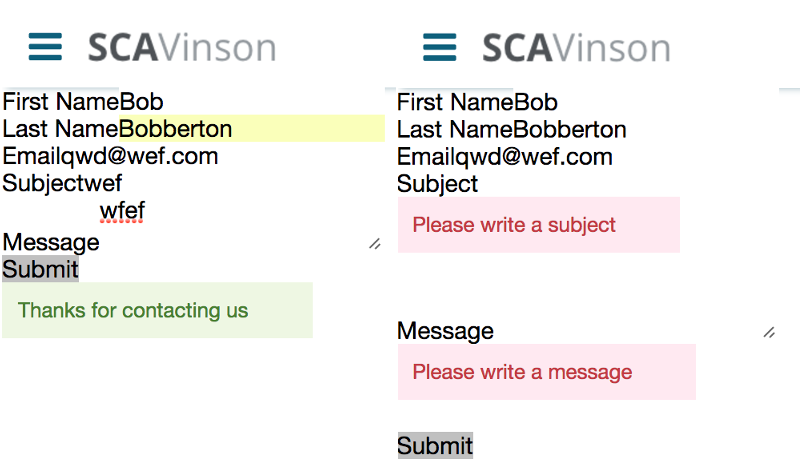
For now we can write some simple function. Add the following as a method:
, showMessage: function(message, type, field)
  {
    console.log(type + ': ' + message);
  }
Now, save and head back to your local server page. With your console open, submit an empty form you should get back a bunch of logs. Similarly, if you complete all the fields and then submit the form, you should get back a ‘success’ log. For example:
Now we know that we’ve made the connection, we can work on improving the user experience of this.
Global Message View
You’ll probably know that we have a fancy pants way of adding messaging to the site. For our endeavour, we’re going to make use of the global messaging view that creates and styles a child view based on what we supply it. You’ll note that we’ve already set things up so that showMessage is given the message, type and field, so let’s put this into practice.
Add GlobalViews.Message.View (MessageView) as a dependency to ContactUs.View.js and then head down to the showMessage function. Replace it with the following:
, showMessage: function(message, type, field)
  {
    var messageView = new MessageView
    ({
      message: message
    , type: type
    });

    if (typeof field !== 'undefined')
    {
      this.application.getLayout().$('[data-input="' + field + '"]').append(messageView.render().$el);
    }
    else
    {
      this.application.getLayout().$('form').append(messageView.render().$el);
    }
  }
So our new function accepts three parameters: message, type and field. We use the message and type to build up what we want to show the user (this could be a success or an error message) and plug that straight into the global message view. Then we perform a check to determine where we should render the message view. If the function was passed a defined value, then we use that as the place to render the message; if it wasn’t, then it just puts it at the bottom of the form. Simple.
This results in messaging like the following. On one side we have what shows when a success message is passed to it, and the other when some fields fail validation:
So with that, we have the backend validation working. Make sure, now, that you put back (uncomment) the frontend validation from the model. In truth, we may never need the backend validation if the frontend validation does it job, but it’s good to have it.
Automatic Frontend Validation
One extra you can add in, by the way, is automatic frontend validation. This makes the validation fire as soon as the user moves their focus off they were just editing.
This functionality is built into Backbone.FormView.js so it’s just a case of adding a bindings object to your view, where the keys are references to fields into templates, and the values are the names of the rules in validation object in the model. Seeing as we already have the template and validation rules set up, we can just plug it in and it’ll work.
In ContactUs.View.js put the following:
bindings:
{
  '[name="firstname"]': 'firstname'
, '[name="lastname"]': 'lastname'
, '[name="email"]': 'email'
, '[name="title"]': 'title'
, '[name="incomingmessage"]': 'incomingmessage'
}
Now, whenever you tap onto a field and then tap away, the validation rule for that field will fire. This is great for instant feedback.
Styling
We’ve pretty much got the entire functionality down now: it works by submitting a form, which creates a case, and we have useful extras attached to it, such as frontend and backend validation, so we know that the data is good. Now we can focus on making it look nice.
A lot of what I’m going to provide in this section is based on my site and its styling, so you won’t necessarily be able to copy and paste it into your site. However, it’ll be relatively simple so the styling should translate to your site.
We need to start by marking up the template. Replace contact_us.tpl with the following:
<section class="contactus-container">
    <h2>{{translate 'Contact Us'}}</h2>
    <p>{{translate 'Use this form to submit a question or query to us and we'll get back to you as soon as possible.'}}</p>

<small class="contactus-required">{{translate 'Required'}}*</small>

    <form class="contactus-form">
        <fieldset>
            <div class="contactus-firstname" data-input="firstname" data-validation="control-group">
                <label for="firstname">{{translate 'First Name'}}<small class="contactus-required">*</small></label>
                <span data-validation="control">
                    <input name="firstname" type="text" id="firstname">
                </span>
            </div>
            <div class="contactus-lastname" data-input="lastname" data-validation="control-group">
                <label for="lastname">{{translate 'Last Name'}}<small class="contactus-required">*</small></label>
                <span data-validation="control">
                    <input name="lastname" type="text" id="lastname">
                </span>
            </div>
            <div class="contactus-email" data-input="email" data-validation="control-group">
                <label for="email">{{translate 'Email'}}<small class="contactus-required">*</small></label>
                <span data-validation="control">
                    <input name="email" type="text" id="email">
                </span>
            </div>
            <div class="contactus-subject" data-input="title" data-validation="control-group">
                <label for="title">{{translate 'Subject'}}<small class="contactus-required">*</small></label>
                <span data-validation="control">
                    <input name="title" type="text" id="title">
                </span>
            </div>
            <div class="contactus-message" data-input="incomingmessage" data-validation="control-group">
                <label for="incomingmessage">{{translate 'Message'}}<small class="contactus-required">*</small></label>
                <span data-validation="control">
                    <textarea name="incomingmessage" type="text" id="incomingmessage"></textarea>
                </span>
            </div>
        </fieldset>

        <div class="contactus-button-container">
            <button class="contactus-button-submit" type="submit">{{translate 'Submit'}}</button>
        </div>
    </form>
</section>
There’s quite a few additions to the template here so let’s go through them:
- I’ve added a header and an opening paragraph. This is standard stuff for a page like this: you need to introduce it so that people understand what it’s for and what they need to do. Sometimes, you can send this to the template via the context object in the view: this is up to you — the prime benefit of serving it from the view would be if you expect the values to change depending on the context. In a contact form like this, there’s probably no scope for that, but with other forms there certainly is.
- Fields are now marked up as required and there’s some explanatory text at the top to indicate this.
- Elements have now got classes on them. What I do is canonically add class names to the elements — this gives us descriptive names for each of them, making selectors easy to use and remember.
- Text has been changed to use the
{{translate}}Handlebars helper. As some of these strings will be unique to the functionality, you’ll need to add custom translation text to the dictionary files, if you want to take advantage of multi-language functionality. If you only operate in one language, then you can leave them as strings or use the{{translate}}functionality — untranslatable strings are simply returned as they are, so you may as well use the{{translate}}helper.
From here we can start to add in some Sass.
Forms are commonplace throughout SuiteCommerce Advanced sites and we have a lot of existing styles that you can extend. When it comes to styling the form itself, it’s up to you. In the following Sass, I’ve chosen styles for my site: a good idea for you is to look at other forms and then extend the classes they extend in order to make your form look like it.
Create _contactus-form.scss in your Sass directory and paste in:
.contactus-container {
    @extend .container;
}

.contactus-form {
    margin: $sc-base-margin * 3;
}

.contactus-firstname,
.contactus-lastname,
.contactus-email,
.contactus-subject,
.contactus-message {
    @extend .row;

    label {
        @extend .input-label;
    }

    input {
        @extend .input-large;
    }
}

.contactus-message textarea {
    @extend .input-textarea;
    display: block;
    width: 100%;
}

.contactus-required {
    @extend .input-required;
}

.contactus-button-container {
    @extend .row;
    margin-top: $sc-base-margin * 4;
}

.contactus-button-submit {
    @extend .button-primary;
    @extend .button-medium;
}
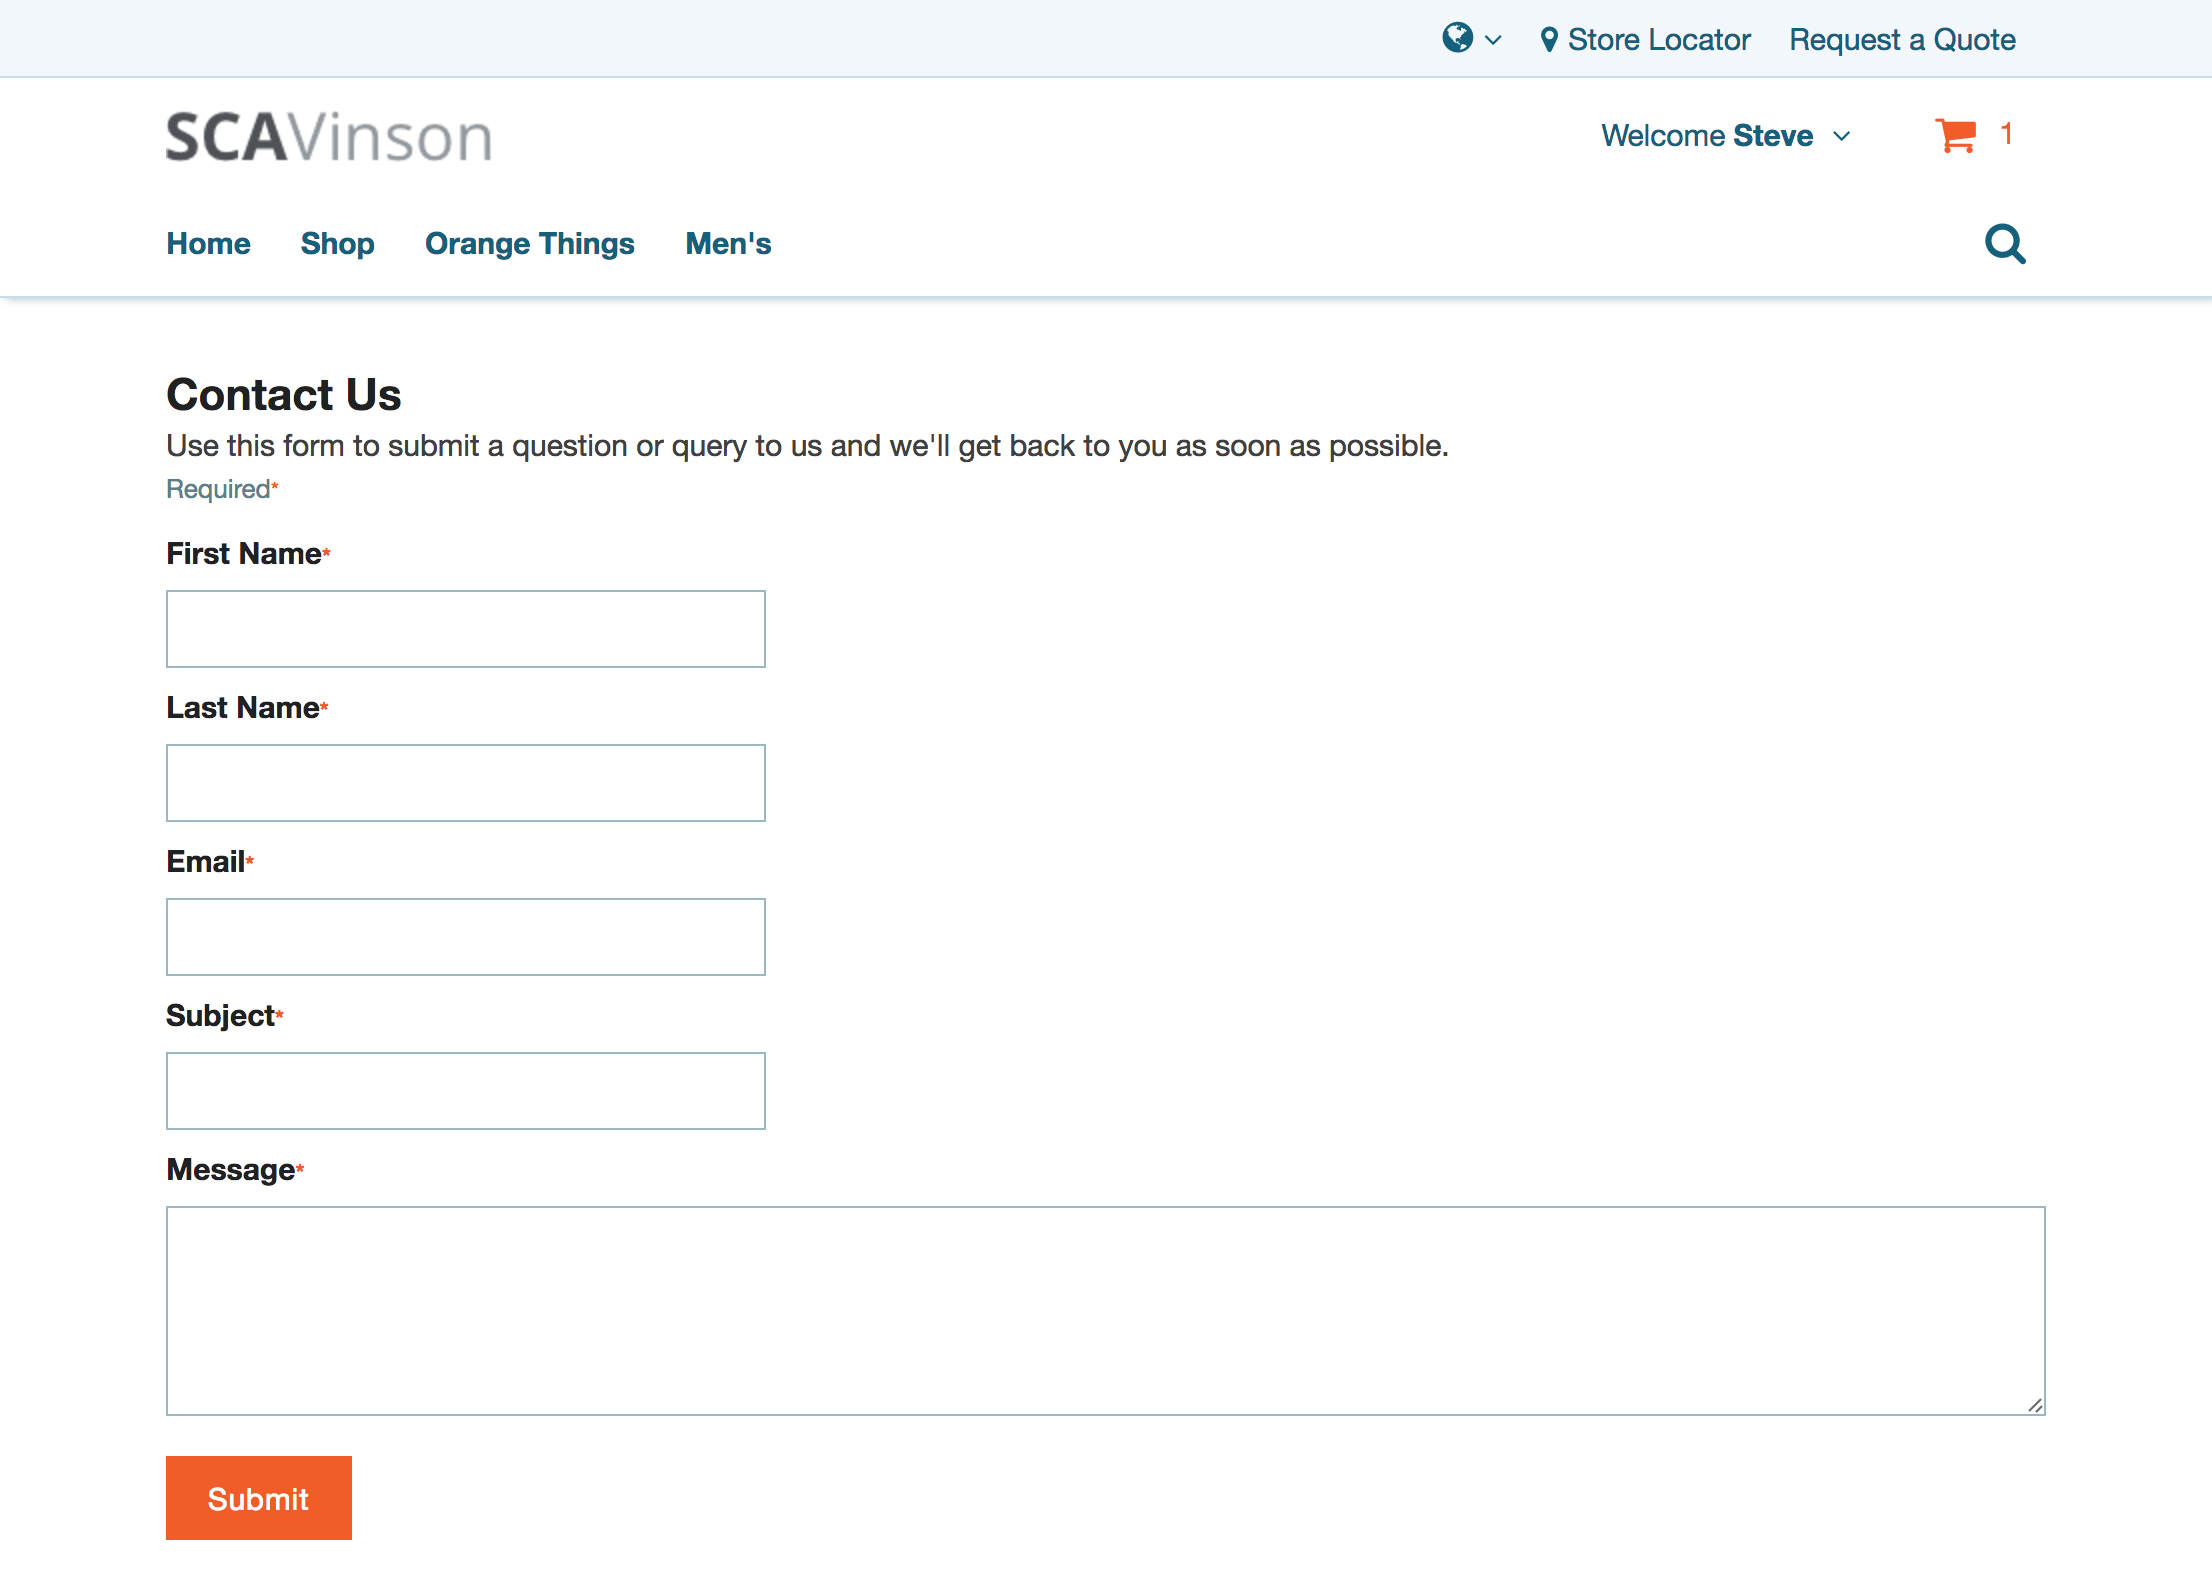
As we’ve added a new page, we’ll need to stop and restart our local server so that it’s aware of the file. Once you’ve done that, refresh the page and you should see something like this:
Now, of note in this stylesheet is the fact that we’ve nested input and label styling in their parents’ declarations. I know that some developers are on the fence about whether to do this (ie give each one a class and then style that) but I think it’s fine if you consider that these are uniform, repeating elements. Admittedly, this is not the case for the textarea element, so you could go back and follow the advice on this and change it to a class.
Also note how we have a lot of class names that start .input- — this is because we’ve built these into our base styles, so you can just use them whenever you’re working with a form.
Other than that, the rest of the stylesheet is really simple. Let’s take a look at a couple more small things that need tidying up.
Attributes, Breadcrumbs and Title
The first thing I want to talk about is the ability to set attributes from the view. When the view is rendered, a single div is created which then contains the rendered template. If you like, you can attach attributes to the div, which may be useful for styling or JavaScript. For example, in ContactUs.View.js, put the following:
attributes:
{
  'class': 'contactus'
}
When you refresh the page and inspect the element, you should see the element has a class on it.
As for breadcrumbs, this is not really necessary for this functionality as it only goes one level deep from the homepage. However, you may find it useful for other projects, or simply include it for familiarity.
Add the following method:
, getBreadcrumbPages: function()
  {
    return [{
      text: _('Contact Us').translate()
    , href: '/contact-us'
    }]
  }
In other projects, if you wish to add an extra level then you can add in an extra object to the array. The order of the objects will determine the order that they appear in the page.
Finally, the page title: nice and simple to put this in place.
title: _('Contact us').translate()
Simple stuff.
Final Thoughts
From here, your form is ready to go: it accepts inputs, validates that data (twice!) and then decides whether to create a record or return error messages. It’s styled and has all the bells and whistles that you’d associate with a page, such as a page title and breadcrumbs. From here, all you need to do is add a link to it on your site and you’re good to go (eg by editing the footer navigation links in your site’s configuration).
If you want to extend the idea further then you could look into perhaps having the form trigger in a modal when it’s clicked in the footer, so that users aren’t taken away from their current page when they want to contact you. This is something I’ve talked about elsewhere and shouldn’t be too difficult to implement.
Another idea I had is that you could embed the contact form as a child view in another page. For example, if you have an in-depth support hierarchy on your site, then you could build a more compact version of the form and embed it at the button of every support page.
Finally, keep in mind that we natively support cases, which can only be opened by the customer logging into their account. Generally, it’s better that customers use this functionality, so you may want to encourage users to log in and use that instead.
Code samples are licensed under the Universal Permissive License (UPL), and may rely on Third-Party Licenses