Get Started with the SuiteCloud Development Framework (SDF) and SuiteCommerce
Caution: this content was last updated over 4 years ago
The SuiteCloud Development Framework (SDF) is a development framework and deployment mechanism for customizations to the NetSuite application. As a developer, you can use it to deliver customizations to individual accounts under your control. If you're part of an organization that produces customizations, you can also use SDF to package up your customizations as SuiteApps and distribute them to multiple accounts (ones not necessarily under your control).
When it comes to SuiteCommerce, SDF has, for the most part, been kept separate from it. Customizations to SuiteCommerce typically focus on changes to changes to the application source code (ie SuiteCommerce Advanced) or, more recently, through extensions and themes. However, 'packaging' up extensions and themes so that they can be easily distributed is not something that the extension and theme developer tools are particularly good at.
We announced in 2019.1 that we had added support for SDF and, since then, take-up has been relatively slow. In a straw poll of community members shortly after, the majority of people who responded said that they weren't confident in using SDF, with a significant number of people completely unfamiliar with that. As a SuiteCommerce developer, I think familiarity with SDF is a good skill to develop because it broadens your avenues for customization to NetSuite.
In this article, I want to talk a bit about:
- The SuiteCloud Development Framework (SDF) and its relationship to SuiteCommerce
- The developer tools included in SDF (such as the IDE and CLI) and how to use them to develop your customization, package it up, and then distribute it
- The SuiteCloud Developer Network (SDN) and why it might be appropriate for you
Introduction to SDF and SuiteCommerce
I'm not going to give a full examination of the SuiteCloud Development Framework; we have a whole book of documentation on it, as well as comprehensive training. What I will do is introduce you to key concepts, its benefits, and the gaps it fills when it comes to developing extensions.
SuiteCloud Development Framework (SDF) is a development framework and deployment mechanism. Customers and partners can use SDF to create customization projects for internal use within their organizations or for commercial distribution. These file-based projects use XML definitions of custom NetSuite objects, such as custom records, custom forms, and workflows. SDF projects also support SuiteScript files.
Gaps and Overlaps with SuiteCommerce
If you've been developing customizations for web stores for a few years now, you'll know that it's entirely possible to make and deliver customizations without SDF, so you're probably wondering why you would add another framework and more processes to your development life-cycle. However, I think gaps appear when you try to:
- Scale up the complexity of your customization
- Work independently of a specific web store or NetSuite account
- Manage your customizations' dependencies, or handle other things that threaten its robustness or integrity
- Package up or version customizations that include NetSuite objects
- Protect, market, and distribute your customizations
SDF bridges these gaps. I hope to demonstrate these throughout the article, but there are some simple examples I can give you now that I think will make it clearer.
Feature Checking, Custom Fields and Other NetSuite Objects
Some customizations are contained entirely within an extension's source code. It needs only to be pushed up and activated and it's good to go. However, there are plenty of customizations that require the user to first create a custom field, for example, that is attached to item records or user records. Without SDF, the user installing the customization must do create this custom field themselves and that means the developer must create documentation and hope that the the user follows it correctly. This introduces risk.
Furthermore, when the complexity of your customization goes up, so does the associated risk, as well as the time the user has to spend setting it up. SDF can automate this.
When defining your customization, you can create XML files to represent the NetSuite objects your customization requires. When these definitions are deployed with SDF, those objects will be created automatically in the user's NetSuite account. This means the user spends zero time setting these objects up, which is a boon, but it also means that you can rely on these fields being set up correctly (ie as you defined them to be).
A simplified example of a custom field represented by XML looks like this:
<itemcustomfield scriptid="custitem_mynewfield">
    <accesslevel>2</accesslevel>
    <appliestoinventory>T</appliestoinventory>
    <displaytype>NORMAL</displaytype>
    <fieldtype>TEXT</fieldtype>
    <label>My New Field</label>
    <searchlevel>2</searchlevel>
    <storevalue>T</storevalue>
</itemcustomfield>
In addition to custom fields, a cornucopia of NetSuite goodies can be run or set up automatically during installation, such as records, scripts, workflows, lists, UI tabs, and more. Specifically for SuiteCommerce, the records for custom content types are supported, which is handy for installation. For you advanced developers, you can also include your custom SSP applications in your SDF projects too. For more information, check the Help Center to see all the different kinds of customizations you can make.
I think another cool thing worth mentioning is that in another XML file, you can include a number of features that your customization depends on. If, for example, you're introducing modifications to matrix items, you can specify them as a requirement; if you're adding an aforementioned custom record, then you need make sure the user has enabled them first.
Here's an example block of dependencies you might include in your manifest.xml:
<dependencies>
    <features>
        <feature required="true">CUSTOMRECORDS</feature>
        <feature required="true">MATRIXITEMS</feature>
    </features>
</dependencies>
These are checked during validation and ensure a user's account can support the customization they are trying to install.
Customization Completeness and Versioning
I have been, and continue to be, a vocal proponent for introducing version control systems to your development life-cycle. The need for it grows more intense if you work in a development team or if you sell packaged customizations to customers. I shan't go into the benefits of VCSes here; instead, I shall emphasize the benefits of SDF and VCS.
As I mentioned above, a benefit of SDF is that you can include your NetSuite objects as XML definitions. This means that when it comes to version your customization, these definitions are included in the commits. Thus, when you save your work and push it upstream, you can be confident then it can then be downloaded and deployed by anyone and they'll have everything they need.
In this sense, the development of your customization in this manner is enveloped entirely, and could be considered 'complete'. All in all, very handy.
SDF Developer Tools
By now you should be getting a taste of what we're talking about here. So, how do we enable you to do this? Well, we have a separate set of developer tools that are specific to SDF. It's worth mentioning right at the bat that these do not fully replace the extension or theme developer tools. In other words, if you want to develop an extension, it is recommend you continue using the extension developer tools; if you then want to publish them with SDF then you will also need to use the SDF tools. Thus, SDF is not a replacement, but an add-on.
Choosing Your Tool
The SDF tools come in the form of either an IDE (integrated developer environment) or a CLI (command line interface). Which one you choose will depend on your own personal preferences, such as how much integration you want with your tools and whether we support them.
The IDE is available as a plugin for Eclipse and WebStorm, whereas the CLI is Node-based and can be used with your own IDE/editor. Generally speaking, if you don't use (or don't want to use) Eclipse or WebStorm then you'll have to use the CLI. If you're unsure, then consider whether you prefer dealing with menus and interfaces, or whether you prefer typing commands. Both support features such as the ability to create SDF projects (including SDF SuiteApps), deploy files, add dependencies, fetch files and objects from a NetSuite account, etc. The CLI has some additional (advanced) features, such as the ability to create batch and shell scripts that use CLI commands to automate your project validation and deployment processes.
As you should already be familiar with CLI tools (because of your experience writing extensions), I'm going to use it for the rest of this article and I would imagine that it is probably the best fit for most developers who are thinking about working with SDF.
SDF Architecture
I'm not going to go into a lot of detail about this, as we have extensive documentation and training, but I will provide some summary information.
SDF makes it easy for you to create NetSuite objects, files and scripts from your local device, as well as making it easy to work with existing ones. Deploying your XML representations of NetSuite objects up to a NetSuite will create those objects as you have defined them; if they already exist in the account, they will be overwritten with what you pushed up. Pulling down NetSuite objects will create XML representations of them in your project; if they already exist locally, they will be overwritten on your device. An equivalent system applies to files that live in the NetSuite file cabinet.
Project Types
As we prepare to get started, it is also worth discussing the concept of SDF project types. There are two types:
- Account customization projects
- SuiteApp projects
There are implications for each, but the basis of your decision rests on what you plan to do with your customization. If you're creating your customization (ie extension) so that it will only affect NetSuite accounts that you own or operate, the first is better for you. If you plan to distribute your customization (eg perhaps because you sell pre-packaged solutions to customers), then creating a SuiteApp may be better for you. It should be noted, however, that in order to create a SuiteApp, you must be a member of our SuiteCloud Developer Network (SDN).
There are additional differences between the two project types. We have an comprehensive list in the help center, so I will put only a summary here.
The differences cover both what you can do locally while developing, and the effects you can have on objects and files in the customized NetSuite account. The key to understanding the differences is to keep in mind the intended scope of the two types. The first type — account customizations — are meant to be only for accounts you own. Therefore, there is an assumption of trust and access toward the developer. This means, for example, that an account customization can configure account features (but a SuiteApp can only check them). Conversely, the ability to hide files and lock objects is supported in SuiteApps (as this can protect your customizations and ensure a level of integrity) but this is not supported in account customizations. When referencing files and objects, account customizations can access any file in the project or account, but SuiteApps are limited to just the ones in the current project.
As we're focused mainly on commerce extensions, many of these limitations may not be important to you as they won't come up. But it is certainly worth getting familiar with the differences. If you work at an agency that provides customizations / professional services to multiple customers, you may want to look more in SuiteApps and potentially becoming an SDN partner.
SuiteCloud Developer Network
I will preface this by saying that we have a lot of information on this elsewhere, not least our company website which lays clear the benefits of joining SDN.
What I will say is that joining SDN is a prerequisite to publishing a SuiteApp. Therefore, if you are planning on packaging up your customization, marketing and selling it, I would consider following the SDN path. In addition to the ability to publish your customization as a SuiteApp, it gives you a number of benefits, such as multiple development accounts to work on and discounted training, but also additional some behind-the-scenes access.
Get Started with the SDF CLI
OK, enough talk. Let's get going.
As previously mentioned, I'm going to mostly focus on the CLI for this demo because I think it's cool and I primarily use an IDE other than Eclipse or WebStorm.
To start, you're going to need to do all of the setup steps listed in the documentation. This means:
- Enabling SDF on your NetSuite account
- Assigning the developer role to a user account
- Setting up token-based authentication for that user
- Setting some SDF preferences
You will also need to download and install the Java SE Development Kit (Java SDK).
For the CLI, you can get it via NPM, which is super cool. So, head over to the NPM registry repository and follow the instructions there.
For the purposes of this tutorial, you are encouraged to code along but the full code is available in GitHub.
Create Project and Set Up Account
OK, so you should your developer account setup, SDF installed, and token-based authentication ready (I hope you made a note of your token ID and secret). We can now start using the CLI.
The first command to run is suitecloud createproject -i. In your current directory, this will create the folder structure and meta files required for your project.
For the purposes of this tutorial, I am creating an Account Customization Project with the name MyFirstSDFExtension. Once the wizard completes, you can then run suitecloud setupaccount, which takes you through a short wizard to connect the project to your NetSuite account and the developer user you created for it. If you run into issues with either of these, refer to the Help Center documentation mentioned above.
Once you've done those two things, we can then move on to looking at the newly created file structure.
Get Familiar with the File Structure
The wizard will have generated a number of folders to organize your customization. Furthermore, there will be some files in some of these folders and others will be empty.
At the top level, there will be two folders: .idea and src:
- .idea — as you dive deeper into the structure, you will see a lot of XML files. These XML files are used by our supported IDEs (Eclipse and WebStorm) as templates for various NetSuite objects. If, for example, you were defining a transaction form then it would provide auto-complete options for all the different fields it could contain.
- src — this is where the source code for your SuiteApp / account customization project will live. Of note are the FileCabinet and Objects folders, which will be where you put binary files (eg your JavaScript) and NetSuite object XML files respectively.
List and Import Files and Objects
One of the benefits of using the SDF CLI or IDE is that you can get a list of all the files and objects on a NetSuite account and pull them down into your project. In other words, when working on your customization, you don't have to create the definitions of your NetSuite objects in XML and then push them up — you can create them in NetSuite using the UI, and then pull down them down and the tools will generate the XML for you. Similarly, if you've already created an extension or uploaded some assets or scripts, you can pull those down.
An important thing to keep in mind is that the ability to import files and objects varies depending on the project type. A full list of differences is listed in the Help Center.
Listing files and objects will just print to your terminal a list of all the files in a specified folder in the account (eg /SuiteScripts) or a list of all the objects in that account.
For example:
suitecloud listobjects
suitecloud listfiles --folder "/SuiteScripts"
Both of these will print out long lists. To make it more manageable, you can use the 'interactive' mode to explore through the lists. To do this, attach -i to the base commands:
suitecloud listobjects -i
suitecloud listfiles -i
Unfortunately, the listfiles explorer will still be quite cumbersome to use if you work on a mature account with SuiteCommerce as it'll enumerate all the files in your themes and extensions. The listobjects one is pretty good, however, as it'll ask you a series of questions to help narrow down the objects you want to see.
For example, let's say that I have created a custom item option called custcol_slogan, I can work through the wizard like this:
$ suitecloud importobjects -i
? Do you want to import all object types? No
? Select the object types you want to import. Item Option Field
? Do you want to enter a script ID to filter your list? Yes
? Enter the full or partial script ID. custcol_slogan
? Select the objects you want to import itemoptioncustomfield:custcol_slogan
? Select the folder where you want to import the objects. /Objects
? All the objects in the project will be overwritten with the objects from the account. Do you want to continue? Yes
The following objects were imported to your project:
itemoptioncustomfield:custcol_slogan
Now, when I check my local project in the Objects folder, I can see an XML file that represents my custom object. You should repeat this process for any other objects that your customization depends on (including ones that the object might depend on, such as source lists).
Putting Your Extension Files into a Project
If you're not pulling down your complete extension from an account and instead want to manually put it into the correct place in the project, then you will need to replicate the correct folder structure. As extensions are uploaded to the SuiteScripts folder in your file cabinet, you will be able to get a sense of what the correct path is. For example:
// Example
MyFirstSDFExtension/src/FileCabinet/SuiteScripts/Deploy_Extensions/Tutorial/ExampleExtensionForSDF

// Pattern
<LocalDirectory>/src/FileCabinet/SuiteScripts/Deploy_Extensions/<Author>/<ExtensionName>
The path will be slightly different if you're building a SuiteApp (instead of SuiteScripts, use SuiteApps instead).
The extension developer tools create individual folders for your extensions within your Workspace directory. Therefore, you will need to create the author folder yourself (which must match the value defined your extension's manifest.json), but everything else (ie the extension code) can then be copied into that directory.
Example
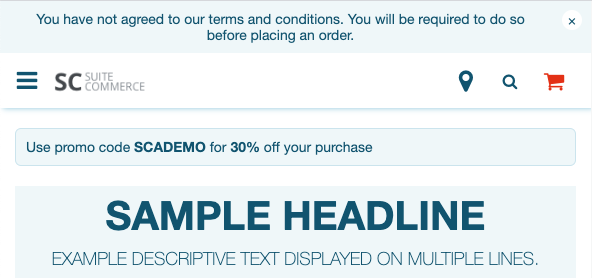
OK, in order to demonstrate the process, I have created a super simple extension. The code is one JavaScript file. It checks the shopper's user profile to see if they have accepted my site's terms and conditions, which I have defined as a custom entity field on my account. If they are logged in, and they haven't, then a banner message will show at the top of the site.
Therefore, there are two clear components of this:
- Extension code that must be uploaded to the account's file cabinet
- A custom entity field that must be created in the NetSuite account
So, I'm going to create the field in my account. As I said, it's a simple custom entity field whose ID is custentity_tsandcs, is a checkbox, and is applied to customer records and web sites. Because I am using a modern version of SuiteCommerce (2019.1+), this will automatically be surfaced to frontend but you may need to include a customization to add this to the profile model for older sites.
Once that's done, I can then pull down the XML representation of that of that field into my project. I'm going to run suitecloud importobjects -i and answer the questions as follows:
- Do you want to import all object types? — No
- Select the object types you want to import. — Entity Field
- Do you want to enter a script ID to filter your list? — Yes
- Enter the full or partial script ID. — custentity_tsandcs
- Select the objects you want to import — entitycustomfield:custentity_tsandcs
- Select the folder where you want to import the objects. — /Objects
- All the objects in the project will be overwritten with the objects from the account. Do you want to continue? — Yes
This generates the XML and puts it in the right folder. Great!
After that, I can copy across my extension code from the extension developer tools into my project. After creating src/FileCabinet/SuiteScripts/Deploy_Extensions/Tutorial in my local project, I can copy into it the Tutorial module folder from my extension developer tools.
Now I have everything I need!
Create the Installation Script
Or do I? We've defined our customization, but we also need to write a definition of how to 'install' it, as it were, because, at the moment, we would be just copying it up to NetSuite. What we also need to do is make the extension manager aware of the new extension, and that means creating a record for the extension.
From a very basic point of view, the only thing we really need to do is create an instance of a customrecord_ns_sc_extmech_extension record. This record type is a custom record we, NetSuite, include with the extension manager that records what extensions are available for activation (along with their metadata). If you navigate to the list of them in your account, you can see records for all the extensions on your account.
You might be thinking: why don't we just include in our project an XML representation of an instance of a record of this type? If you try this, you'll run into difficulties. This sort of customization is normally quite straight-forward, but the problem arises when you try to do this for a record type that you, the account owner, does not own. The record type we want to add an instance of belongs to the extension manager bundle and is locked, which means that it is not possible to make modifications to its schema. It also means that we are not allowed to create/deploy instances of its record through SDF.
While this is annoying, this is not a blocker. We are still able to create records in the UI and we are able to create records through running scripts on the instance itself.
Therefore, our plan is going to be to run a script when a user installs the bundle we're going to create out of our customization. This script is going to, among a number of things, create the custom record instance we want.
This process is actually pretty standard. Our extensions team uses it for every extension they write and deliver as a bundle/SuiteApp. Furthermore, the concept of a 'bundle installation script' is one that is built into NetSuite as a type. As specialized server SuiteScript, it is automatically run at various points before or after a bundle is installed, updated, or uninstalled. As developers, we can provide functions that run at these times.
Luckily for us, as developers who are going to bundle up a customization that involves a commerce extension, we can use the standard installation script, which does all of the work and provides APIs for beforeInstall(), afterInstall(), afterUpdate(), beforeUninstall(). The only thing we need to do in our installation script (for our basic example of an extension) is to check that the extension manager has been installed and that we can find the correct path to the script that does the work for us.
A copy of the BI script can be found in the file cabinet, in the folder where the extension manager lives. At the time of writing, I am using SCEM provided in bundle 295133, so I am going to navigate to SuiteBundles > Bundle 295133 in the file cabinet. I'm going to click Download next to ExtensionBundleSS2.js to get a copy of the BI script.
If you open it up, you'll see that we've laid out what we want to happen at the various stages in the life cycle of a bundle. In fact, the code we've provided for each of the events is virtually identical. All we're really doing is checking whether the path to a file exists and, if it does, use standard-looking methods for each of the events.
If you're curious about this, you can find the path for the file in Setup > Company > General Preferences > Custom Preferences.
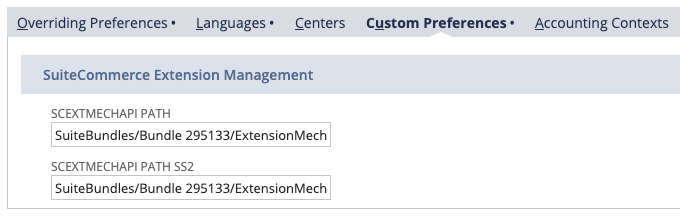
As we've written a file using SuiteScript 2.0, we'll be using the SS2 path. You can then look up the file in your file cabinet and see what exactly is going on. I'm not going to dive into too much detail because it's not really necessary, but the important thing is that we're not just adding a custom record instance — we're also doing a number of checks at the events we have defined. For example, we want to make sure the extension manager has been installed before a user tries to install an extension.
All that matters for us now is that we have a script that handles bundle installation for us, so we need to add it to our project.
Back in your local project directory, go to src/FileCabinet/SuiteScripts/Deploy_Extensions/Tutorial/ExampleExtensionForSDF and create a folder called BackendScripts. Put the copy of ExtensionBundleSS2.js in it and rename it to SC_EXT_BI_ExampleExtension.js. The exact name and location of the folder and file does not matter particularly, but you should put the file somewhere where it will get uploaded with the rest of the files. The important things to keep in mind here is that it should be named something specific to your project (so that is unique and easily identifiable) but also not something that will get caught by the extension manager / developer tools (ie confused for extension code).
Before we move on, there's just one final note for advanced customizations: at the top of the file is an empty array called extension_folders. If you have a complex customization with multiple extensions in it, you will need to specify the paths to the manifests explicitly. (For us, with our simple customization with one extension in it, we're leaving it blank because, by default, it is set up to work with just one.)
Validate
So, now do I have everything I need? Let's find out by running suitecloud validate.
The following warnings were found during local validation:
    /Users/sgoldberg 1/MyFirstSDFExtension/src/Objects/custentity_tsandcs.xml
        - Line No. 8 - The "appliestopartner" field depends on the "CRM" feature. The manifest must define the "CRM" feature as required or optional.
        - Line No. 12 - The "appliestovendor" field depends on the "ACCOUNTING" feature. The manifest must define the "ACCOUNTING" feature as required or optional.
        - Line No. 13 - The "appliestowebsite" field depends on the "WEBSITE" feature. The manifest must define the "WEBSITE" feature as required or optional.
        - Line No. 16 - The "availabletosso" field depends on the "SUITESIGNON" feature. The manifest must define the "SUITESIGNON" feature as required or optional.
Turns out I don't. When developing a SuiteApp or account customization, it's best to try and develop as independently as possible. However, when you pull down NetSuite objects, their XML representations will be generated using the state of the specific account. This means that some XML elements might be added in there that do not necessarily apply to your customization (even if those elements have no values or are false) because of the features enabled on your account.
As part of the project, we will need to explicitly state whether certain features are required or whether they are optional (and the warnings can be ignored). You can manually write them into your project's manifest.xml but you may find it easier to use the suitecloud adddependencies command. This will make an automatic assessment and add the required XML to your manifest. This is super handy, but you'll probably want to double check them yourself.
I ran the command and it set all of them to optional. Now when I re-run the validation process, it returns a happy green message without warnings or errors.
Deploy
Everything looks good, so now we can push it up to NetSuite. To do this, just run suitecloud deploy. Assuming everything goes well, you'll see a bunch of green confirmation messages — if it doesn't, you'll need to address the issues that are returned.
A crucial step at this point is to deploy the bundle installation script. A SuiteScript must be deployed before it will run on your instance; accordingly, before we can associate our script with the bundle, we will need to deploy it. In doing so, we will create a record for the script, which we can then reference to our bundle. I recommend reading the documentation on script deployment.
- In NetSuite, go to Customization > Scripting > Scripts > New
- In the file input field, type in SC_EXT_BI_ExampleExtension.js; the script in our project should appear in the auto-complete (if it doesn't, you will need to find it, or double-check that it has uploaded successfully)
- Click Create Script Record
- In the form, enter a Name (eg SC EXT BI Example Extension) and click Save
- Click Deploy Script
- In the script deployment form, enter details as follows:
- ID — _sc_ext_bi_example_extension (or whatever is appropriate for your customization)
- Status — Released
- Log Level — Error
- Click Save to deploy the script
When that's done, the script will be available for us to use in our bundle.
Bundling Up Our Customization
At this point, our account customization project is developmentally complete and has been pushed up to our NetSuite account. However, the final step is packaging it up and distributing it.
As I said at the top of this post, I am focusing on ACPs rather than SuiteApps — the process is different if you are an SDN partner — but for ACPs, the next logical step is to bundle up your customization so that it can be distributed to other accounts. For that, we're going to use SuiteBundler.
SuiteBundler is an easy way to manage and distribute customizations between projects, and features an easy-to-use wizard as an interface. We're going to specify the files we want to include in the bundle, along with our installation script and the custom entity field required to make it work. Once we've done that, we can specify whether to keep the bundle private (only this user can install it on an account), shared (only available to specific accounts), or public (anyone can install it).
If you haven't already got it enabled, you will need to enable the SuiteBundler feature on account by going to Setup > Company > Setup Tasks > Enable Features > Create Bundles with SuiteBundler.
I would also recommend reading through the step-by-step process in our documentation first.
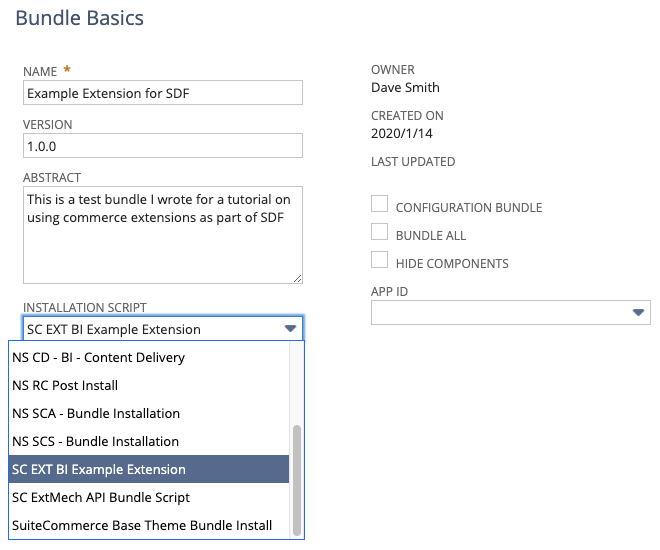
To begin, go to Customization > SuiteBundler > Create Bundle. You'll see a page like this:
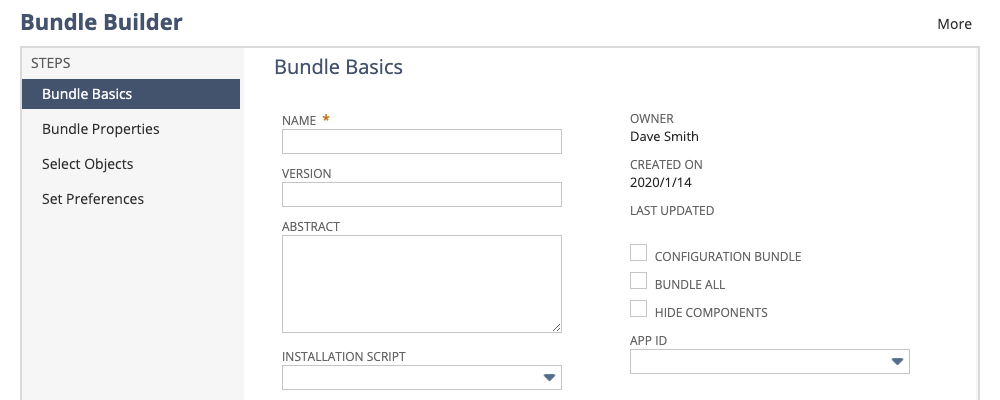
On this page, you set the metadata for your bundle. I'm going to set the basic information to match what I set in my extension's manifest file. I'm going to select our newly deployed script as the Installation Script:
Go to the next page.
On the Bundle Properties page, you set some more metadata — but this time you are specifying options that can be used by potential users to refine their search when searching for bundles. For ease, I am setting the Product to NetSuite, the Vertical to eCommerce and Language to English (U.S.). Progress to the next page.
The next page is the most important. It is on the Select Objects page that you tell SuiteBundler to include all the files and objects in the final bundle. First, let's add the files.
- In the Object Types field, select File Cabinet > Folders
- In Choose Objects, select ExampleExtensionForSDF — it will appear in the Bundle Contents field
Note that if the folder does not appear in the Choose Objects field, it is because the folder has not been set to be included in SuiteBundler bundles. To change this, open the file cabinet in other window and go to SuiteScripts > Deploy_Extensions > Tutorial; click Edit next to ExampleExtensionForSDF
to edit its record. Check the Available for SuiteBundles box and save the record. Back in the Select Objects page, refresh the page and repeat the steps.
Still on this page, go to Custom Fields > Entity Fields and include the Terms and Conditions field. After that, click Next.
On the final page, you can set some preferences for your bundle. It is also a useful time as it gives you the opportunity to review the contents of your bundle. Our customization is simple, so it just includes our extension's files, the entity field, and the bundle installation script (and its deployment record). However, more complex ones will include other things such as dependent objects — use this to make sure that you're not including anything you don't need to.
As for the options on this page, I would recommend keeping the entity field's default preference of Hide on Existing Custom Forms. As for Lock on Install, this is up to you; locking a folder, file or object will prevent a user from modifying it. If you only plan to distribute the customization to accounts you administer, then you might want to leave them unlocked so that you can make ad hoc customizations to them. However, generally speaking, I would recommend locking the files. This will help prevent accidental changes to the files and objects, which could break the customization.
Click Save to finalize creating your bundle.
The final page in the wizard, confirms the bundle's creation and offers some next steps. Modifying the availability of your bundle might be a good next step. By default, your bundle will be private so that only accounts you administer will be able to search and install it. You can increase the level of availability by either specifying additional accounts to make it available to, or by making it public. Also on this page are options to allow you to replace/update/deprecate a bundle you own — but that is a story for another day.
And that's it! You've created your customization and bundled it up so that it can be distributed to other accounts. If you want to install it on another account then you can switch roles to another account and search and install the bundle. It should then appear in the extension manager for that account; once activated it should appear on your site!
Advanced Customizations
If you're ready to take the next steps then there are some additional things I can tell you that will be useful. However, it is worth keeping in mind that if you want to go deeper and wider in this area, it is recommend you read more into topics around SDF, SuiteBundler, SDN and SuiteScript. Bundled customizations can be very complex — our SuiteCommerce code is delivered as numerous bundles with a lot of different scripts, objects, and files.
However, there are some small things we can take a quick look at.
Support for SuiteScript Server Page (SSPs) Applications
Advanced developers may be familiar with the concept of creating custom SSP files to include in web stores. Perhaps you have a wild new checkout application you want to bundle up, or some other customization that must live separately from the rest of your site's SSPs. Accordingly, SSP applications can be represented as XML definitions.
Support for Custom Content Type (CCT) Records
XML representations of the records required to 'install' a CCT once it has been added as an extension are also available.
A reference to the custom record that is associated with the content type is defined by the customrecordid element. This reference must have a one-to-one relationship to the CMS content type, meaning that the custom record must not be associated with any other CMS content type.
The icon image path, defined by the iconimagepath element, is represented by a string value. It must start with a slash (/) character and be in an SVG file format.
CMS content type objects must have values defined for the name and label elements. The content type name must be unique.
Here's an example:
<cmscontenttype scriptid="custcontenttype_sample">
    <customrecordid>[scriptid=customrecord_childdatetime]</customrecordid>
    <description>This is the description of the content type.</description>
    <iconimagepath>/netsuite.com/sample_image.svg</iconimagepath>
    <label>Sample CCT</label>
    <name>Sample Custom Content Type</name>
</cmscontenttype>
Copy to Account (Beta)
Before I go on, a disclaimer: Copy to Account is a beta feature. The contents of this feature are preliminary and may be changed or discontinued without prior notice. Warranties and product service levels do not apply to this feature or the impact of the feature on other portions of the NetSuite application.
This feature, first introduced as a beta in 19.1, allows administrators to deploy a custom object to another account that they administer. It is very helpful if you want a quick and easy way to move a customization from one account to another without using code. You don't need to write an XML object, create an ACP, or bundle/deploy projects. After enabling the feature, you'll see a link on each page in the top-right of the page. This'll launch a wizard to copy the object (and any dependencies) to another account you administer.
New Standard Developer Role
Also in 2019.1, was the introduction of a specialized developer role for working with SDF. As a best practice, it's generally not recommended to use an account with an administrator role as your default account — working with an account that has, instead, the role of Developer is easy to set up and has everything you need to build your SDF customizations. You could combine this with the account you use for deploying extensions to your NetSuite account (eg the SCDeployer role).
Final Thoughts
So, to summarize, we have gone through the steps of taking a simple commerce extension and packaging it up into a bundle using SDF and SuiteBundler. This can be a useful way to maintain the integrity of your customizations because you can have the entire customization (eg including its associated records and objects) saved locally in your machine. This is might be described as 'account agnostic' in the sense that you define your customizations in such a way that it can be applied to any account (within reason) because all its requirements will be included automatically.
Once we deployed our project to NetSuite, we looked at how we can package it up using SuiteBundler to produce our very own bundle. These bundles can then be provisioned to other NetSuite accounts on ad hoc basis, via a list of account IDs, or publicly (so that anyone can install them) which really widens distribution avenues for customizations.
Developing your customization with SDF also opens the door for customizations other than account customization projects: SuiteApps. Although we didn't explore this, there isn't a lot of difference in this example, but there are a whole number of nuances that we capture in our documentation. If you do think you've got a killer extension or customization that you want to distribute to a wider audience (eg on SuiteApp.com) then you'll need to take a look at SDN and become a partner.
In the meantime, I hope you start to think about the SDF tools and SuiteBundler and how you might use them for your next customization.
Code samples are licensed under the Universal Permissive License (UPL), and may rely on Third-Party Licenses